
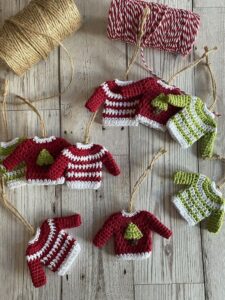
The Crochet mini-sweater pattern for decoration is a delightful project for anyone who loves handmade crafts, cozy designs, and creative seasonal ornaments. This tiny crocheted sweater can be used to decorate Christmas trees, gift packages, miniature displays, wreaths, shelves, and handmade garlands. Although it resembles a real sweater, its small size makes it a manageable project for crocheters who want to practice basic stitches while creating something charming and useful. With a little yarn, a suitable crochet hook, and a few simple techniques, you can make a miniature garment that brings warmth and personality to your home.
One of the best things about a decorative crochet mini sweater is its versatility. You can make it in traditional Christmas colors such as red, green, and white, or choose soft neutral shades for a rustic, farmhouse-inspired decoration. Pastel yarns create a gentle, playful appearance, while metallic details and contrasting borders can give the finished piece a festive touch. You can also experiment with stripes, textured stitches, tiny buttons, and embroidered designs to create a miniature sweater that reflects your personal style. Each variation offers a new opportunity to explore color combinations and develop your crochet skills.
In this tutorial, you will learn how to create a Crochet mini-sweater pattern for decoration step by step, from selecting your materials to assembling the body, sleeves, neckline, and finishing details. The instructions use beginner-friendly crochet stitches and explain how the pieces fit together to form a miniature sweater. You will also discover practical tips for maintaining consistent tension, correcting common mistakes, and adapting the design to different decorative purposes. Whether you are preparing handmade Christmas ornaments, making thoughtful gifts, or simply looking for a relaxing yarn project, this guide will help you create a beautiful miniature sweater with a neat, finished appearance.
Materials, Crochet Stitches, and Preparation for Your Mini Sweater
Before beginning your Crochet mini-sweater pattern for decoration, gather the necessary materials. You will need lightweight or medium-weight yarn, a crochet hook appropriate for that yarn, scissors, a yarn needle, and a measuring tape. Stitch markers are optional but useful for identifying the beginning of rounds and keeping track of sleeve placement. If you want to add decorative elements, prepare small amounts of contrasting yarn, embroidery thread, or lightweight buttons that suit the finished design.
Cotton yarn is an excellent option for a decorative mini sweater because it produces clear stitches and holds its shape well. Acrylic yarn is another practical choice, especially when you want a broad range of colors or a soft appearance. For a rustic decoration, you might choose a natural beige or cream yarn. For a festive ornament, red, forest green, white, and gold-inspired shades can create a traditional seasonal look. Choose a yarn that is comfortable to work with and avoid combining materials with very different thicknesses unless you deliberately want a mixed-texture effect.
Select a crochet hook that works well with your chosen yarn. A smaller hook than the yarn label recommends can produce tighter stitches, which may help the miniature sweater retain its shape. However, stitches should not be so tight that inserting the hook becomes difficult. Since this project is decorative rather than intended to be worn, you can adjust the hook size to achieve the appearance you prefer. Keep in mind that changing hook size or yarn thickness will also change the final dimensions.
You should understand a few basic crochet stitches before starting. This pattern uses chain stitch (ch), slip stitch (sl st), single crochet (sc), and half double crochet (hdc). Chain stitches create the starting foundation and help shape openings. Slip stitches join rounds or secure yarn without adding much height. Single crochet creates a compact fabric, while half double crochet builds height more quickly and produces a slightly softer texture. The instructions use US crochet terminology.
For this beginner-friendly design, the sweater is constructed from a small rectangular body, two miniature sleeves, and a simple neckline. The body is worked from the lower edge upward, leaving openings for the sleeves and a small opening at the top for the neck. The sleeves are made separately and attached afterward. This construction method is straightforward to understand and allows you to adjust the body and sleeve proportions independently.
Before crocheting the full project, make a small test swatch using your selected yarn and hook. Observe whether the stitches create a fabric that is firm enough to hold its shape without becoming stiff. If the swatch curls, try adjusting your tension or hook size. Prepare your workspace, arrange the materials within reach, and review each step before beginning. A few minutes of preparation can make the mini crochet sweater ornament easier to assemble and more consistent in appearance.
Step-by-Step Crochet Mini-Sweater Pattern for Decoration
Step 1: Create the sweater body. Begin by making a foundation chain of 20 stitches for a small decorative sweater. This is a starting measurement rather than a fixed requirement, because the final size depends on your yarn, hook, and tension. For the first row, work one single crochet into the second chain from the hook and continue with one single crochet in each remaining chain. You should have 19 single crochet stitches. Chain one and turn your work.
Step 2: Build the body height. Work one single crochet into each stitch across the next row. Chain one and turn at the end. Repeat this process until the rectangle measures approximately 3 to 3.5 inches in height. Keep the edges as straight as possible by counting your stitches at the end of every row. If you prefer a slightly taller sweater, add more rows. If you want a shorter ornament, stop when the proportions look right for your design.
Step 3: Shape the upper body and neckline. To create a simple shoulder area, work across the next row until you reach the center section. For a basic miniature design, leave approximately 5 center stitches unworked and complete the remaining stitches on the other side in a separate section. This creates a small neck opening. Work one or two additional rows on each shoulder section, keeping the outer edges even. The opening does not need to be large; it simply needs to suggest the shape of a sweater neckline.
Step 4: Form the body. Fold the rectangle so the lower edges meet and the upper sections form the shoulders, with the neck opening positioned at the top. Join the side edges using slip stitches or a yarn needle, leaving suitable openings near the upper sides for the sleeves. If you prefer a flatter, two-dimensional Christmas ornament, you can instead make two matching body panels and stitch around the sides, shoulders, and bottom while leaving the neckline and sleeve openings unjoined. The flat version is especially easy to hang on a tree or attach to a decorative display.
Step 5: Crochet the sleeves. Make two matching sleeves. For each sleeve, create a foundation chain of 10 stitches, then work one single crochet in the second chain from the hook and in each remaining chain. Continue working rows of single crochet until the piece measures approximately 1.5 to 2 inches long. If you want tapered sleeves, decrease one stitch near each edge in one or two rows. Fold each sleeve lengthwise and join the long edge, leaving the wider end open for attaching it to the body. Repeat for the second sleeve, ensuring both pieces have similar dimensions.
Step 6: Attach the sleeves and finish the neckline. Position each sleeve at the side opening of the body, align the edges, and sew them securely with a yarn needle. Weave in loose ends on the reverse side. To finish the neckline, attach yarn at the neck opening and work a round of single crochet evenly around the edge. Join with a slip stitch. You can repeat the round if you want a thicker collar. Finally, shape the sweater gently with your fingers and check that the sleeves are balanced. Your Crochet mini-sweater pattern for decoration is now ready for embellishment or display.
Creative Finishing Ideas, Customization, and Display Tips
Once the basic sweater is complete, you can personalize it to suit your decorative theme. A mini crochet Christmas sweater looks especially attractive in red and white, with a green neckline or contrasting cuffs. For a winter-inspired ornament, use blue, white, and silver-toned yarn. If you prefer a neutral home decor style, cream, beige, brown, and muted green can create a calm, coordinated appearance. Changing colors is an easy way to make several ornaments from the same pattern without repeating exactly the same design.
Adding stripes is one of the simplest ways to give your miniature sweater more character. Work a few rows in one color, then change to a contrasting yarn for the next row. To change colors neatly, complete the final yarn-over of the last stitch with the new color, then continue crocheting. Keep the unused yarn ends tidy and weave them in securely afterward. Two or three narrow stripes are often enough to create a balanced look without making the tiny garment appear too busy.
You can also decorate the front with embroidered stars, hearts, snowflakes, or simple geometric shapes. Use a yarn needle and a small amount of contrasting yarn to create the design. For example, a few short embroidered lines can resemble a traditional winter motif, while a small heart can give the sweater a sweet handmade appearance. Plan the placement before stitching so the design remains centered and does not distort the crocheted fabric.
Another appealing option is a crochet mini-sweater Christmas ornament with a hanging loop. Make a short chain of approximately 12 to 15 stitches, join the ends to form a loop, and securely attach it to the back of the neckline. Check that the loop is firmly stitched before hanging the ornament. You can also use a narrow ribbon, provided it is attached securely and suits the intended display. For ornaments placed on Christmas trees, position them away from heat sources and open flames.
If you want a more textured finish, experiment with half double crochet or alternating rows of single crochet and half double crochet. You could add a contrasting border around the bottom edge and sleeve cuffs to imitate knitted ribbing. A simple border can be created by attaching yarn at the edge and working single crochet stitches evenly around the selected section. Avoid adding too many decorative elements at once, because the small scale of the sweater means even tiny details can have a strong visual effect.
Careful finishing is essential for a polished result. Weave in all loose yarn ends, check the sleeve seams, and make sure the neckline is evenly shaped. If the sweater is intended to lie flat, gently arrange it on a clean surface and adjust the corners with your fingers. Store finished ornaments in a dry container when they are not being displayed. If the piece becomes dusty, remove the dust gently rather than pulling at the stitches. With thoughtful color choices and neat finishing, this handmade crochet mini sweater can become a charming addition to seasonal decorations, handmade gift wrapping, or a collection of miniature crochet projects.
Frequently Asked Questions About the Crochet Mini-Sweater Pattern for Decoration
1. Is the Crochet mini-sweater pattern for decoration suitable for beginners?
Yes. This pattern uses basic stitches, simple rectangular pieces, and straightforward assembly. Beginners who know how to make chains and single crochet stitches can follow the instructions at a comfortable pace. Counting stitches and checking the shape regularly will help you achieve a more balanced result.
2. What yarn is best for a decorative crochet mini sweater?
Cotton and acrylic yarn are both suitable choices. Cotton provides clear stitch definition and a relatively firm shape, while acrylic offers softness and a wide range of colors. Choose a yarn thickness that works with your hook and the size of the ornament you want to make.
3. How long does it take to crochet a mini sweater?
The time depends on your experience, yarn thickness, stitch choice, and the amount of decoration you add. A simple version may take a few hours, while an ornament with stripes, embroidery, or additional finishing details may take longer. Working carefully is more important than finishing quickly.
4. Can I make the mini sweater in different sizes?
Yes. To create a larger sweater, increase the foundation chain and work additional rows. You may also need to enlarge the sleeves and neckline so the proportions remain consistent. To make a smaller version, reduce the stitch count and row count, but check the shape frequently because small changes can affect the overall appearance.
5. How do I keep the sweater from curling at the edges?
Curling may occur when the stitches are too tight or the fabric is naturally prone to curling. Try a slightly larger hook, maintain consistent tension, and check that you are not accidentally skipping stitches. A neat border can also help the edges appear more even. Since this is a small decorative item, gentle shaping with your fingers may be sufficient.
6. Can I make a flat version instead of a three-dimensional sweater?
Absolutely. A flat version is often easier for beginners and works particularly well as a Christmas tree ornament, gift tag, or garland decoration. Crochet two matching body panels, create two matching sleeve pieces if desired, and join the components around the edges. Leave the neckline and other openings defined rather than closing the entire outline.
7. How can I attach the sleeves neatly?
Place each sleeve against the body opening and secure it with pins or stitch markers before sewing. Use a yarn needle and matching yarn to join the edges with small, even stitches. Check the placement from the front before securing the final stitches, and make sure the sleeves are approximately the same length.
8. What decorations can I add to the sweater?
You can use embroidered snowflakes, hearts, stripes, small crocheted shapes, contrasting borders, or a hanging loop. Lightweight decorations generally work best because they do not overwhelm the miniature design. If you add buttons or other small components, ensure they are securely attached and keep them away from young children.
9. Can I use leftover yarn for this project?
Yes. The Crochet mini-sweater pattern for decoration is an excellent way to use small amounts of leftover yarn. You can combine complementary colors to make stripes or use a single color for a simple design. Make sure the yarns have reasonably compatible thicknesses so the stitches remain consistent.
10. How do I make a hanging loop for a Christmas ornament?
Chain approximately 12 to 15 stitches, depending on the desired loop size. Join the chain into a loop and fasten off, leaving a long tail for sewing. Attach the loop securely to the upper back of the sweater near the neckline, then check the seam before hanging the ornament.
11. Why does my mini sweater look uneven?
Uneven results often come from inconsistent tension, accidental increases or decreases, or differences between the sleeve pieces. Count stitches at the end of each row, use stitch markers when necessary, and measure both sleeves before attaching them. Pressing or gently shaping the finished piece can improve its appearance.
12. Can I sell mini sweaters made using this pattern?
You can consider selling handmade items you make, but you should follow any applicable laws and the terms associated with any pattern or materials you use. If you develop your own variations, describe the finished item accurately and calculate your material and labor costs before setting a price. Avoid making unsupported claims about the item’s durability or safety.
13. How should I store crochet mini-sweater decorations?
Store the ornaments in a clean, dry container away from direct sunlight, moisture, and excessive heat. Arrange them so that the sleeves and neckline do not become crushed. Before storing them for the season, check for loose threads and repair any seams that need attention.
14. Can I use this pattern for a handmade gift?
Yes. A miniature sweater can be a thoughtful handmade gift, particularly when its colors reflect the recipient’s interests or favorite season. You can attach it to gift wrapping, include it in a decorative basket, or present it as a small ornament. Neat finishing and a carefully chosen color scheme will make the gift feel more personal.
Conclusion: Enjoy Making Your Crochet Mini-Sweater Pattern for Decoration
The Crochet mini-sweater pattern for decoration offers a fun way to practice fundamental crochet skills while creating a charming handmade ornament. In this tutorial, you learned how to select yarn and tools, crochet the body and sleeves, shape the neckline, assemble the pieces, and add decorative finishing touches. You also explored color combinations, embroidery ideas, hanging loops, and practical solutions to common crochet challenges.
The key to a successful miniature sweater is to work patiently, maintain consistent tension, and check the proportions as you go. You can follow the basic design for a classic ornament or personalize it with stripes, contrasting cuffs, textured stitches, and seasonal motifs. Whether you use the finished piece for Christmas decorations, handmade gifts, or a year-round miniature display, every version gives you an opportunity to express your creativity.
Now it is time to choose your favorite yarn and try this Crochet mini-sweater pattern for decoration yourself. Remember that your first attempt is a chance to learn, and small adjustments can help you achieve an even better result on your next project. Please leave your honest opinion in the comments and share your suggestions for future crochet tutorials. Which colors would you choose, and what decorative details would you add to your mini sweater? Your ideas and feedback can inspire other crochet enthusiasts to create their own beautiful handmade ornaments.