
The Fabric Hair Bandana Pattern is a wonderful sewing project for anyone who wants to create a stylish, comfortable, and reusable hair accessory at home.
A handmade fabric hair bandana is more than just a practical accessory. It can add personality to everyday outfits, keep loose hair away from the face, and create a charming finishing touch for casual looks.
Learning how to follow a Fabric Hair Bandana Pattern also gives you the opportunity to practice essential sewing techniques, including measuring, cutting, pinning, stitching, turning fabric, and finishing seams neatly. The process does not require expensive equipment, and many people can complete a simple version in an afternoon. In this guide, you will learn how to select suitable materials, prepare the fabric, construct the bandana, and personalize the finished piece. The instructions are designed to help you achieve an attractive result while understanding why each step matters.
Materials and Preparation for Your Fabric Hair Bandana Pattern
Before beginning your Fabric Hair Bandana Pattern, gather all the materials you need. Preparing everything in advance makes the sewing process easier and helps prevent interruptions once you start assembling the headband. You will need woven cotton fabric, coordinating thread, fabric scissors or a rotary cutter, a measuring tape, pins or sewing clips, an iron, and a sewing machine or hand-sewing needle.
Cotton fabric is one of the best choices for this project because it is breathable, easy to handle, and available in many prints. Lightweight quilting cotton works especially well because it holds its shape without feeling excessively heavy. You can also experiment with cotton lawn or other lightweight woven fabrics, provided they are suitable for the design. Avoid materials that fray excessively or stretch significantly if you are still learning basic sewing techniques.
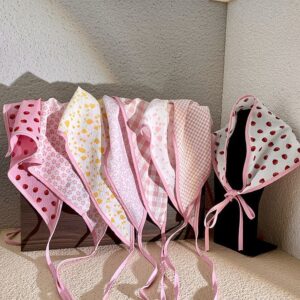
The next step is selecting the colors and patterns. A floral fabric hair bandana creates a delicate, romantic appearance, while polka dots and gingham offer a timeless look. Bold prints can make the accessory stand out, and solid colors provide versatility for everyday wear. If you are using leftover fabric, choose a piece large enough to accommodate the entire pattern without placing important design elements too close to the seams.
Measure the intended wearer before cutting your fabric. For a simple adult headband, you can begin with a main fabric rectangle approximately 22 inches long and 5 inches wide, adjusting the measurements to suit your preferred width and head circumference. These measurements are only a starting point, not a universal size. A bandana with a wider front or a gathered appearance may require a different shape, while a smaller accessory for a child needs appropriately reduced dimensions.
For the pointed bandana ends, prepare a paper template or mark angled lines directly on the fabric. One easy option is to shape the ends into tapered points so the finished accessory resembles a traditional bandana tied around the head. You can create symmetrical points by folding the paper template in half before cutting the outline. Accurate measurements and matching edges will help the finished headband look balanced.
Before cutting, wash and dry the fabric according to its care instructions, especially if the finished bandana will be washed frequently. This step helps reduce the risk of shrinkage after sewing. Press the fabric flat with an iron and place it on a clean, stable surface. Carefully mark the pattern using fabric chalk or a suitable marking tool, then cut the pieces neatly. Taking your time during preparation will make the remaining steps much easier.
Step-by-Step Instructions for Sewing a Fabric Hair Bandana Pattern
Begin by transferring your Fabric Hair Bandana Pattern onto the prepared fabric. If your design uses two matching pieces, place the fabric with the right sides facing each other. Align the edges carefully and secure them with pins or sewing clips. Keeping the pieces from shifting is especially important around the pointed ends, where small inaccuracies can affect the final shape.
Next, stitch around the perimeter using a straight stitch and a consistent seam allowance of approximately 1/4 inch. Leave an opening of about 2 to 3 inches along one straight section so you can turn the fabric right side out later. Backstitch at the beginning and end of the stitching to secure the seam. Avoid sewing across the opening, because you will need it to finish the accessory.
When sewing around pointed ends, slow down as you approach each corner. Stop with the needle down, lift the presser foot, and pivot the fabric to follow the next edge. This technique helps create cleaner angles and reduces the chance of crooked seams. If your pattern includes narrow points, keep the stitching accurate and avoid cutting too close to the seam when trimming excess fabric.
After stitching, trim excess fabric at the corners without cutting through the thread. Carefully clip the seam allowance near the pointed ends to reduce bulk, and trim any uneven edges where necessary. Turn the bandana right side out through the opening. Use a blunt turning tool or the closed end of a suitable tool to gently shape the points. Avoid sharp objects that could puncture the fabric or weaken the seams.
Press the bandana with an iron, arranging the edges so that the seams sit neatly along the perimeter. Fold the raw edges of the opening inward to match the surrounding seam allowance. Pin the opening closed, then sew it shut with a neat topstitch. You can continue topstitching around the entire perimeter for a polished finish. This extra row of stitching helps the fabric maintain its shape and gives your handmade hair bandana a professional appearance.
Finally, try the bandana on and assess the fit. If the design includes long pointed ends, position the center section over the top of your head, bring the ends around, and tie them comfortably. If you are making a headband that uses elastic or a separate fastening, follow the construction method appropriate to that design. The accessory should feel secure without creating uncomfortable pressure. Adjust the measurements for your next version if you prefer a wider band, longer ties, or a looser fit.
Customization, Styling, and Tips for a Professional Finish
One of the most enjoyable aspects of a Fabric Hair Bandana Pattern is the freedom to customize the design. You can create several accessories using different fabrics while following the same basic construction process. Small changes in color, width, and shape can produce very different results, making this an excellent project for building a coordinated collection of handmade accessories.
For a classic everyday look, choose cotton with a small floral print, delicate stripes, or traditional gingham. If you prefer something more modern, try abstract patterns, contrasting colors, or simple monochromatic designs. A reversible bandana is another attractive option. To make one, use two coordinating fabrics and place their right sides together before stitching. Once turned and pressed, the accessory can be worn with either side facing outward.
The width of the bandana also influences its appearance. A narrow version creates a subtle accent, while a wider band can provide more coverage and a bold silhouette. If you want a fuller shape, experiment with slightly wider fabric pieces and adjust the finished dimensions after testing a sample. Remember that wider fabric may require additional length or a different shape to wrap comfortably around the head.
You can also decorate your DIY fabric hair bandana with small details. Consider adding a narrow fabric border, decorative topstitching, or a small fabric bow. Embroidery can add a personal touch, while contrasting thread can highlight the outline. Keep embellishments securely attached and avoid placing bulky decorations where they could cause discomfort. For accessories intended for young children, avoid small detachable parts that could present a choking hazard.
If you are new to sewing, practice on a scrap piece of similar fabric before working on your final bandana. Test the stitch length, check the thread tension, and make sure the fabric feeds smoothly under the presser foot. A medium stitch length is generally a good starting point for lightweight woven cotton. If the fabric puckers, check your tension and avoid pulling the material while sewing. Small adjustments can make a noticeable difference in the final result.
Proper care will help your finished accessory remain attractive. Follow the fabric manufacturer’s care instructions, and consider washing cotton bandanas in cool or warm water with similar colors. Avoid excessive heat if the material is prone to shrinking. After washing, reshape the accessory and press it if necessary. Store your handmade headbands in a clean, dry place to protect them from dust and creases. With careful construction and regular maintenance, your fabric bandana headband can become a useful addition to your everyday wardrobe.
Frequently Asked Questions About the Fabric Hair Bandana Pattern
1. Is the Fabric Hair Bandana Pattern suitable for beginners?
Yes. A basic Fabric Hair Bandana Pattern is suitable for beginners because it uses straightforward techniques such as cutting, straight stitching, turning fabric, and pressing seams. Start with a simple cotton design and avoid complicated embellishments until you feel comfortable with the construction process. Practicing on fabric scraps can help you gain confidence before sewing the final piece.
2. What is the best fabric for a handmade hair bandana?
Lightweight woven cotton is an excellent choice because it is breathable, easy to sew, and available in many colors and prints. Quilting cotton is particularly convenient for beginners. Cotton lawn may provide a softer, lighter feel, while other woven fabrics can work if they hold their shape and are comfortable against the skin.
3. How much fabric do I need to make a fabric hair bandana?
The amount depends on the size, shape, and construction method. A simple adult design may fit within a piece measuring approximately 22 by 5 inches, but larger designs or two-layer reversible versions require more material. Always prepare a pattern template and confirm the dimensions before cutting.
4. Can I make a reversible fabric hair bandana?
Yes. Use two coordinating fabric pieces, place them with their right sides together, and stitch around the perimeter while leaving a small turning opening. Trim the corners carefully, turn the piece right side out, press it, and close the opening. Both fabrics will be visible on different sides, giving you two styling options in one accessory.
5. Do I need a sewing machine to make this pattern?
No. A sewing machine makes the process faster, but you can sew a fabric hair bandana by hand using a needle, thread, and small, even stitches. Hand sewing requires more time and patience, particularly around pointed ends, but it can produce an attractive result when the stitches are consistent and the seams are secured properly.
6. How do I make the bandana fit my head comfortably?
Measure the intended wearer and consider how the accessory will be tied or fastened. The finished length should accommodate the head comfortably while leaving enough material for the desired fastening method. If you plan to tie the ends, include sufficient extra length for a secure knot. Avoid making the bandana so tight that it causes pressure or discomfort.
7. Why do the pointed ends of my fabric bandana look uneven?
Uneven points can result from inaccurate cutting, shifting fabric, inconsistent seam allowances, or insufficient trimming at the corners. To improve the shape, align the fabric pieces carefully, sew slowly around each point, and trim excess seam allowance without cutting the stitches. Turning the corners gently and pressing them carefully will also improve the finished appearance.
8. How can I stop the edges from fraying?
Enclosing the raw edges inside the sewn construction is one effective way to prevent fraying. Stitch the pieces with the right sides together, turn them right side out, and close the turning opening. If your design has exposed raw edges, consider an appropriate finishing technique, such as a zigzag stitch or a suitable overlock finish.
9. Can I use leftover fabric scraps for this project?
Absolutely. A DIY fabric hair bandana is an excellent way to use suitable fabric remnants from quilting, clothing alterations, and other sewing projects. Make sure each piece is large enough for the pattern and free from damaged areas. Smaller scraps can also be used for decorative accents or coordinated accessories.
10. How can I make my fabric hair bandana look more professional?
Focus on accurate measurements, symmetrical cutting, even seam allowances, careful corner trimming, and thorough pressing. Coordinating thread and neat topstitching can make the design look polished. Choose fabric that suits the intended style, and inspect the finished seams for loose threads or uneven sections before wearing the accessory.
11. Can I adapt the pattern for children?
Yes. You can adapt the dimensions to create a smaller accessory, but measure carefully rather than simply reducing every measurement by the same percentage. Make sure the bandana fits comfortably and cannot easily slip over the face. For young children, supervise use and avoid loose decorative components, long unsecured ties, or other features that could create a safety hazard.
12. Is a fabric hair bandana washable?
Most cotton versions are washable, but the correct method depends on the fabric, thread, and any embellishments. Follow the material’s care instructions and test unusual fabrics before washing the finished accessory. Gentle washing, appropriate drying, and occasional pressing can help preserve the shape and color.
13. Can I make a fabric hair bandana without a printed pattern?
Yes. You can draft a simple pattern using paper, a ruler, and measurements taken for the intended wearer. Draw the main band shape, add the desired pointed ends, and include the seam allowance before cutting the fabric. Making a paper template also allows you to reproduce the design more consistently when creating additional bandanas.
14. What should I do if the finished bandana feels too stiff?
The fabric may be too heavy, the seams may contain excessive bulk, or the accessory may be too narrow to sit comfortably. Try a lighter woven cotton for your next version, trim the seam allowances carefully, and press the seams without flattening the fabric excessively. Prewashing suitable cotton can also help soften the material.
Conclusion: Create Your Own Fabric Hair Bandana Pattern
Creating a Fabric Hair Bandana Pattern is a practical and enjoyable way to develop sewing skills while making an accessory that reflects your personal style. Throughout this guide, you learned how to select suitable fabrics, prepare accurate measurements, cut and assemble the pattern, sew clean seams, shape pointed ends, and finish the accessory with careful pressing and topstitching. You also explored customization ideas, fabric care, and solutions to common sewing problems.
The best part of this project is its flexibility. You can begin with a simple cotton bandana and gradually experiment with reversible fabrics, different widths, colorful prints, and decorative details. By practicing the basic techniques and paying attention to the small finishing steps, you can create a collection of handmade hair accessories for everyday wear or thoughtful gifts. Remember that your first attempt does not have to be perfect; each project offers an opportunity to improve your measurements, stitching, and overall design.
Now it is your turn to try this Fabric Hair Bandana Pattern and make it your own. Choose a fabric you love, follow the instructions step by step, and enjoy the satisfaction of creating something useful with your own hands. If you have already tried a similar sewing project, please leave your honest opinion in the comments. Share your favorite fabric choices, describe what worked well for you, and suggest any improvements or new ideas you would like to see in future tutorials. Your feedback and suggestions can inspire other sewing enthusiasts to begin their own creative projects.