
The Crochet Heart Coaster Pattern is a charming and practical project for anyone who loves handmade decorations, creative gifts, and beautiful crochet accessories.
One of the best things about a Crochet Heart Coaster Pattern is that it can be customized to match different home decor styles and occasions.
This Crochet Heart Coaster Pattern is designed to guide you through the process from selecting materials to shaping the heart, completing the border, and finishing your handmade piece. The instructions use common crochet techniques and include practical tips for maintaining an even shape. You will learn how to create a foundation, work the rounded upper sections, form the pointed bottom, and add a neat edging. The pattern is an original, beginner-friendly construction guide, so stitch counts and final dimensions may vary slightly depending on your yarn, hook, and personal tension. Take your time, enjoy the process, and remember that handmade projects become more rewarding with practice.
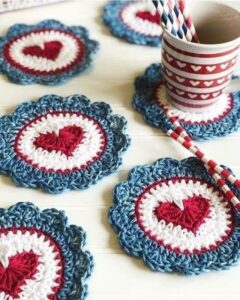
Materials, Crochet Stitches, and Preparation for Your Heart Coaster
Before beginning your Crochet Heart Coaster Pattern, gather the materials you need. You will need approximately 15–25 grams of medium-weight cotton yarn, a crochet hook suitable for your yarn, scissors, a yarn needle, and a measuring tape. Cotton is generally a good choice for coasters because it handles everyday use well and can be washed according to the yarn label. A small amount of yarn is usually enough for one coaster, making this project a practical way to use leftover supplies.
Choose a crochet hook that creates a firm, flexible fabric rather than a loose, open texture. For many medium-weight cotton yarns, a hook around 3.5–4.5 mm can be a useful starting point, although the recommended size on your yarn label should guide your choice. If your stitches look too loose, try a smaller hook. If the fabric feels stiff and difficult to work, a slightly larger hook may help. The goal is to make a coaster that lies flat and supports a cup without excessive stretching.
Understanding the basic stitches will make this Crochet Heart Coaster Pattern easier to follow. The main techniques are the chain stitch (ch), slip stitch (sl st), single crochet (sc), half double crochet (hdc), double crochet (dc), and treble crochet (tr). These stitches create different heights, which help shape the rounded top and pointed bottom of the heart. If you are unfamiliar with any stitch, practice it on a small swatch before beginning the main project.
The following instructions use US crochet terminology. A chain stitch creates the foundation, while a single crochet produces a compact fabric. A half double crochet creates a little more height, and a double crochet adds additional height and flexibility. A treble crochet is taller and can help form the upper curves of the heart. A slip stitch is useful for joining rounds, moving across stitches, and securing the finishing edge without adding much height.
Prepare your workspace before you start crocheting. Place your yarn where it can unwind smoothly, keep your scissors and yarn needle nearby, and make sure you have enough light to see individual stitches. If you are making several coasters, write down the hook size, yarn brand, and colors you use. This simple habit helps you reproduce the same dimensions later and makes it easier to create matching sets for gifts or home decoration.
Finally, consider the size and intended use of your Crochet Heart Coaster Pattern. A coaster measuring approximately 4–5 inches across is often suitable for a standard mug, but your finished size will depend on your yarn and stitch tension. If you want a larger piece, you can use thicker yarn or a larger hook, or carefully expand the pattern while maintaining the heart’s proportions. For a smaller coaster, choose finer cotton yarn and an appropriately smaller hook. Make sure the finished fabric is thick enough to provide a stable surface for a cup.
Step-by-Step Crochet Heart Coaster Pattern Instructions
Step 1: Create the foundation. Begin with a magic ring if you are comfortable using one, or make a short chain and join it into a small ring with a slip stitch. The magic ring is convenient because it allows you to close the center tightly, reducing the hole in the middle of your coaster. If you prefer the chain method, take care not to twist the chain before joining it. This starting point forms the center from which the heart will develop.
Step 2: Work the center stitches. Chain two, then work a combination of single crochet, half double crochet, and double crochet stitches into the ring. For a beginner-friendly starting round, try 3 single crochet stitches, 3 half double crochet stitches, 4 double crochet stitches, 2 treble crochet stitches, 4 double crochet stitches, 3 half double crochet stitches, and 3 single crochet stitches. Adjust the sequence if necessary to accommodate your starting method and tension. Pull the magic ring closed gently if you used one, and inspect the fabric before proceeding.
Step 3: Shape the upper curves. The rounded top of a heart consists of two lobes. To create them, work additional stitches into selected areas of the foundation round, placing increases where the fabric needs more width. For example, work two stitches into a stitch near each upper curve, using a mix of half double crochet and double crochet stitches. Keep the increases balanced on both sides so that the two lobes appear similar. If your center begins to curl, loosen your tension slightly or add a carefully placed increase.
Step 4: Form the center indentation. The small dip between the two upper curves is one of the defining features of a heart. To emphasize this shape, work a slip stitch or a single crochet in the center area between the lobes, depending on the structure of your fabric. Avoid adding too many tall stitches directly in the middle, because this can make the top appear rounded instead of heart-shaped. Lay your work on a flat surface and check whether the two curves are balanced before continuing.
Step 5: Create the pointed bottom. Work down the sides toward the lower center, using taller stitches where the heart needs width and shorter stitches as you approach the tip. Place stitches evenly along each side and keep the left and right sections as symmetrical as possible. At the lowest point, use a small cluster of stitches or a carefully positioned increase if needed to create a defined point. The exact arrangement depends on your foundation round, so check the silhouette frequently instead of relying only on a fixed stitch count.
Step 6: Add a stabilizing border. Once the heart shape is recognizable, work a round of single crochet stitches around the outer edge. Place one stitch into each available stitch or space, adding extra stitches around curved sections when necessary to prevent puckering. Near the center indentation, use fewer stitches if the edge is spreading outward. At the bottom point, work the stitches carefully so that the tip remains distinct. Join the border with a slip stitch, then fasten off and leave a tail long enough to weave in securely.
Finishing, Customization, and Troubleshooting Your Crochet Heart Coaster
Finishing is an important part of creating a polished Crochet Heart Coaster Pattern. Use a yarn needle to weave the loose ends through several stitches on the back of the coaster, changing direction once or twice to help secure them. Avoid pulling the yarn too tightly, because this may distort the heart’s outline. Trim the excess yarn only after you are confident that the ends are secure. A neat back makes the coaster more durable and comfortable to use.
Blocking can help your heart coaster achieve a more balanced shape. Lightly dampen the cotton piece according to the yarn care instructions, place it on a clean, flat surface, and gently adjust the two upper curves and lower point. Allow it to dry completely before using it. Do not stretch the fabric excessively, since this can create thin areas or change the proportions. If your coaster already lies flat and has a clear heart shape, only minimal shaping may be necessary.
Color selection is another way to personalize your Crochet Heart Coaster Pattern. Classic red, blush pink, and white are popular choices for romantic occasions, while cream, beige, sage green, and dusty blue work well in everyday interiors. You can also create a striped design by changing colors between rounds or adding a contrasting border. To make a matching set, use the same yarn weight and hook size for every coaster and maintain consistent stitch tension.
Texture can make a simple heart coaster look more distinctive. For example, a border worked in a contrasting color can frame the heart, while a round of carefully spaced stitches can add definition to the silhouette. You may also experiment with slightly raised stitches in the center, provided the finished surface remains sufficiently flat for a cup. Avoid bulky embellishments, beads, or buttons on the drinking surface, because they can make the coaster unstable and may scratch delicate furniture.
If your coaster curls at the edges, the most common causes are tight tension, too few stitches around the curves, or a hook that is too small for your yarn. Try gently relaxing your tension or increasing the hook size slightly. If the edge becomes wavy, you may have added too many stitches. Remove the border and repeat it with fewer increases. If one lobe is larger than the other, compare the stitches on each side and make small corrections in the next round rather than forcing the fabric into shape.
Careful maintenance will help your finished coasters remain attractive. Follow the yarn manufacturer’s washing instructions, and test any cleaning method on a spare swatch when possible. Cotton coasters can often be washed gently, but the exact care method depends on the fiber blend and any decorative materials used. Let the pieces dry completely before stacking or storing them. With proper care, a set of handmade heart coasters can remain a useful and meaningful part of your home for a long time.
Frequently Asked Questions About the Crochet Heart Coaster Pattern
1. Is the Crochet Heart Coaster Pattern suitable for beginners?
Yes. This Crochet Heart Coaster Pattern is suitable for beginners who have learned basic stitches such as chain, single crochet, half double crochet, and double crochet. The most challenging part may be shaping the two upper curves and the pointed bottom. Practicing the stitches on a small sample first can make the process easier. Work slowly, count your stitches when necessary, and compare both sides as you go.
2. What yarn is best for a crochet heart coaster?
Cotton yarn is generally the best choice because it is absorbent, durable, and suitable for items used around drinks. It also tends to hold its shape well when crocheted with an appropriate hook. Acrylic yarn can be used for decorative pieces, but it may not offer the same absorbency or heat resistance as cotton. Always consider the intended use and the care instructions for the fiber you choose.
3. How much yarn do I need for one heart coaster?
Most small heart coasters require only a modest amount of yarn, often approximately 15–25 grams of medium-weight cotton yarn. The actual amount depends on the coaster’s dimensions, the thickness of the yarn, and your stitch tension. If you are making a complete set, purchase or prepare a little extra yarn so that all the pieces can be finished in matching colors.
4. Why does my crochet heart look more like a circle?
A heart may look circular if the upper lobes are not clearly defined or the center indentation is too shallow. The lower point may also need more shaping. Check that your taller stitches are arranged to form two rounded upper sections and that the center dip is distinct. Shorter stitches near the indentation and careful adjustments along the lower sides can help create a recognizable heart silhouette.
5. Why is my crochet heart coaster curling?
Curling usually occurs when the fabric is too tight or the border does not contain enough stitches for the shape. Check whether the main piece lies flat before adding the edging. If it curls, consider using a larger hook or adding a small number of stitches around the curved sections. If the edges become wavy instead, reduce the number of increases and make sure the border is not overcrowded.
6. Can I make the Crochet Heart Coaster Pattern in different sizes?
Yes. You can adjust the size by changing the yarn weight, hook size, or number of stitches used to shape the heart. Thicker yarn and a larger hook generally create a larger coaster, while finer yarn and a smaller hook produce a smaller piece. Keep the proportions balanced so that the two upper lobes and the bottom point remain clearly defined.
7. How can I make a matching set of crochet heart coasters?
Choose one yarn type, one hook size, and a consistent color palette. Make the first coaster carefully and use it as a reference for the remaining pieces. You can create a coordinated set using the same color for every heart or alternate between two or three complementary shades. Consistent tension and matching borders will help the coasters look cohesive when displayed together.
8. Can crochet heart coasters be given as handmade gifts?
Absolutely. A set of Crochet Heart Coasters makes a thoughtful handmade gift for birthdays, Valentine’s Day, anniversaries, housewarmings, and other special occasions. Arrange several coasters in a small gift box or tie them together with a simple ribbon. Choose colors that suit the recipient’s home, and make sure the yarn ends are secured and the pieces are clean before wrapping them.
9. How do I wash and care for crochet heart coasters?
Care depends on the yarn fiber and any decorative additions. Many cotton coasters can be washed gently according to the yarn label, then laid flat to dry. Avoid harsh cleaning methods unless the yarn manufacturer confirms they are suitable. If the coaster loses its shape, gently reshape it while damp and allow it to dry completely before using it again.
10. How can I make the edges of my heart coaster look neat?
Work a consistent round of single crochet around the outside, paying special attention to the curves and bottom point. Avoid adding too many stitches in one area, and keep the tension even. Weave in the yarn tails securely with a yarn needle, then lightly block the finished piece if needed. A neat border can improve the appearance of the entire coaster without requiring complicated techniques.
Conclusion: Create Your Own Crochet Heart Coaster Pattern
The Crochet Heart Coaster Pattern is a rewarding handmade project that combines simple crochet stitches with a charming heart-shaped design. Throughout this guide, you learned how to select suitable materials, prepare your yarn and hook, create the foundation, shape the upper curves, define the center indentation, and form the pointed bottom. You also discovered how to add a clean border, weave in loose ends, block the finished piece, and troubleshoot common problems such as curling and uneven edges.
With cotton yarn, consistent tension, and a little patience, you can create beautiful heart coasters for everyday use, seasonal decorations, or thoughtful handmade gifts. Experiment with different colors, sizes, and borders to make each piece reflect your personal style. Most importantly, remember that every project is an opportunity to practice your skills and develop your own creative approach.
Now it is your turn to try this Crochet Heart Coaster Pattern! Have you made a heart-shaped coaster before, or are you planning to create your first one? Please leave your honest opinion, share your experience, and tell us which colors or finishing techniques you would choose. Your suggestions and creative ideas can inspire other crochet enthusiasts and help everyone discover new ways to enjoy this lovely handmade project.