
The Fabric wine bottle cover pattern with a drawstring is a charming and practical sewing project that transforms an ordinary fabric scrap into a beautiful reusable bottle bag.
One of the best features of this Fabric wine bottle cover pattern with a drawstring is its versatility. You can make it using cotton fabric, linen, quilting cotton, or another medium-weight material that holds its shape without becoming too stiff.
This sewing project is also an excellent opportunity to practice essential techniques such as measuring, cutting fabric, sewing straight seams, finishing raw edges, and creating a drawstring casing. The finished cover can be reused for different occasions, making it a practical alternative to disposable gift wrapping. You can personalize it with ribbons, contrasting fabrics, decorative stitching, or small fabric labels. In this tutorial, you will learn how to prepare your materials, construct the bottle cover, create the drawstring closure, and add finishing touches that make your handmade project both attractive and functional.
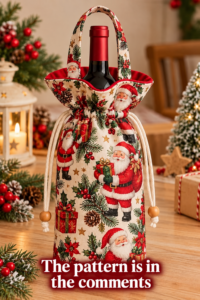
Materials and Preparation for the Fabric Wine Bottle Cover Pattern with a Drawstring
Before beginning the Fabric wine bottle cover pattern with a drawstring, gather all your materials and prepare a clean, well-lit workspace. Having everything ready will make the sewing process easier and help you avoid unnecessary interruptions. You do not need an extensive collection of tools, and many of the supplies may already be available in your sewing basket.
For the main fabric, choose approximately half a yard of medium-weight cotton, quilting cotton, or linen. The exact amount depends on the width of the fabric, the dimensions of your bottle, and whether you want a lining. A coordinating lining fabric is optional but recommended if you want a neat interior and a more substantial finished cover. Select colors and prints that complement the occasion or the person receiving the gift.
You will also need a measuring tape or ruler, fabric scissors or a rotary cutter, pins or sewing clips, matching thread, and a sewing machine. A fabric marker or tailor’s chalk will help you draw accurate cutting lines. For the closure, prepare a length of ribbon, cotton cord, or another suitable drawstring material. A safety pin or bodkin can make threading the cord through the casing much easier.
Start by measuring the bottle you intend to cover. Measure its height from the bottom to the point where you want the fabric to gather. Then measure the circumference around the widest part of the bottle. These two measurements are important because wine bottles can vary in height, width, and shape. A cover designed for one bottle may fit another differently, so checking the dimensions before cutting will help you achieve a comfortable fit.
For a simple standard-sized cover, begin with a fabric rectangle approximately 14 inches wide and 16 inches tall, adjusting the dimensions to suit your bottle. This is a starting point rather than a universal measurement. The width should accommodate the bottle’s circumference, seam allowances, and a little extra room. The height should include the desired finished length, the bottom seam allowance, and enough additional fabric for the drawstring casing.
Before cutting, wash and dry washable fabric according to its care instructions, then press it with an iron. Prewashing helps reduce the chance of shrinkage after the cover has been sewn. Place the fabric on a flat surface, check that its edges are straight, and mark the rectangle carefully. If you are using a directional print, make sure the pattern will appear upright when the bottle cover is finished.
How to Cut and Sew the Main Bottle Cover
The first construction stage of the Fabric wine bottle cover pattern with a drawstring is creating the main fabric body. Accurate cutting and consistent seam allowances will help the finished cover sit neatly around the bottle. Take your time with this stage, particularly if your fabric has stripes, checks, or a print that you want to align.
Step 1: Cut the fabric rectangle. Using your measurements, cut one rectangle for the outer cover. If you want a lined version, cut a second rectangle of the same dimensions from the lining fabric. Check that both pieces are equal in size and that their corners are square. For a personalized project, you can use one fabric for the exterior and a contrasting print for the lining.
Step 2: Fold and sew the side seam. Place the outer fabric with its right sides together, bringing the shorter edges into alignment. Pin or clip the edges, then sew along the side using a seam allowance of approximately 1/2 inch. Backstitch at the beginning and end to secure the seam. If your fabric frays easily, finish the raw edges with a zigzag stitch, an overlock stitch, or another suitable seam-finishing technique.
Step 3: Create a flat bottom. With the fabric still inside out, flatten the tube so the side seam lies along one side. Align the lower edges and pin them together. Sew across the bottom using a consistent seam allowance, making sure the seam is secure. This creates a simple flat-bottomed bag that can hold a bottle upright when placed on a stable surface.
Step 4: Shape the bottom corners if desired. For a more structured base, you can box the corners. With the bottom seam and side seam aligned, measure approximately 1 to 1 1/2 inches from the corner tip, depending on the desired base width. Draw a straight line across the corner and sew along it. Repeat on the opposite corner, then trim the excess fabric while leaving a safe seam allowance. This technique creates a wider base and gives the cover a more bag-like shape.
Step 5: Prepare the lining. If you are making a lined cover, sew the lining side and bottom seams in the same way as the outer fabric. Leave the lining inside out and turn the outer cover right side out. Place the outer cover inside the lining so their right sides face each other. Align the top raw edges and match the side seams. Pin around the opening, then sew the layers together while leaving a small turning gap if your design requires it.
Step 6: Turn and press the cover. Carefully pull the fabric through the opening so the right sides face outward. If you left a turning gap in the lining, close it with a neat machine stitch or hand stitching. Push out the corners gently without forcing the fabric, then press the top edge with an iron. The cover should now resemble a simple fabric bag with a closed bottom and an open top, ready for the drawstring casing.
Creating the Drawstring Casing and Finishing the Cover
The drawstring is the defining feature of the Fabric wine bottle cover pattern with a drawstring. It allows the top of the fabric to gather around the bottle neck, creating a decorative finish while helping the bottle remain enclosed during presentation. A carefully sewn casing will also make the cord easier to move when opening and closing the cover.
Step 7: Mark the casing. At the upper edge of the cover, fold the fabric toward the inside by approximately 1/4 inch and press to conceal the raw edge. Fold it again by about 1 to 1 1/2 inches, depending on the width of your ribbon or cord. This second fold forms the casing. Make sure the folded channel is wide enough for the drawstring to pass through without becoming trapped.
Step 8: Sew around the casing. Pin the folded fabric in place and stitch close to the lower edge of the fold. Leave a small opening in the stitching for inserting the drawstring. If you are making a lined cover, make sure the casing is constructed neatly so the lining does not bunch or interfere with the channel. Sew slowly around the opening and check that the casing width remains consistent.
Step 9: Prepare the drawstring. Cut a piece of ribbon or cord long enough to pass through the casing and leave comfortable ends for tying. For many standard covers, approximately 24 to 30 inches is a useful starting point, but you should adjust the length to suit your design. Attach a safety pin securely to one end of the cord, making sure the pin is fully closed before guiding it through the channel.
Step 10: Thread the cord through the channel. Insert the safety pin into the casing opening and gently push it through the fabric tunnel. Gather the fabric over the pin and pull the material along the cord a little at a time until the pin emerges from the same opening. Remove the pin and adjust the ends so they are approximately equal in length. Pull the cord gently to confirm that the opening gathers smoothly.
Step 11: Secure the drawstring ends. Tie small knots at the ends of the cord or ribbon to prevent them from slipping back into the casing. If you are using ribbon, you can finish the ends with an appropriate fray-prevention method. Avoid applying heat to synthetic ribbon unless the manufacturer’s instructions specifically permit it. Test the closure by opening and closing it several times before placing a bottle inside.
Step 12: Add decorative details. Your Fabric wine bottle cover pattern with a drawstring is now ready for personalization. You can add a fabric bow, a small appliqué, decorative buttons, a sewn label, or contrasting topstitching. For a holiday version, consider a red-and-green print or a simple snowflake design. For a birthday gift, choose a colorful fabric that reflects the recipient’s interests. Keep decorations securely attached and away from areas that might catch on the bottle.
Customization Ideas, Troubleshooting, and Frequently Asked Questions
One advantage of the Fabric wine bottle cover pattern with a drawstring is how easily it can be adapted to different styles. A classic cotton print creates a relaxed handmade appearance, while linen gives the cover a natural texture. Velvet or other heavier decorative fabrics can produce a more luxurious presentation, although thicker materials may require adjustments to the seam allowances and casing. Choose a fabric that can be sewn comfortably with your available equipment.
For a reusable gift presentation, consider adding a small fabric tag with a handwritten message or a decorative stitched motif. You can also create a coordinated set using several fabrics, making each cover suitable for a different occasion. A simple patchwork exterior is another option if you have leftover quilting cotton. Keep the patchwork pieces reasonably lightweight and press the seams carefully so the cover does not become unnecessarily bulky.
If you want a more structured shape, use a slightly heavier outer fabric or add a suitable lightweight interfacing. Test the interfacing on a scrap first to check how it affects the fabric’s flexibility. A cover that is too stiff may not gather comfortably around the bottle neck, while a very thin fabric may wrinkle more easily. Finding a balance between structure and softness will help you achieve a polished result.
Common sewing problems are usually easy to correct. If the cover is too narrow, check the bottle circumference and recalculate the width before cutting another piece. If the drawstring refuses to slide, inspect the casing for tight stitches, bulky seams, or a channel that is too narrow. If the bottom appears uneven, check that the fabric edges were aligned before sewing and that both boxed corners, if used, were measured consistently.
Before using the finished cover, inspect the side and bottom seams, test the drawstring, and check that no pins or sharp tools remain inside. The cover is intended as a decorative fabric accessory, not as a protective container for carrying heavy bottles. Keep the bottle upright when possible, avoid lifting a heavy glass bottle by the drawstring alone, and supervise children around glass bottles and small decorative parts.
Frequently Asked Questions
1. What fabric is best for a Fabric wine bottle cover pattern with a drawstring?
Medium-weight cotton and quilting cotton are excellent choices because they are easy to cut, sew, and press. Linen is another attractive option, while heavier fabrics can provide more structure. Choose a material that suits your sewing machine and the appearance you want.
2. How much fabric do I need for one wine bottle cover?
Approximately half a yard is often enough for a simple cover, depending on the fabric width, bottle dimensions, and whether you are adding a lining. Measure your bottle and calculate the cutting dimensions before purchasing fabric. A larger or unusually shaped bottle may require more material.
3. Can a beginner sew this bottle cover?
Yes. This project is suitable for beginners who can sew a straight seam and follow basic measuring instructions. The main techniques are cutting a rectangle, joining the side and bottom seams, folding a casing, and threading a drawstring. Practicing on fabric scraps first can make the process easier.
4. How do I choose the correct dimensions?
Measure the bottle’s circumference and height. Add enough width for the seam allowances and comfortable movement around the bottle. For the height, include the desired finished length, the bottom seam allowance, and the additional fabric needed for the casing. Test your measurements with paper if you are unsure.
5. Is a lining necessary?
No. An unlined cover is quicker to sew and works well with fabric that does not fray excessively or become too transparent. A lining creates a neater interior and can give the cover additional body. If you use a lining, choose a fabric that works well with the outer material.
6. What can I use instead of a ribbon for the drawstring?
Cotton cord, narrow fabric ties, or suitable decorative string can work well. The material should be flexible enough to pass through the casing and strong enough for repeated opening and closing. Make sure the casing is wide enough for the chosen drawstring.
7. Why does my drawstring get stuck?
The channel may be too narrow, the stitching may have caught part of the channel, or the cord may be too thick. Check the opening and gently guide the cord through the casing. If necessary, widen the casing in a future version and use a thinner cord.
8. Can I make a cover for bottles of different sizes?
Yes. The pattern can be adapted for sparkling wine bottles, smaller bottles, or other similarly shaped containers. Measure each bottle individually because circumference and height can vary significantly. Make a test cover from inexpensive fabric when developing a new size.
9. Can I use this pattern for Christmas gifts?
Absolutely. Christmas-themed cotton, metallic accents, ribbon bows, and small fabric appliqués can make the cover suitable for holiday gifting. You can also coordinate the colors with your wrapping paper or table decorations. Ensure that all embellishments are securely attached.
10. How should I wash and store the finished cover?
Follow the care instructions for the fabrics and decorative materials you selected. If the cover is machine washable, wash it with similar colors and avoid harsh treatment that could damage the drawstring or embellishments. Allow it to dry completely before folding and storing it in a clean, dry place.
Conclusion
The Fabric wine bottle cover pattern with a drawstring is a practical and creative sewing project that combines simple construction with attractive personalization. Throughout this tutorial, you learned how to select suitable materials, measure your bottle, cut and sew the fabric body, create a flat or boxed bottom, prepare an optional lining, and construct a functional drawstring casing. You also discovered ways to customize the finished cover with different fabrics, decorative details, and seasonal designs.
With careful measuring and a little patience, you can create reusable bottle covers for birthdays, holidays, dinner invitations, and handmade gift sets. The pattern is flexible enough to accommodate different bottle sizes and fabric styles, allowing you to make each project your own. Start with a straightforward cotton version, practice the basic techniques, and experiment with more elaborate designs as your confidence grows.
I would love to hear your honest opinion! Have you tried making a fabric wine bottle cover with a drawstring, or do you have another sewing technique that makes this project even better? Please share your experience, questions, and suggestions in the comments. Your feedback and creative ideas can inspire other sewing enthusiasts to try this enjoyable handmade project.