
The Crochet Christmas bauble ornament pattern is a delightful way to bring handmade charm, warmth, and creativity to your holiday decorations.
One of the best things about the Crochet Christmas bauble ornament pattern is its versatility. You can choose traditional Christmas colors such as red, green, gold, and white, or experiment with modern combinations like dusty pink, cream, silver, and sage green.
In this tutorial, you will learn how to crochet a round Christmas bauble using clear, step-by-step instructions. The pattern explains the materials you need, the stitches used to shape the ornament, and the process of increasing and decreasing stitches to create a rounded form. You will also discover how to add stuffing, close the opening neatly, and attach a hanging loop. By following this Crochet Christmas bauble ornament pattern, you can create a decorative ornament that reflects your personal style while practicing useful crochet techniques. The instructions use US crochet terminology and include helpful tips for achieving a smooth, attractive finish.
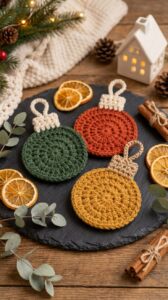
Materials, Crochet Stitches, and Preparation for Your Christmas Bauble
Before beginning your Crochet Christmas bauble ornament pattern, gather all the materials you need. Preparing your supplies in advance makes the process easier and allows you to focus on shaping the ornament. You will need yarn in your preferred Christmas colors, a crochet hook suitable for the yarn, a yarn needle, scissors, and a small amount of polyester fiberfill. Choose a yarn that produces a firm fabric, since a tight stitch pattern helps the stuffing remain inside the ornament.
For a classic bauble, medium-weight cotton or acrylic yarn works well. Cotton creates a defined stitch texture, while acrylic offers a wide selection of festive colors and is easy to find in many yarn collections. A crochet hook slightly smaller than the yarn label recommends can help you create a dense fabric with fewer visible gaps. However, the best hook size depends on your tension, so make a small test piece if you are unsure. The goal is to produce a flexible fabric that holds its shape without stretching excessively.
You should also understand the basic crochet abbreviations used in this pattern. MR means magic ring, ch means chain, sc means single crochet, inc means increase by working two single crochet stitches into the same stitch, and dec means decrease by joining two stitches into one. Sl st means slip stitch, and st or sts means stitch or stitches. These abbreviations are commonly used in US crochet patterns and will help you follow the instructions without confusion.
The magic ring is especially useful because it allows you to begin crocheting in the round with a tightly closed center. If you prefer not to use a magic ring, you can chain two stitches and work the first round into the second chain from the hook. This alternative can be helpful for beginners who find the magic ring difficult at first. Whichever method you choose, make sure the center opening is small enough to prevent stuffing from escaping.
For this pattern, the finished ornament will measure approximately 3 to 4 inches in diameter, depending on your yarn, hook, and crochet tension. The design is worked continuously in spiral rounds, which means you do not join each round with a slip stitch unless the instructions specifically say otherwise. Using a stitch marker to identify the first stitch of each round is strongly recommended. Move the marker upward as you complete each round so you always know where the next round begins.
Before starting, choose whether you want a single-color ornament or a multicolored design. A single-color bauble creates a classic appearance, while alternating colors can produce stripes or decorative bands. You can also use a contrasting color for the hanging loop or add embroidery after the crocheting is complete. Keep in mind that embellishments should be securely attached, especially if the ornament will be displayed where young children or pets can reach it.
Step-by-Step Crochet Christmas Bauble Ornament Pattern
Step 1: Create the magic ring. Begin with your chosen yarn and crochet hook. Make a magic ring, then work six single crochet stitches into the ring. Pull the yarn tail to close the center tightly. Place a stitch marker in the first stitch of the round. You should now have a small circular center that forms the top or bottom of your bauble, depending on how you orient the finished ornament.
Step 2: Increase the circle. In Round 2, work two single crochet stitches into every stitch around. You will have 12 stitches at the end of this round. In Round 3, work one single crochet in the first stitch, then increase in the next stitch. Repeat this sequence around to reach 18 stitches. In Round 4, work one single crochet in each of the next two stitches, then increase in the following stitch. Repeat around to reach 24 stitches. These increases gradually expand the circular fabric.
Step 3: Continue increasing to shape the bauble. In Round 5, work one single crochet in each of the next three stitches, then increase in the following stitch. Repeat around to reach 30 stitches. In Round 6, work one single crochet in each of the next four stitches, then increase in the following stitch. Repeat around to reach 36 stitches. Your crochet piece should now resemble a flat circle. If it curls excessively, check your stitch count and tension. If it becomes wavy, your increases may be too frequent or your hook may be too large.
Step 4: Crochet the middle section. Once the circle reaches the desired width, work one single crochet in every stitch around for approximately six to eight rounds, without adding increases. This creates the rounded sides of your Crochet Christmas bauble ornament pattern. The exact number of rounds determines the ornament’s height, so you can adjust this section to create a flatter or fuller shape. Keep your tension consistent and count the stitches periodically to make sure you maintain 36 stitches in each round.
Step 5: Begin decreasing. To round the upper half of the ornament, start decreasing gradually. In the next round, work one single crochet in each of the next four stitches, then make one decrease. Repeat around to reduce the stitch count from 36 to 30. In the following round, work one single crochet in each of the next three stitches, then decrease around to reach 24 stitches. Use an invisible single crochet decrease if you want a smooth surface with fewer visible gaps. This technique involves picking up the front loops of two stitches and completing them together.
Step 6: Continue decreasing and prepare for stuffing. In the next round, work one single crochet in each of the next two stitches, then decrease around to reach 18 stitches. At this stage, begin adding small amounts of polyester fiberfill if you are making a stuffed ornament. Distribute the stuffing evenly, using the blunt end of your crochet hook or a stuffing tool to reach the sides gently. Avoid packing it too tightly, because excessive stuffing can stretch the stitches and create an uneven surface.
Step 7: Close the final rounds. Work one single crochet in the next stitch, then decrease in the following stitch, repeating around to reach 12 stitches. Add a little more stuffing if needed, checking that the bauble feels evenly filled. In the final round, decrease around to reach six stitches. Cut the yarn, leaving a tail long enough to close the opening. Thread the tail through a yarn needle and pass it through the remaining front loops. Pull gently to close the hole, then secure the yarn and weave in the end carefully.
Step 8: Check the shape. Roll the finished bauble gently between your hands to distribute the stuffing and smooth out the surface. Look for loose stitches, visible holes, or uneven areas. If the ornament appears slightly oval, adjust the stuffing carefully before the opening is fully secured. A little shaping at this stage can make a noticeable difference to the final appearance. Keep the yarn tail hidden inside or weave it through several stitches before trimming it.
Adding the Hanging Loop, Decorative Details, and Finishing Touches
The hanging loop is an important part of the Crochet Christmas bauble ornament pattern because it allows you to display your finished creation on a Christmas tree or decorative branch. You can use the same yarn as the bauble or choose a contrasting color for a subtle decorative accent. A simple crochet chain creates a traditional handmade look, while a narrow ribbon or sturdy cord offers a different finish.
To make a crochet hanging loop, attach the yarn securely near the top of the ornament. Chain approximately 18 to 24 stitches, depending on how long you want the loop to be. Slip stitch into the attachment point to form a loop, then fasten off and weave in the ends securely. Test the loop gently before hanging the ornament. If you prefer a ribbon, thread it through a secure stitch near the top and tie the ends into a firm knot or bow.
For a more traditional Christmas appearance, choose red, green, white, or gold yarn. You can create a collection of baubles in solid colors and arrange them together for a coordinated look. White yarn with silver embroidery can suggest a snowy winter theme, while deep green with gold accents creates a classic festive combination. The Crochet Christmas bauble ornament pattern is flexible enough to accommodate many styles without changing the basic construction.
You can also decorate the surface with embroidered stars, small snowflakes, or simple geometric patterns. Use a yarn needle and a small amount of contrasting yarn to add these details after completing the bauble. Surface embroidery is a useful way to personalize an ornament without making the crochet instructions more complicated. Keep decorative stitches relatively light so they do not distort the rounded shape.
If you enjoy working with color changes, consider creating striped baubles. To change colors, finish the final yarn-over of the last stitch in the old color with the new color, then continue crocheting. Carrying unused yarn inside the ornament may work for small color sections, but it can add bulk if many colors are used. For clean stripes, you can fasten off each color and weave in the ends carefully, although this creates more finishing work.
Another option is to make a textured ornament using stitches such as front-loop single crochet or back-loop single crochet in selected rounds. These techniques create subtle ridges that catch the light and add visual interest. Practice the stitch on a small sample first, particularly if you are new to working in the round. Avoid making the fabric too loose, as gaps can reveal the stuffing and reduce the ornament’s durability.
Before displaying your bauble, inspect the hanging loop, the closure, and any added decorations. Make sure the stuffing is fully enclosed and that the yarn ends have been secured. These ornaments are intended as decorative items rather than toys, and small parts can present a choking hazard. Keep them out of reach of young children and pets, and avoid placing them near open flames, heaters, or other sources of excessive heat.
Customization Ideas, Troubleshooting, and Frequently Asked Questions
One of the most enjoyable aspects of the Crochet Christmas bauble ornament pattern is the ability to adjust the design to suit your home or gift recipient. You can make miniature baubles for a small tree, larger ornaments for a wreath, or matching sets in several colors. To create a larger bauble, increase the number of stitches in the expansion rounds and add more even rounds before decreasing. To make a smaller bauble, stop increasing earlier and reduce the number of middle rounds.
If your bauble looks uneven, begin by checking the stitch count. Missing or adding stitches accidentally can cause the shape to lean, ripple, or develop unexpected bumps. A stitch marker helps prevent this problem, especially when crocheting in a spiral. Count each round before moving on, and remember that an increase means two stitches worked into one stitch, while a decrease combines two stitches into one.
Another common issue is visible stuffing. This usually happens when the crochet fabric is too loose or the stuffing has been packed unevenly. Try a smaller hook to create a denser fabric, and add the stuffing in small portions. If your yarn is particularly fine, you may need additional rounds or a different yarn weight to achieve the desired thickness. The best result comes from a fabric that is firm but still flexible enough to shape comfortably.
If the ornament becomes too tall or too flat, adjust the number of even rounds in the middle section. More even rounds create a taller, fuller shape, while fewer rounds produce a flatter ornament. The exact result depends on yarn thickness, hook size, and individual tension. For a coordinated set, make a note of your materials and round counts so you can reproduce the same size for future ornaments.
Frequently Asked Questions
1. Is the Crochet Christmas bauble ornament pattern suitable for beginners?
Yes. The pattern uses basic stitches, including single crochet, increases, and decreases. Beginners who are comfortable with working in the round can follow the instructions step by step. Practicing the magic ring and invisible decrease beforehand can make the process easier.
2. What yarn is best for crocheting Christmas baubles?
Cotton and acrylic yarn are both suitable options. Cotton offers clear stitch definition, while acrylic provides a wide range of colors and a soft finish. Choose yarn that creates a dense fabric when crocheted with your selected hook.
3. How much yarn do I need for one ornament?
A small bauble generally requires only a modest amount of yarn, often less than 25 grams for a standard 3- to 4-inch ornament. Actual usage varies according to yarn weight, stitch tension, and finished size. A small leftover ball of yarn may be enough for a single bauble.
4. Can I make a crochet Christmas bauble without stuffing?
Yes. You can crochet a decorative cover for a lightweight, shatter-resistant ornament form instead of making a fully stuffed bauble. The cover dimensions must match the form, and you should avoid using fragile glass objects if the finished ornament may be handled frequently. Another option is to use a suitable lightweight craft sphere.
5. Why does my crochet circle curl?
A circle may curl if it does not have enough increases or if your tension is too tight. Check the stitch count and compare the number of increases with the pattern. A small amount of curling at the beginning can sometimes be corrected as the work grows, but persistent curling usually indicates that the stitch count or hook size needs adjustment.
6. How do I keep the stuffing from showing through?
Use a smaller crochet hook if necessary, maintain even tension, and avoid stretching the stitches while adding fiberfill. Stuff the ornament gradually rather than forcing large amounts into the opening. A dense single crochet fabric is generally effective for keeping the filling concealed.
7. Can I use different colors in the same ornament?
Absolutely. Stripes, contrasting hanging loops, and embroidered snowflakes are all attractive choices. You can change yarn colors between rounds or add decorative details after the bauble has been completed. Secure all yarn ends carefully to prevent the decoration from unraveling.
8. How can I make the ornament larger or smaller?
Adjust the increase rounds to change the width, then adjust the number of even rounds to change the height. A smaller ornament can be made by stopping the increases earlier, while a larger one may need additional increase rounds and a longer middle section. Maintain a balanced increase and decrease sequence to preserve the rounded shape.
9. Can these crocheted baubles be washed?
Care depends on the yarn and any additional decorations. If the ornament is made from washable yarn, gentle spot cleaning is often a practical choice. Avoid soaking ornaments containing materials that may retain moisture, lose their shape, or become damaged. Allow the ornament to dry completely before storing it.
10. How do I store crochet Christmas ornaments after the holidays?
Store the ornaments in a clean, dry container away from direct sunlight and excessive heat. Avoid placing heavy objects on top of them, since pressure can flatten the stuffing. Keep delicate embroidery and hanging loops from becoming tangled by placing the ornaments in separate compartments or wrapping them loosely in soft tissue paper.
Conclusion
The Crochet Christmas bauble ornament pattern offers a fun and rewarding way to create handmade decorations for the holiday season. In this tutorial, you learned how to select suitable yarn and tools, work a magic ring, increase stitches to create the rounded shape, crochet the middle section, and decrease gradually to close the ornament. You also learned how to add stuffing, secure the final stitches, create a hanging loop, and personalize the bauble with festive colors and decorative details.
With a few basic crochet skills and some creativity, you can make a collection of ornaments that complements your Christmas tree, enhances a wreath, or becomes a thoughtful handmade gift. Experiment with different yarn colors, textures, and sizes to discover combinations that reflect your personal style. Remember to count your stitches, maintain consistent tension, and secure all yarn ends for a neat and durable result.
I would love to hear your honest opinion about this Crochet Christmas bauble ornament pattern. Have you tried making crocheted Christmas ornaments before, or do you have a favorite color combination or finishing technique to recommend? Leave your comments, experiences, and suggestions below. Your ideas may inspire other crochet enthusiasts to create their own beautiful handmade decorations!