
A Crochet heart coaster pattern is a lovely way to combine creativity, practicality, and handmade charm in a single small project.
One of the best things about this crochet heart coaster pattern is that it can be adapted to different colors, yarn textures, and decorative styles.
Another advantage of making a crochet heart coaster is that it does not require a large amount of material or an extensive time commitment. It is an excellent project for using leftover cotton yarn from previous crochet creations. The pattern can also be repeated easily, allowing you to make matching sets for your home or prepare several handmade gifts. In this guide, you will learn about the necessary materials, important crochet techniques, stitch abbreviations, and a detailed step-by-step process for creating your own heart-shaped coaster. By following the instructions carefully, you can achieve a neat shape, balanced stitches, and a beautiful finished accessory.
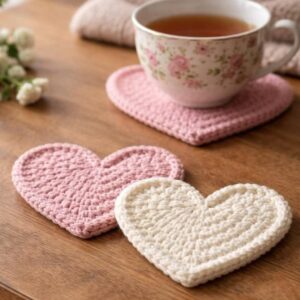
Materials and Crochet Techniques for Your Heart Coaster
Before beginning your Crochet heart coaster pattern, organize all the materials you will need. Having everything nearby makes the process easier and helps you maintain consistent stitches throughout the project. The materials are simple and affordable, making this an accessible craft for different skill levels.
Cotton yarn is the recommended choice for this project because it is durable, absorbent, and suitable for everyday use. Choose medium-weight cotton yarn or another yarn that produces a firm fabric. Avoid yarn that is excessively fluffy because it may make the heart shape less defined.
For a standard coaster, prepare approximately 20 to 30 grams of cotton yarn, depending on the thickness and final dimensions. You can use one color for a classic appearance or combine two colors to create a decorative edge.
You will also need a crochet hook that matches your yarn. A hook between 3.5 mm and 4.5 mm is a useful starting point for many medium-weight cotton yarns. Check the yarn label and adjust the hook size if your stitches appear too loose or too tight.
Additional materials include scissors, a yarn needle, and a measuring tape. The yarn needle will help you hide loose ends neatly, while the measuring tape allows you to check whether your coaster has reached your preferred size.
Understanding the basic crochet abbreviations will make the instructions easier to follow. This pattern uses the following American crochet terminology:
- ch: Chain stitch.
- sl st: Slip stitch.
- sc: Single crochet.
- hdc: Half double crochet.
- dc: Double crochet.
- tr: Treble crochet.
- st: Stitch.
- inc: Increase, meaning two stitches worked into the same stitch.
- MR: Magic ring.
The magic ring is a useful technique for starting crochet projects in a closed circle. If you find it difficult, you can replace it with a small chain loop and work the stitches into that loop.
For this heart-shaped design, you will use a combination of short and tall stitches. Short stitches create a firm outline, while taller stitches help form the rounded upper sections and the pointed bottom of the heart.
Maintaining consistent tension is especially important. If your stitches are too loose, the coaster may become floppy and lose its shape. If they are too tight, the fabric may curl or become difficult to work with.
Before starting, remember that the finished coaster should lie reasonably flat on a table. You can adjust your hook size or tension as needed to achieve a balanced result.
Step-by-Step Crochet Heart Coaster Pattern
Now it is time to begin the actual Crochet heart coaster pattern. The instructions below describe a decorative heart-shaped coaster worked in rounds, starting from the center and gradually developing the recognizable heart silhouette.
Step 1: Create the center foundation.
Start with a magic ring using your chosen cotton yarn. If you prefer, chain 4 and join the first and last chains with a slip stitch to form a small ring.
Work 12 double crochet stitches into the ring. Pull the magic ring closed if you used that method, and join the round with a slip stitch into the first double crochet.
You should now have a small circular center. This foundation will support the upper curves and lower point of your heart.
Step 2: Build the first rounded section.
Chain 1 to begin the next round. Work 1 single crochet into the next stitch, followed by 2 half double crochet stitches in the following stitch.
Continue with 2 double crochet stitches in the next stitch, followed by 2 treble crochet stitches in the following stitch.
This combination of stitches creates the height needed to form one of the rounded upper sections of the heart. Keep your stitches relaxed but consistent.
Step 3: Form the upper curves.
Continue around the foundation, repeating the gradual increase in stitch height on the opposite side. Work the stitches in a balanced arrangement so that both upper sections have similar proportions.
A useful sequence for shaping is:
- 1 sc in the next stitch.
- 2 hdc in the next stitch.
- 2 dc in the next stitch.
- 2 tr in the next stitch.
Repeat the corresponding sequence on the opposite side of the heart. Adjust the placement according to your starting point so that the two curves remain symmetrical.
Step 4: Create the central indentation.
The small dip at the top of the heart is one of the most recognizable features of this design. To create it, work a slip stitch in the central joining area between the two rounded sections.
This stitch helps define the indentation and separates the two upper curves visually. Avoid pulling the yarn too tightly, as excessive tension may cause the center to fold inward.
Step 5: Shape the lower point.
As you continue along the lower portion, use double crochet and treble crochet stitches to create a gradual taper toward the bottom.
Work the stitches in a balanced sequence, making sure that the lower point is centered beneath the two rounded sections. The exact placement depends on your foundation and tension.
If the bottom looks too rounded, adjust the stitch placement by concentrating the taller stitches around the lower center and using shorter stitches along the sides.
Step 6: Finish the outer edge.
For a neat finish, work single crochet stitches around the entire heart. Place approximately one stitch in each stitch along the upper curves and sides, adjusting the spacing around the corners and lower point.
At the top indentation, use a slip stitch if necessary to keep the shape defined. Join the final stitch with a slip stitch, cut the yarn, and leave a small tail.
Use your yarn needle to weave the tail through several stitches on the wrong side. Repeat with any remaining loose ends.
Step 7: Check the shape and dimensions.
Place the coaster on a flat surface and gently arrange the edges with your fingers. A typical finished heart coaster measures approximately 4 to 5 inches across, although the final size depends on your yarn and hook.
If the piece curls, check your tension and consider blocking it lightly. If the edges look uneven, adjust the border before weaving in all the ends.
Step 8: Add optional decorative details.
You can leave the heart simple or add a contrasting border using a different yarn color. A row of slip stitches or single crochet stitches in a contrasting shade creates a lovely decorative outline.
Small embroidered details are another possibility, provided they do not make the coaster surface uneven. Avoid bulky decorations where cups and glasses will rest.
This step-by-step Crochet heart coaster pattern gives you a practical foundation for creating a handmade accessory that can be repeated in different colors and sizes.
Finishing, Customization, and Care Tips for Crochet Heart Coasters
Once your crochet heart coaster is complete, spend a few minutes checking its overall appearance. A carefully finished project looks more professional and is generally more enjoyable to use. Look for loose yarn ends, uneven stitches, and areas where the outline may need a little adjustment.
Blocking can help improve the final shape. Lightly dampen the coaster with water, remove excess moisture with a clean towel, and arrange it on a flat surface. Gently adjust the rounded sections and pointed bottom until the heart looks symmetrical.
Allow the coaster to dry completely before using it. Avoid stretching the fabric excessively because this can distort the stitches and change the original dimensions.
Color selection is another way to personalize this project. Red and pink are traditional choices for romantic decorations, while cream, beige, and brown create a more understated appearance. Pastel colors are especially attractive for spring and handmade gifts.
You can also create a coordinated collection using several shades. For example, make one red heart, one pink heart, one cream heart, and one lavender heart. Together, these coasters create an attractive handmade set for a coffee table or dining area.
If you want to make a slightly larger coaster, use a thicker cotton yarn or a larger crochet hook. However, remember that changing the hook size may also affect the firmness of the finished fabric.
For smaller coasters, choose a thinner cotton yarn and a proportionally smaller hook. Always check that the finished stitches remain dense enough to support a cup or glass.
Another creative option is to experiment with the border. A simple single crochet edge provides a clean finish, while a contrasting slip stitch border creates a subtle decorative effect. You can also use a second yarn color for the final round.
When caring for your handmade coaster, follow the washing instructions provided with your yarn. Many cotton coasters can be gently hand-washed or machine-washed on a delicate cycle, depending on the yarn specifications.
Use mild detergent and avoid excessive heat during drying. High temperatures can affect the shape and texture of some yarns, so allowing the coaster to air-dry is often a good option.
If the coaster becomes slightly misshapen after washing, reshape it while damp and allow it to dry flat. Regular care helps maintain its appearance and makes the handmade accessory more suitable for everyday use.
These small details make a difference when preparing multiple coasters as gifts. A matching set with consistent dimensions, coordinated colors, and neatly finished edges looks thoughtful and carefully crafted.
Creative Uses, Common Mistakes, and Frequently Asked Questions
A Crochet heart coaster pattern offers many possibilities beyond its original purpose. These handmade hearts can be used as decorative accents on coffee tables, bedside tables, office desks, and kitchen surfaces.
They are also suitable for gift baskets. Combine a set of heart coasters with a handmade mug cozy or a small fabric gift bag to create a thoughtful present for someone special.
Another idea is to use several hearts as part of seasonal home decorations. Red and pink versions are perfect for Valentine’s Day, while cream and pastel designs work beautifully throughout the year.
You can even make a collection in different colors for a handmade craft fair. Simple, practical crochet projects are attractive because they are relatively quick to produce and can be customized according to different preferences.
However, beginners sometimes encounter difficulties while making heart-shaped crochet pieces. One common problem is an uneven shape. This usually happens when the increases are not distributed symmetrically or when stitch tension changes during the project.
Another common mistake is using too much tension around the central indentation. If the center is pulled too tightly, the heart may develop an exaggerated dip or begin to fold inward.
A coaster that curls at the edges may have stitches that are too tight or insufficient increases. Checking the fabric after each round makes it easier to correct these problems before completing the project.
If your coaster looks too loose, consider using a smaller hook. If the stitches feel difficult to work into, try a slightly larger hook and check your tension.
Frequently Asked Questions
1. Is the crochet heart coaster pattern suitable for beginners?
Yes! This project is suitable for beginners who already understand basic crochet stitches. The instructions introduce simple techniques such as chain stitches, single crochet, half double crochet, and double crochet. Taking your time with the shaping process will help you achieve a beautiful result.
2. What is the best yarn for a crochet heart coaster?
Cotton yarn is generally the best option because it is absorbent, durable, and easy to maintain. It also produces a firm fabric that helps the coaster retain its shape. Medium-weight cotton yarn is a practical starting point.
3. How much yarn do I need to make one heart coaster?
Approximately 20 to 30 grams of cotton yarn is usually sufficient for a standard-sized coaster. The exact amount depends on the yarn thickness, hook size, stitch tension, and finished dimensions.
4. What crochet hook size should I use?
A hook between 3.5 mm and 4.5 mm is a useful starting range for medium-weight cotton yarn. Always consider the yarn label and make a small sample if you are unsure about the appropriate hook size.
5. How long does it take to crochet a heart coaster?
The time varies according to your experience and working speed. An experienced crocheter may complete one coaster in approximately 30 to 60 minutes, while a beginner may need more time to practice the stitches and shaping.
6. Why does my crochet heart coaster curl?
Curling can happen when the stitches are too tight, the increases are insufficient, or the hook size is too small. Try adjusting your tension, changing the hook size, and checking the shape as you work.
7. How can I make both sides of the heart symmetrical?
Pay close attention to the placement of your stitches, especially around the upper curves and lower point. Following the same stitch sequence on both sides and counting stitches regularly will help create a balanced shape.
8. Can I use acrylic yarn instead of cotton?
Yes, acrylic yarn can be used for decorative coasters. However, cotton is generally preferable for everyday use because it is absorbent and handles warmth better than many synthetic yarns. Always follow the yarn manufacturer’s care and temperature recommendations.
9. Can I wash handmade crochet heart coasters?
Most cotton crochet coasters can be washed gently, but you should always check the yarn care label first. Use mild detergent, avoid excessive heat, and reshape the coaster while damp if necessary.
10. How can I make my crochet heart coaster larger?
You can use thicker yarn, a larger crochet hook, or add another carefully planned round of stitches. Remember that increasing the size may require adjusting the shaping to preserve the heart silhouette.
11. Can I make a crochet heart coaster in different colors?
Absolutely! Red, pink, lavender, cream, white, and pastel shades are popular choices. You can also use one color for the main heart and another for the border to create a personalized design.
12. Are crochet heart coasters good handmade gifts?
Yes. They are practical, attractive, and easy to customize. A set of matching heart coasters makes a thoughtful gift for birthdays, Valentine’s Day, Mother’s Day, anniversaries, housewarmings, and other celebrations.
13. How do I keep my crochet coaster flat?
Maintain consistent tension, distribute increases evenly, and avoid pulling the stitches too tightly. After finishing, lightly block the coaster if needed and allow it to dry flat.
14. Can I sell handmade crochet heart coasters?
Yes, you can make and sell your own finished crochet coasters. Choose durable materials, maintain consistent quality, and calculate the cost of yarn and your working time when setting a price.
15. What can I do with leftover cotton yarn?
Leftover cotton yarn is perfect for making additional heart coasters in different colors. You can combine the finished pieces into coordinated sets, create seasonal collections, or use them as small handmade gifts.
Conclusion
Creating a Crochet heart coaster pattern is a wonderful way to transform a small amount of yarn into a beautiful and useful handmade decoration. Throughout this tutorial, you learned about the recommended materials, basic crochet abbreviations, stitch techniques, and the step-by-step process for shaping a heart coaster. You also discovered how to create a neat border, improve the finished shape, choose attractive color combinations, and care for your handmade piece.
The best part of this project is its versatility. You can follow the same basic idea to create several coasters in different colors, prepare thoughtful gifts, or add a charming handmade touch to your home. Remember that practice makes a difference, and every new piece gives you another opportunity to improve your crochet skills.
Now it is your turn to pick up your hook and start creating! If you try this crochet heart coaster pattern, please leave your honest opinion in the comments. We would love to know how your project turned out, which colors you chose, and whether you have any suggestions or creative ideas for improving this design. Your feedback and experiences can inspire other crochet enthusiasts to enjoy this lovely handmade project!