
The Patchwork Fish Rug Pattern is a charming and creative sewing project that transforms colorful fabric pieces into a decorative fish-shaped rug.
Creating a Patchwork Fish Rug Pattern is also a wonderful way to explore different fabric combinations, experiment with shapes, and practice basic sewing techniques.
In this tutorial, you will learn how to plan, cut, assemble, and finish your own Patchwork Fish Rug Pattern, following a practical step-by-step process inspired by the fish-shaped patchwork project in the reference design. The instructions explain the materials you may need, how to prepare the fabric pieces, how to create the fish outline, and how to assemble the different sections into a finished rug. Even if you are relatively new to sewing, taking your time and following each stage carefully can help you achieve a beautiful handmade result.
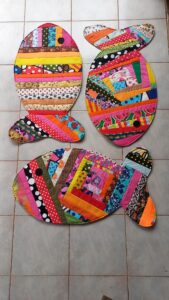
Materials and Preparation for the Patchwork Fish Rug Pattern
Before beginning your Patchwork Fish Rug Pattern, organize all the materials needed for the project. Preparing everything in advance makes the sewing process easier and helps prevent interruptions while assembling the different fabric sections. You do not need expensive supplies to create this decorative rug, especially if you already have fabric remnants from previous sewing or quilting projects.
For the main patchwork surface, choose several pieces of cotton fabric, quilting fabric, or other suitable woven materials. Combining different prints can create the colorful appearance that makes a Patchwork Fish Rug Pattern so appealing. Floral prints, geometric designs, polka dots, stripes, and solid colors can all work beautifully together.
You will also need a backing fabric to cover the underside of the rug. A sturdy cotton fabric or another suitable woven material can provide a clean finish. For additional thickness and comfort, consider using batting or a layer of washable padding between the patchwork top and the backing. Choose materials appropriate for the intended floor surface and make sure the finished rug remains stable.
Other useful supplies include a sewing machine, matching thread, fabric scissors or a rotary cutter, a cutting mat, a measuring ruler, pins or sewing clips, a fabric marking pen, and an iron. A paper pattern or large sheet of paper will also help you draw and adjust the fish silhouette before cutting the fabric.
Start by washing and drying washable fabrics before cutting them, particularly when combining materials from different sources. This preparation helps reduce the possibility of uneven shrinkage after the rug is completed. Press each piece with an iron to remove wrinkles and make accurate measurements easier.
Next, decide how large you want your Patchwork Fish Rug Pattern to be. A small version can work as a decorative accent, while a larger design may be suitable for a spacious room. Remember that the fish silhouette includes a head, body, tail, and fins, so consider the proportions of each section when drawing the pattern.
Draw the complete fish shape on paper, including a rounded or slightly pointed head, an elongated body, a tail, and decorative fins. You can create a simple outline using curved lines and triangular shapes. Keep the design balanced so that the tail and fins complement the body rather than making the rug difficult to assemble.
Once the outline is ready, divide the body into smaller geometric sections. These sections will become the individual patchwork pieces. You can use rectangles, squares, triangles, and irregular fabric shapes, depending on the appearance you want. Number the paper sections or make a simple layout sketch to remember where each fabric piece belongs.
Cutting and Assembling the Patchwork Fish Rug Pattern
The first important stage of constructing your Patchwork Fish Rug Pattern is preparing the fabric pieces. Place your selected fabrics on a flat surface and organize them according to color, print, or texture. This makes it easier to visualize the final composition before sewing anything together.
Using your paper template as a guide, cut the fabric into manageable sections. If you are creating a patchwork body with several geometric pieces, remember to include seam allowances along the edges. A seam allowance of approximately 1/4 inch to 1/2 inch can work, depending on your preferred sewing method and the thickness of the material.
Begin assembling the patchwork body by joining two fabric pieces with their right sides facing each other. Pin or clip the edges together and sew along the marked seam line. Open the pieces and press the seam carefully with an iron. Pressing as you work helps keep the patchwork surface smooth and prevents unnecessary bulk.
Continue adding the remaining fabric sections one at a time. Follow your layout sketch to maintain the intended color arrangement. If the design contains contrasting fabrics, distribute them evenly throughout the body so that one area does not appear noticeably heavier than the others.
When several pieces have been joined, compare the patchwork section with your paper fish template. Trim uneven edges carefully and check whether the assembled fabric is large enough to cover the main body shape. If necessary, add another patchwork section before cutting the final silhouette.
Now prepare the tail and fins. These elements can be made using matching fabrics or contrasting prints to emphasize the fish shape. Cut the tail according to your paper template, remembering to leave enough seam allowance. The fins can be created from simple curved or triangular shapes, depending on the design.
If you want a more structured appearance, consider adding interfacing to the tail and fins. This can help the smaller sections maintain their shape during assembly. Choose an interfacing appropriate for your fabric and the desired flexibility of the finished rug.
Once the body, tail, and fins are ready, arrange them on a flat surface to check their proportions. Make sure the pieces meet neatly and that the overall silhouette resembles the intended fish design. Adjust the edges before proceeding to the next stage.
Sewing, Quilting, and Finishing the Patchwork Fish Rug Pattern
With the patchwork sections prepared, you can begin assembling the complete Patchwork Fish Rug Pattern. Place the body, tail, and fins according to your template. If the design uses separate pieces, join the corresponding sections carefully, keeping the seam allowances consistent.
Prepare the backing by placing it on a flat surface with the right side facing down. Position the batting or padding over it, if you are using one. Then place the patchwork top over the batting with the right side facing up. Smooth all three layers gently to remove wrinkles and make sure the edges are aligned.
Secure the layers with sewing clips, safety pins suitable for quilting, or temporary fabric basting. Start securing the center and gradually move toward the outer edges. This helps prevent the layers from shifting while you sew.
Next, stitch the layers together using a sewing machine. You can follow the existing patchwork seams to create a simple quilting effect. Another option is to sew parallel lines or gentle curved lines that follow the shape of the fish body. Choose a quilting arrangement that complements the fabric patterns without making the surface too busy.
If your Patchwork Fish Rug Pattern includes decorative fins and a tail, add the finishing stitches around these areas carefully. Reinforce the seams where different sections meet because these areas may experience additional movement during regular use. Keep the stitching neat and avoid pulling the fabric too tightly.
After quilting, trim excess batting and backing fabric around the fish outline. Leave enough material for the binding or finishing edge. Use your paper template or the patchwork top as a guide to maintain the original silhouette.
Prepare fabric strips for binding. You can use a single coordinating color or combine different scraps for a more colorful border. Fold the strips according to your preferred binding technique, press them, and attach them around the outer edge of the rug.
Sew the binding securely, paying special attention to the corners, tail, and fin sections. Curved areas may require shorter stitches and careful handling to prevent puckering. If necessary, use clips to hold the binding in position while sewing.
Once the binding is attached, inspect the entire rug. Check for loose threads, unfinished seams, skipped stitches, and uneven edges. Remove excess thread and make any small corrections needed. Press the finished project gently, following the care instructions for the fabrics used.
For a rug intended for floor use, consider adding a suitable non-slip backing or placing it over an appropriate rug pad. Avoid relying on ordinary fabric alone to prevent slipping. Make sure the backing is compatible with your floor material and does not damage its surface.
Creative Ideas, Care Tips, and Frequently Asked Questions About the Patchwork Fish Rug Pattern
One of the most enjoyable aspects of the Patchwork Fish Rug Pattern is the opportunity to customize the design. You can create a traditional fish-inspired appearance using blue, green, and turquoise fabrics, or choose warm colors such as orange, yellow, and red for a more vibrant result.
Another possibility is to use fabrics with marine-inspired prints. Small waves, shells, dots, and abstract patterns can give the rug a playful appearance without requiring complicated sewing techniques. If you prefer a more understated design, use neutral fabrics with occasional colorful sections.
You can also experiment with the size and arrangement of the patchwork pieces. Larger fabric sections create a simpler composition, while smaller pieces produce a more detailed appearance. Beginners may find it easier to start with a limited number of geometric shapes before attempting more complicated layouts.
Personalized details can make your handmade rug even more special. For example, you could add embroidered scales, a decorative eye, or small fabric appliqués. Make sure that any additional decorations are securely attached and suitable for the rug’s intended use.
Proper maintenance will help preserve the appearance of your finished project. Before cleaning, check the care instructions for every fabric, batting, and backing material used. Some combinations may be suitable for gentle machine washing, while others may require spot cleaning or hand washing.
Avoid using excessive heat when ironing the finished rug, especially if it contains synthetic padding or decorative materials. If the rug becomes damp, allow it to dry completely before placing it back on the floor. Regularly inspect the backing and binding to make sure that everything remains secure.
Frequently Asked Questions
1. What is a Patchwork Fish Rug Pattern?
A Patchwork Fish Rug Pattern is a sewing project in which different fabric pieces are joined together to create a decorative rug shaped like a fish. The design combines traditional patchwork techniques with a playful silhouette, making it suitable for colorful handmade home décor.
2. Is the Patchwork Fish Rug Pattern suitable for beginners?
Yes. Beginners can make this project by starting with simple fabric shapes and basic straight seams. Preparing a paper template and organizing the fabric pieces before sewing can make the process much easier. It is also helpful to practice joining a few fabric scraps before assembling the complete rug.
3. What fabrics should I use for a patchwork fish rug?
Cotton and quilting fabrics are practical choices because they are generally easy to cut, sew, and press. You can combine different prints and solid colors to create an interesting patchwork effect. For a rug intended for frequent use, choose durable materials that are appropriate for the intended floor surface.
4. Can I use leftover fabric scraps?
Absolutely. Using fabric scraps is one of the main advantages of a patchwork project. You can combine leftover materials from previous sewing projects, provided they are clean, suitable for the intended use, and reasonably compatible in weight and construction.
5. How do I make the fish shape look balanced?
Create a paper template before cutting your fabric. Pay attention to the proportions between the head, body, tail, and fins. Arrange the pieces on a flat surface and make adjustments before sewing them together. This simple preparation can help produce a more recognizable fish silhouette.
6. Do I need batting for the Patchwork Fish Rug Pattern?
Batting is optional, but it can provide additional thickness and a softer feel. If you choose to use it, select a material suitable for the intended purpose and make sure the finished rug does not become too bulky or unstable.
7. How can I prevent the patchwork pieces from moving while sewing?
Use pins or sewing clips to secure the fabric before stitching. For larger sections, temporary basting can help keep the layers aligned. Sewing slowly and pressing the seams between steps also contributes to a neater result.
8. How can I finish the edges of the fish rug?
Fabric binding is a practical finishing technique. Cut strips of coordinating fabric, fold them, and sew them around the outer edge. Carefully follow the curves of the fish silhouette and reinforce areas where the tail and fins meet the body.
9. Can I customize the colors and dimensions?
Yes. One of the best features of this project is its flexibility. You can adjust the size of the fish, change the proportions, use different fabric prints, and experiment with various color combinations. Just remember to adapt the paper template and fabric measurements to your chosen dimensions.
10. How do I keep the rug from slipping?
Use a compatible non-slip rug pad or an appropriate non-slip backing designed for the floor material. Check the manufacturer’s instructions to make sure the product is safe for your flooring. Keep the rug flat and avoid placing it on a surface where it may slide.
11. Can I wash a handmade patchwork fish rug?
That depends on the materials used. Check the care instructions for the fabric, batting, binding, and backing before washing. If the materials are washable, use an appropriate gentle cleaning method. When you are unsure, spot cleaning may be a safer option.
12. How long does it take to complete this sewing project?
The time varies according to the rug’s dimensions, the number of patchwork pieces, and your sewing experience. A simple design may take less time than one with many small sections and decorative details. Preparing the materials and template in advance can make the process more efficient.
Conclusion
Creating a Patchwork Fish Rug Pattern is a rewarding way to transform fabric scraps into a beautiful handmade decoration. Throughout this tutorial, we explored how to choose suitable materials, prepare a fish-shaped template, cut and organize patchwork sections, assemble the body, and create the tail and fins. We also covered the importance of quilting, attaching the backing, finishing the edges with binding, and choosing appropriate materials to improve the rug’s durability and stability.
The most important part of this project is taking your time with each stage. Careful measurements, organized fabric arrangements, secure stitching, and thoughtful finishing techniques can make a significant difference in the final appearance. You can also personalize your fish rug with different colors, prints, sizes, and decorative details to create a design that reflects your own creativity.
We hope this Patchwork Fish Rug Pattern tutorial inspires you to explore new patchwork possibilities and enjoy the process of making something with your own hands. If you try this project, please leave your honest opinion in the comments. We would also love to hear your suggestions, favorite fabric combinations, and ideas for improving this handmade design. Your feedback can inspire other sewing enthusiasts to create their own beautiful patchwork projects!