
The Pattern for a Wallet Made from Denim is a practical and creative sewing project that transforms an old pair of jeans into a useful accessory for everyday life.
One of the most appealing features of a denim wallet pattern is its versatility. You can choose different shades of denim, combine pieces from several pairs of jeans, add decorative stitching, or include a small fabric lining to create a personalized finish.
This wallet made from denim can be adapted to different styles and needs. You might prefer a simple folded wallet with a few card slots, or a slightly larger design with a zipper pocket for coins. Beginners can start with a basic rectangular shape and gradually add more compartments as their sewing skills improve. The instructions below explain how to prepare the materials, measure and cut the fabric, assemble the wallet, and add finishing details. With patience and careful measurements, you can create a durable handmade accessory that is both attractive and functional.
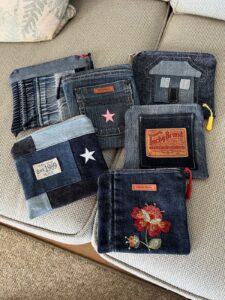
Materials and Preparation for Your Denim Wallet Pattern
Before starting the Pattern for a Wallet Made from Denim, gather all the materials needed for the project. You will need a clean pair of old jeans or denim scraps, a coordinating cotton fabric for the lining, sewing thread, scissors, pins or fabric clips, a ruler, tailor’s chalk, and a sewing machine or hand-sewing needle. Choose denim that is in good condition, without large holes or areas that are too thin.
For this DIY denim wallet, medium-weight denim is a convenient choice because it provides structure without making the finished accessory excessively bulky. If your jeans are particularly thick, avoid using several heavy layers in the same area. A lighter cotton fabric can be used for the inner compartments, helping the wallet fold more easily and making the card pockets less bulky.
Begin by washing and drying the old jeans before cutting them. This removes dirt and helps prevent unexpected shrinkage after the wallet has been assembled. Iron the denim and lining fabric so that both materials are smooth and easier to measure. If you want to reuse an existing jeans pocket as a decorative feature, carefully remove it with a seam ripper and set it aside for later.
For a basic folded wallet, prepare one main denim rectangle measuring approximately 9 inches by 7 inches. This piece will form the outer body of the wallet. You will also need a lining rectangle of the same size, two card-pocket pieces measuring approximately 4.5 inches by 4 inches each, and one additional fabric rectangle measuring approximately 4.5 inches by 3.5 inches for a small extra pocket. These are suggested measurements and can be adjusted to suit your preferred wallet dimensions.
Before cutting, remember that the measurements include a seam allowance of approximately 1/4 inch unless otherwise indicated. Mark each piece carefully with tailor’s chalk or a washable fabric marker. Use a ruler to check that the corners are square and the edges are straight. Accurate cutting at this stage will make the sewing process much easier and help the finished handmade denim wallet look neat.
Finally, organize the pieces according to their function. Keep the outer denim rectangle separate from the lining and pocket pieces. If you are using different shades of denim, arrange them before sewing to decide how the colors will look together. This simple preparation step helps you visualize the final design and prevents mistakes during assembly.
Step-by-Step Instructions for Sewing a Wallet Made from Denim
Start by preparing the card pockets. Take the two smaller pocket rectangles and fold the top edge of each piece toward the wrong side by approximately 1/4 inch. Fold it again to enclose the raw edge, press the fold with an iron, and sew a straight line along the folded edge. This creates a clean opening that is less likely to fray with regular use.
Next, position the first card-pocket piece on the right side of the lining fabric. Place it approximately 1 inch from the bottom edge, making sure it is centered from left to right. Pin or clip the sides and bottom in place. Sew along the two sides and the bottom edge, leaving the top open. Repeat this process with the second pocket, positioning it slightly above or overlapping the first pocket according to the amount of space available.
For the additional pocket, take the smaller rectangle and finish its upper edge using the same double-fold method. Position it on the opposite side of the lining if you want a separate compartment for folded notes or small receipts. Sew along its sides and bottom, leaving the top open. Make sure the stitching is secure, but avoid sewing through any area that should remain accessible.
Now prepare the outer body of the denim wallet sewing pattern. Place the denim rectangle on your work surface with the right side facing upward. If you want to add a decorative jeans pocket, position it on the outer panel and check that it does not interfere with the wallet’s folding line. Sew around the sides and bottom of the decorative pocket, leaving its original opening accessible. Reinforce the upper corners with a few extra stitches.
Place the completed lining and outer denim rectangle together, with their right sides facing each other. Align all four edges and secure them with pins or clips. Sew around the perimeter using a 1/4-inch seam allowance, leaving an opening of approximately 3 inches along one edge. This opening will allow you to turn the wallet right side out. Sew slowly around the corners to maintain an even shape.
Carefully trim excess fabric from the corners without cutting through the stitching. Turn the wallet through the opening and gently push out the corners using a blunt, suitable tool. Avoid using sharp objects that could puncture the fabric or damage the seams. Fold the raw edges of the opening inward, press the entire wallet flat, and sew the opening closed with a neat line of topstitching.
Adding Structure, Closures, and Decorative Details
Once the main body of the wallet made from denim has been assembled, check how it folds. Place the wallet flat with the lining facing upward, then fold the left and right sides toward the center. Adjust the folds so that the wallet closes evenly without putting too much pressure on the pockets. Press the fold lines gently with an iron, following the care instructions for the fabrics you selected.
If you want a more structured wallet, you can add lightweight fusible interfacing between the outer denim and lining. Cut the interfacing to the same dimensions as the main panels, then apply it according to the manufacturer’s instructions. Choose a lightweight product because thick interfacing combined with denim can make the wallet difficult to fold. Test a small fabric sample first if you are unsure how the materials will respond to heat.
A closure can make the wallet more practical. One simple option is a small sew-on snap fastener. Mark the center of the front flap and the matching position on the opposite side before attaching the two parts. Follow the fastener’s instructions and reinforce the fabric around the attachment points if necessary. Another option is a short fabric tab with a button and buttonhole, which creates a classic handmade appearance.
You can also personalize the DIY denim wallet with decorative stitching. Use a contrasting thread color to highlight the edges, outline a pocket, or create a simple geometric design. Neutral thread produces a subtle finish, while golden, white, or colorful thread can create a more noticeable detail. Keep decorative stitching away from the areas where cards or folded cash will be inserted.
If you have leftover denim from the same jeans, consider adding a small label or fabric loop. A narrow denim strip can be folded lengthwise, stitched along its edge, and attached to an outer seam before the wallet is turned right side out. This small detail can make the accessory easier to hold or identify. Make sure that any added loop is securely attached and does not interfere with the wallet’s closure.
Before considering the project complete, inspect every seam and pocket. Check that the card compartments are wide enough for the cards you intend to carry and that the wallet folds without excessive resistance. Remove loose threads and reinforce any stitching that looks weak. A careful final inspection helps your recycled denim wallet remain functional through regular use.
Customization Ideas, Care Tips, and Common Questions
One advantage of the Pattern for a Wallet Made from Denim is that it can be customized in many ways. You can use dark denim for a classic appearance, faded blue fabric for a casual look, or combine different denim shades to create a patchwork effect. If you have several small scraps, arrange them into a larger panel and stitch them together before cutting the wallet body. This is a useful way to use fabric pieces that might otherwise be discarded.
Another idea is to create a minimalist wallet with fewer compartments. Instead of adding several pockets, use one or two card slots and a central space for folded notes. This design requires less fabric and is easier to sew, especially for beginners. A compact wallet can also be a good choice when you want a lightweight accessory that fits comfortably into a small bag.
For a more decorative version, consider adding embroidery or small fabric appliqués. Simple flowers, initials, stars, or geometric shapes can give the wallet an individual character. If you use appliqué, finish the edges carefully so that the decoration does not begin to lift with regular handling. Keep embellishments flat and secure to avoid making the wallet unnecessarily bulky.
To care for your handmade denim wallet, remove loose dirt with a soft brush or slightly damp cloth. If the wallet needs a more thorough cleaning, check the care requirements of all materials, including the lining, interfacing, and closure. Avoid aggressive washing methods that could weaken the seams or damage decorative details. Allow the wallet to dry completely before using it again.
FAQ: Frequently Asked Questions About a Wallet Made from Denim
1. Can beginners make a wallet from old jeans?
Yes. A basic denim wallet pattern is suitable for beginners who know how to sew a straight line. Start with a simple folded design, use clear measurements, and avoid adding too many compartments during your first attempt. Practicing on fabric scraps before sewing the final pieces can also help you become more comfortable with the process.
2. What type of denim is best for this project?
Medium-weight denim is generally a practical option because it provides durability while remaining manageable to sew. Very thick denim can create bulky seams, especially where several layers overlap. If you only have heavy denim, use thinner cotton fabric for the lining and inner pockets.
3. Can I make this wallet without a sewing machine?
Yes. You can sew a wallet made from denim by hand using a strong needle and durable thread. Use small, even stitches and reinforce areas that receive frequent pressure, such as pocket corners and closure points. Hand sewing takes longer, but it allows you to complete the project without a machine.
4. How many card slots should a denim wallet have?
The number depends on the size of the wallet and your needs. A small wallet may have two or three card compartments, while a larger design can include additional slots. Remember that every extra pocket adds fabric layers and bulk, so plan the layout before sewing.
5. Can I use the original pockets from my jeans?
Yes. Reusing an original jeans pocket is a creative way to add a functional or decorative detail. Carefully remove the pocket, check that its fabric is still strong, and sew it onto the wallet panel before assembling the outer body. Make sure the pocket does not interfere with the folding area.
6. How can I prevent the wallet from becoming too thick?
Use lightweight lining fabric, limit the number of overlapping denim layers, and avoid heavy interfacing. Trim excess seam allowances carefully and distribute pockets evenly. A simple design with fewer compartments is often more comfortable to fold and carry.
7. Can I add a zipper pocket for coins?
Yes. A zipper pocket can be added to a larger version of the wallet. Choose a small zipper and install it in a separate fabric panel before attaching that panel to the lining. Beginners may find it easier to practice inserting a zipper on a scrap piece first.
8. How can I make the wallet look more professional?
Accurate cutting, even stitching, neat corners, and consistent seam allowances make a significant difference. Press the fabric during assembly, use a suitable thread, and finish all raw edges carefully. A coordinated lining and simple decorative topstitching can also improve the final appearance.
Conclusion
Creating a Pattern for a Wallet Made from Denim is a rewarding way to transform old jeans into a useful handmade accessory. In this tutorial, you learned how to prepare recycled denim, select suitable lining fabric, measure and cut the pieces, sew card compartments, assemble the wallet body, and add practical finishing details such as closures and decorative stitching. You also discovered how small changes in color, pocket placement, and fabric combinations can make each wallet unique.
The most important part of this project is taking your time with the measurements and checking each seam as you work. Whether you choose a simple design or add extra compartments, your wallet made from denim can reflect your personal style while making good use of leftover fabric.
I would love to hear your sincere opinion about this tutorial. Share your experience, tell us which details you would customize, and leave any suggestions that could help other readers create their own denim wallets.