
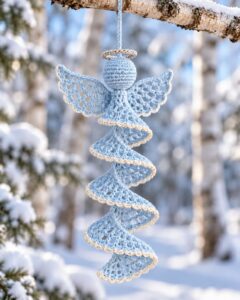
The Crocheted spiral angel pattern is a beautiful and delicate crochet project that brings elegance, creativity, and a special handmade touch to Christmas decorations.
One of the most attractive features of the crocheted spiral angel is the movement created by its twisted body and flowing decorative sections.
This Crocheted spiral angel pattern is also a lovely opportunity to practice important crochet skills. Throughout the project, you will work with basic stitches, increases, decreases, chains, slip stitches, and techniques for creating decorative shapes. Although the spiral construction may look complicated at first, dividing the project into smaller sections makes it easier to understand and complete. You can create the head, body, wings, and halo separately before assembling everything into one beautiful ornament. In this tutorial, you will find a suggested step-by-step pattern, material recommendations, assembly instructions, and creative ideas to help you make your own handmade crochet angel.
Materials and Crochet Stitches for the Crocheted Spiral Angel Pattern
Before beginning your Crocheted spiral angel pattern, prepare all the materials needed for the project. Having everything organized will make the process more comfortable and help you maintain consistent stitches. For a delicate Christmas ornament, lightweight cotton yarn is an excellent choice because it produces defined stitches and helps the angel maintain its shape.
Choose white, cream, ivory, or another color for the main body. You can also use metallic gold or silver thread for decorative details. A small quantity of skin-tone yarn can be useful if you want to create a colored face, while a contrasting shade can be used for the wings and halo.
For the crochet hook, a size between 2 mm and 3 mm is a good starting point when working with fine cotton yarn. However, always check the yarn thickness and adjust the hook according to your personal tension. Smaller hooks generally produce tighter stitches, which can help the ornament maintain a neat appearance.
You will also need polyester stuffing for the head, a yarn needle for sewing the pieces together, scissors, stitch markers, and a small amount of embroidery thread. If you want to create a hanging ornament, prepare a thin ribbon or a small crochet loop for attaching the angel to a Christmas tree.
The following abbreviations will be used throughout this crochet angel pattern:
- MR: Magic ring.
- ch: Chain stitch.
- sc: Single crochet.
- hdc: Half double crochet.
- dc: Double crochet.
- tr: Treble crochet.
- sl st: Slip stitch.
- inc: Increase, working two stitches in the same stitch.
- dec: Decrease, joining two stitches into one.
- st: Stitch.
- FO: Fasten off.
This pattern uses US crochet terminology. The measurements are approximate and may vary depending on your yarn, hook size, and tension. Before assembling the angel, make sure that the pieces are proportionate and that the spiral section hangs naturally.
Step-by-Step Crochet Instructions for Making the Spiral Angel
Step 1: Crochet the angel’s head.
Start with your chosen yarn color and make a magic ring.
Round 1: Work 6 sc into the MR (6).
Round 2: Work 2 sc in each stitch around (12).
Round 3: Repeat (1 sc, 1 inc) around (18).
Round 4: Repeat (2 sc, 1 inc) around (24).
Rounds 5–7: Work 24 sc around (24).
Round 8: Repeat (2 sc, 1 dec) around (18).
Round 9: Repeat (1 sc, 1 dec) around (12).
Add a small amount of polyester stuffing, making sure the head remains rounded. Fasten off, leaving a long tail for sewing.
Step 2: Create the spiral body.
The spiral body is the most distinctive feature of this Crocheted spiral angel pattern. Begin with white or cream yarn.
Chain 24.
Row 1: Starting in the second chain from the hook, work 1 sc in each chain across (23).
Row 2: Ch 1, turn, work 2 sc in each stitch across (46).
Row 3: Ch 1, turn, work 1 sc in each stitch across (46).
Row 4: Ch 1, turn, work 2 sc in each stitch across (92).
The repeated increases create a curved and ruffled strip. As the strip grows, it naturally begins to form a spiral when gently rolled or arranged. If the fabric becomes too wavy or bulky, reduce the number of increases slightly.
Step 3: Shape the spiral dress.
After completing the crochet strip, gently twist it into a spiral shape. Begin with the narrower end and wrap the remaining fabric around it, allowing the outer edge to create a flowing dress.
Use small stitches to secure the layers in selected places. Do not sew the entire spiral flat because the design should retain its dimensional appearance.
Adjust the folds until the angel looks balanced. The lower portion should spread slightly outward, while the upper portion should remain narrow enough to support the head.
Step 4: Crochet the angel’s wings.
Use white yarn to create two matching wings.
For each wing, chain 8.
Row 1: Starting in the second chain from the hook, work 1 sc, 1 hdc, 3 dc, 1 hdc, and 1 sc.
Row 2: Ch 1, turn, work 1 sc, 2 hdc in the next stitch, 2 dc in each of the next three stitches, 2 hdc in the next stitch, and 1 sc.
Fasten off and leave a long yarn tail.
The curved shape creates a simple feather-like wing. You can add a small embroidered line or decorative stitches to make the wings look more detailed.
Step 5: Make the angel’s halo.
To create the halo, use gold or yellow yarn.
Chain 18 and join the ends with a slip stitch to form a ring. Work 1 sc in each chain around and join with another slip stitch.
Fasten off, leaving enough yarn to attach the halo to the angel’s head. If you want a slightly firmer halo, crochet another round of slip stitches or use a thin, flexible decorative cord covered with yarn.
Step 6: Assemble the angel.
Position the head at the upper part of the spiral dress and sew it securely using the remaining yarn tail. Attach the wings symmetrically to the back of the body.
Place the halo above the head and secure it with small stitches. Check that all components are firmly attached and that the spiral dress hangs naturally.
Your crocheted spiral angel should now have a rounded head, a flowing twisted dress, two decorative wings, and a beautiful halo.
Decorating, Finishing, and Displaying Your Handmade Crochet Angel
Once the main structure of your Crocheted spiral angel pattern is complete, you can begin adding the small details that make the ornament unique. If you want a traditional angel appearance, use delicate white yarn and subtle gold accents. For a more modern decoration, pastel colors such as blush pink, light blue, and lavender can create a soft and elegant result.
Facial details are optional. You can embroider two small eyes using black or brown thread and add a tiny mouth with a delicate stitch. Alternatively, leave the face without features for a classic decorative angel. This simple style is particularly popular for Christmas ornaments because it creates a peaceful and timeless appearance.
To make the wings more attractive, add small lines of embroidery that imitate feathers. You can also crochet a second, smaller wing layer and sew it over the first one. Use a contrasting thread to highlight the edges without making the decoration too heavy.
The spiral dress can also be customized with beads or small decorative stitches. If you choose to use beads, make sure they are firmly attached and appropriate for the intended display location. For decorations used around children, avoid small detachable embellishments.
To transform your angel into a Christmas tree ornament, crochet a small hanging loop at the top of the head or behind the halo. A chain of approximately 15 to 20 stitches can work well, depending on the desired loop size. Secure both ends firmly and test the attachment before hanging the ornament.
Finally, inspect the entire project and weave in all loose yarn ends. Adjust the spiral folds, straighten the wings, and check the halo placement. If necessary, use a small amount of gentle steam from a safe distance to relax the yarn, following the care instructions for your fiber. Your handmade angel is now ready to become part of your holiday decorations.
Creative Variations, Care Tips, and Frequently Asked Questions
The Crocheted spiral angel pattern offers many possibilities for creative variations. You can make a collection of angels in different sizes by changing the yarn thickness and hook size. Smaller angels are perfect for Christmas tree decorations, while larger versions can be used as table centerpieces or decorative pieces on shelves.
Another interesting idea is to create angels using metallic yarn. Gold, silver, and pearl-colored threads can give the spiral dress a festive appearance. If metallic yarn is difficult to work with, you can use ordinary cotton yarn and add metallic details afterward.
You can also experiment with different spiral shapes. A shorter spiral creates a compact dress, while a longer strip produces a more dramatic flowing effect. Adjusting the increases changes the fullness and movement of the fabric, allowing you to create different silhouettes.
For a coordinated Christmas decoration collection, make matching angels in the same color palette as your other handmade ornaments. You can use similar wings, halos, and decorative details to create a consistent festive theme.
To keep your crochet angel in good condition, store it in a dry place away from direct sunlight and excessive moisture. If dust accumulates, gently remove it with a soft brush. Avoid pulling the wings or spiral folds because these areas may become distorted if handled roughly.
Frequently Asked Questions
1. Is the Crocheted spiral angel pattern suitable for beginners?
Yes. Beginners who know basic crochet stitches can try this project. The head and wings use simple techniques, while the spiral dress requires some practice with increases and shaping. Working through one section at a time makes the project easier to understand.
2. What yarn is best for making a crochet spiral angel?
Cotton yarn is an excellent choice because it provides good stitch definition and helps the ornament maintain its shape. Acrylic yarn can also be used for a softer finish. Choose a lightweight yarn if you want a delicate miniature decoration.
3. How do I make the spiral dress curl naturally?
The spiral effect is created by working repeated increases along a crochet strip. These additional stitches make one edge longer than the other, encouraging the fabric to curve. Rolling and arranging the strip gently helps create the final spiral shape.
4. Can I make the angel without stuffing?
Yes. The stuffing is mainly used for the head. If you prefer a flatter decoration, you can crochet a flat circular head instead. The spiral dress and wings can remain unchanged.
5. What colors are best for a Christmas crochet angel?
White, ivory, cream, gold, and silver are traditional choices. Pastel pink, pale blue, and lavender are also beautiful options. You can combine two or three colors to create a personalized ornament.
6. How can I make the angel’s wings look more realistic?
Add embroidered feather lines, use textured stitches, or crochet two layers of wings. You can also use a slightly different shade of white to create subtle contrast. Keep the wings symmetrical for a balanced appearance.
7. Can I make this spiral angel in different sizes?
Absolutely. Use thicker yarn and a larger hook for a bigger angel, or fine cotton yarn and a smaller hook for a miniature version. You may also adjust the length of the spiral strip to change the overall height.
8. How do I attach the halo securely?
Position the halo above the head and use several small stitches to attach it. Make sure the connecting yarn is hidden as much as possible. If the halo is made from a flexible ring, check that it cannot easily become detached.
9. Can I sell handmade crocheted spiral angels?
Yes. Handmade crochet ornaments can be offered as seasonal decorations and personalized gifts. Focus on consistent stitching, secure assembly, and careful finishing. Make sure any embellishments are firmly attached and suitable for the intended use.
10. How do I keep the spiral dress from losing its shape?
Use consistent crochet tension and secure the spiral at selected points with small stitches. Avoid excessive stretching and store the angel carefully. If necessary, gently reshape the folds by hand.
11. Can I use this pattern to make a hanging Christmas ornament?
Yes. Add a secure crochet loop at the top of the angel or behind the halo. Make sure the loop is firmly attached before hanging the ornament on a Christmas tree or decorative display.
12. How long does it take to crochet a spiral angel?
The time depends on your crochet experience, yarn thickness, and the amount of decoration you add. A simple version may take a few hours, while a more detailed angel with embroidered wings and decorative finishing may require additional time.
Conclusion
The Crocheted spiral angel pattern is a beautiful handmade project that combines simple crochet techniques with an elegant and distinctive spiral design. Throughout this tutorial, you learned how to prepare your materials, crochet the head, create the flowing spiral dress, shape the wings, make the halo, and assemble all the pieces into a charming angel ornament.
You also discovered how to customize your creation with different yarn colors, embroidery, decorative stitches, and hanging loops. With patience and creativity, you can make beautiful angels for Christmas trees, festive displays, handmade gifts, and seasonal decorations.
We would love to hear your thoughts about this Crocheted spiral angel pattern! Leave your honest opinion in the comments and share your suggestions for new colors, sizes, and decorative details. Your ideas can inspire other crochet enthusiasts to create their own beautiful handmade angels and make the holiday season even more special.