
A Fabric Slipper Pattern is a wonderful sewing project for anyone who enjoys creating comfortable, practical, and beautiful handmade accessories.
One of the most appealing aspects of a Fabric Slipper Pattern is its versatility. You can create lightweight slippers for warmer days, padded designs for colder weather, or simple indoor footwear that keeps your feet comfortable while relaxing at home.
Following a Fabric Slipper Pattern is also an excellent opportunity to practice useful sewing techniques. During the project, you will learn how to measure your feet, prepare a pattern, cut fabric accurately, assemble the upper section, construct the sole, and finish the edges neatly. These techniques are useful for many other fabric crafts and sewing projects. By working carefully through each stage, you can create a pair of slippers with a comfortable fit, attractive appearance, and secure construction.
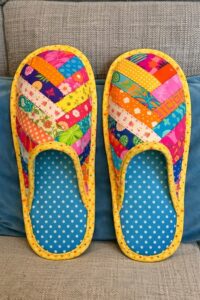
Materials and Preparation for Your Fabric Slipper Pattern
Before starting your Fabric Slipper Pattern, gather all the materials needed for the project. For the outer fabric, choose cotton, lightweight canvas, quilting fabric, or another comfortable material that is easy to sew. For the inner lining, soft cotton or fleece can provide a pleasant surface against the feet. If you want additional cushioning, prepare batting, foam, or quilted fabric to place between the layers.
You will also need fabric scissors, a measuring tape, sewing pins or clips, matching thread, a sewing machine, an iron, and a fabric marking pencil. For the sole, consider using a stronger fabric or a suitable non-slip material designed for indoor footwear. A layer of interfacing can also help stabilize the upper sections and prevent excessive stretching during assembly.
The first important step is measuring your feet correctly. Place your foot on a sheet of paper while standing naturally and trace around its outline. Keep the pencil vertical and avoid drawing too close to the toes or heel. Measure the length from the longest toe to the back of the heel and the widest part of the foot. Repeat the process for the other foot because small differences between feet are common.
Use these measurements to create your slipper sole template. Add approximately 1/2 inch around the outline for seam allowance, adjusting the amount according to your sewing technique. If you prefer a relaxed fit, you may add a little extra space around the toe area. However, avoid making the slippers excessively large because loose footwear can become uncomfortable and difficult to walk in.
Next, prepare the upper pattern. A simple fabric slipper can be made with a curved upper piece that covers the toes and the front portion of the foot. Draw a shape that follows the width of your foot and provides enough height for comfortable coverage. You can create a paper prototype and temporarily hold it around your foot to check its proportions before cutting the final fabric pieces.
Once the pattern is ready, organize your materials into separate groups: outer fabric, lining fabric, sole fabric, and cushioning material. Cut two mirrored pieces for each slipper, paying attention to the direction of the fabric print. If you are making a pair, remember that the left and right slippers should be mirror images rather than identical pieces placed in the same direction.
Step-by-Step Instructions to Sew the Fabric Slippers
Begin assembling your Fabric Slipper Pattern by preparing the upper sections. Place the outer fabric and lining pieces together with their right sides facing each other. If you are adding batting, position it according to your chosen construction method. Secure the layers with pins or clips, making sure the edges remain aligned throughout the sewing process.
Sew around the curved edges of the upper section, leaving the bottom edge open for turning and later attachment to the sole. Use a consistent seam allowance of approximately 1/4 to 1/2 inch, depending on the size and shape of your pattern. Backstitch at the beginning and end of the seam to secure the stitching. If the curve is particularly rounded, make small clips in the seam allowance without cutting through the stitching.
Turn the upper piece right side out through the opening. Use a blunt tool to gently shape the curved sections and remove any wrinkles. Avoid using sharp objects that could damage the fabric. Press the piece carefully with an iron, following the fabric care instructions. A neatly pressed upper section will make the next assembly steps easier and help the finished slipper look more professional.
Now prepare the soles. Cut two pieces of outer fabric, two lining pieces, and two cushioning pieces according to your sole template. Place the layers together, following your preferred construction method. For a padded slipper, position the cushioning between the fabric layers. Pin everything securely and sew around the perimeter, leaving a small opening if necessary for turning.
If you want a stronger sole, add a durable bottom layer made from an appropriate non-slip material. This is particularly useful for slippers intended for smooth indoor floors. Make sure the material is compatible with your sewing machine and needle. If it is too thick or difficult to sew, use a construction method suitable for that specific material rather than forcing it through the machine.
Once the upper and sole pieces are ready, position the upper section over the front portion of the sole. Match the center points first, then align the side edges and pin them carefully. Distribute the fabric evenly around the curved section so that the slipper does not develop unwanted folds. Sew slowly around the opening, keeping the seam allowance consistent. Repeat the process for the second slipper, checking that both pieces have matching shapes and dimensions.
Adding Comfort, Finishing the Edges, and Personalizing Your Slippers
The next stage of your Fabric Slipper Pattern focuses on comfort and durability. Examine the seams carefully and check that the upper section sits naturally over the foot. If the fabric feels too tight, identify the area causing the problem before making adjustments. Small modifications to the paper pattern can help improve the fit of future pairs.
If your slipper design includes a separate sole lining, attach it carefully to cover the internal seam allowance. This creates a smoother surface and gives the inside of the footwear a cleaner appearance. You can use a hand-sewn slip stitch or a neat machine stitch, depending on the construction method. Make sure there are no loose threads or uncomfortable fabric folds inside the slipper.
For additional cushioning, consider inserting a removable insole made from soft foam or another suitable padding material. The insole should fit comfortably without creating excessive pressure around the toes or sides. A padded layer can make handmade slippers feel more pleasant, especially when worn for extended periods indoors.
You can also finish the upper opening with bias binding, a fabric band, or a folded edge. Bias binding is particularly useful for curved sections because it follows the shape of the slipper more easily. Choose a coordinating color for a subtle finish or a contrasting print if you want to add a decorative detail. Sew slowly around the opening to maintain a smooth, even edge.
Personalization is another enjoyable part of this sewing project. You can add small fabric bows, decorative buttons, embroidery, appliqué shapes, or contrasting panels. Floral fabrics create a delicate appearance, while solid colors offer a simple and timeless style. If the slippers are intended as gifts, you can choose fabrics that reflect the recipient’s favorite colors or patterns.
Finally, inspect both slippers from every angle. Check the stitching, sole attachment, upper opening, and internal lining. Remove excess threads and press any fabric areas that need a little adjustment. Test the slippers on a clean, level indoor surface and make sure they fit securely without slipping off. Remember that fabric slippers are generally intended for indoor use, and their grip depends on the materials and construction. A carefully completed Fabric Slipper Pattern should combine comfort, practical construction, and a beautiful handmade finish.
Fabric Slipper Pattern Tips, Variations, and Frequently Asked Questions
One of the best things about a Fabric Slipper Pattern is that the basic design can be adapted in many different ways. You can make closed-toe slippers for extra coverage, open-back slippers for quick everyday use, or padded versions for cooler seasons. Each variation requires only a few adjustments to the original pattern, making this a useful project to repeat with different fabrics and designs.
For a beginner-friendly version, start with cotton fabric and a simple two-piece construction. Avoid adding too many layers or complicated decorative elements during your first attempt. Once you become familiar with the process, you can experiment with quilting, additional padding, decorative stitching, and different sole materials. Practicing on fabric scraps before sewing the final pieces can also help improve your confidence.
Choosing the correct fabric is important for the overall result. Soft cotton is comfortable and easy to handle, while fleece provides a warmer interior. Canvas and denim can be used for selected outer sections when additional structure is desired. However, the fabric should remain comfortable and flexible enough to allow natural foot movement.
Accurate measurements are equally important. A slipper that is too small may create pressure around the toes, while one that is too large may move around during walking. Always compare the finished pattern with your foot measurements before cutting expensive fabric. If possible, create a test version using inexpensive material and make adjustments before sewing the final pair.
Careful stitching also makes a significant difference. Use a suitable needle for the fabric thickness, select a consistent stitch length, and avoid pulling the material while sewing. Reinforce areas that experience additional tension, particularly where the upper section joins the sole. These small details can help improve the overall construction and appearance of your handmade slippers.
Frequently Asked Questions
1. Is a Fabric Slipper Pattern suitable for beginners?
Yes! This project is suitable for beginners who have basic sewing skills. The main techniques include tracing a foot outline, cutting fabric, sewing curved edges, assembling layers, and attaching the upper section to the sole. Starting with a simple design makes the process easier to understand.
2. What is the best fabric for making handmade slippers?
Cotton, fleece, flannel, and soft quilting fabric are popular choices. Cotton is easy to sew and offers many decorative options, while fleece and flannel provide a warmer interior. You can combine different materials to create a comfortable and attractive result.
3. How do I make sure my fabric slippers fit correctly?
Measure both feet before creating your pattern. Trace their outlines while standing naturally and compare the measurements. Add an appropriate seam allowance and allow enough room around the toes. Making a test pair is a helpful way to check the fit before using your final fabric.
4. Can I make fabric slippers without a sewing machine?
Yes. You can sew fabric slippers by hand using a strong backstitch and suitable sewing thread. However, hand sewing takes more time and requires consistent stitches, especially around the sole and upper attachment areas.
5. What can I use to make the slipper soles non-slip?
You can use suitable non-slip sole fabric or materials specifically designed for indoor footwear. Make sure the product is appropriate for the intended surface and follow its application instructions. Ordinary cotton fabric alone may become slippery on smooth floors.
6. How much fabric do I need for one pair of slippers?
The quantity depends on the slipper size, design, and number of layers. A simple pair generally requires relatively small fabric pieces for the outer sections, lining, and soles. Preparing your paper pattern first will help you calculate the required amount more accurately.
7. Can I add padding to my handmade slippers?
Absolutely! Batting, suitable foam, or quilted fabric can be used to create a softer interior. Make sure the padding is distributed evenly and does not make the slippers excessively tight. A removable insole is another practical option.
8. How can I make the slippers warmer?
Choose fleece, flannel, or another soft insulating fabric for the lining. You can also add a thin layer of suitable padding between the outer fabric and lining. These materials provide additional warmth while maintaining a flexible construction.
9. Can I customize the size of this Fabric Slipper Pattern?
Yes. You can adjust the sole template and upper section to accommodate different foot sizes. Always remember to account for seam allowances and check the proportions before cutting the final fabric. The pattern can also be adapted for different slipper styles.
10. How should I wash handmade fabric slippers?
Follow the care instructions for the fabrics and materials used. Many cotton slippers can be gently hand-washed, while some materials may require more delicate care. Remove removable insoles when appropriate and allow the slippers to dry completely before wearing or storing them.
11. Can fabric slippers be made as handmade gifts?
Yes! Handmade slippers are thoughtful gifts because they can be personalized with different colors, prints, and decorative details. You can create pairs for family members and friends by adjusting the pattern to their measurements and preferences.
12. How can I make my fabric slippers last longer?
Use durable materials, reinforce important seams, and avoid excessive tension when attaching the upper section to the sole. Keep the slippers clean and dry, inspect them regularly, and repair loose stitching before it becomes a larger problem.
Conclusion
Creating a Fabric Slipper Pattern is a rewarding way to combine sewing skills, creativity, and everyday practicality. In this tutorial, we covered how to select suitable materials, measure your feet, prepare the sole and upper templates, cut the fabric, assemble the different layers, and finish the slippers with comfortable details. We also explored ways to personalize the design with padding, decorative edges, and different fabric combinations.
With careful measurements and secure stitching, you can transform simple fabric pieces into comfortable handmade slippers that reflect your personal style. Whether you choose a simple cotton design or a warmer padded version, the most important part is creating footwear that fits comfortably and is appropriate for indoor use. Take your time, enjoy every stage, and remember that each new sewing project is an opportunity to improve your skills.
Have you ever made handmade fabric slippers, or are you planning to try this project for the first time? Leave your honest opinion in the comments and share your suggestions for colors, fabrics, and creative details. Your ideas and experiences can inspire other sewing enthusiasts to explore this Fabric Slipper Pattern and create their own beautiful handmade projects!