
A Fabric shoulder bag pattern is a wonderful way to create a beautiful, practical, and reusable accessory that combines creativity with everyday functionality.
One of the best things about following a Fabric shoulder bag pattern is the opportunity to customize the finished project.
This sewing project is suitable for people who already know a few basic sewing techniques as well as beginners who want to practice cutting, pinning, stitching, and finishing fabric edges. The construction process involves preparing the bag pieces, assembling the outer fabric, creating the lining, attaching the shoulder strap, and completing the final details. Each stage contributes to the overall appearance and durability of the accessory. By following this step-by-step Fabric shoulder bag pattern, you can create a personalized handmade bag while learning useful sewing techniques that can be applied to many other fabric projects.
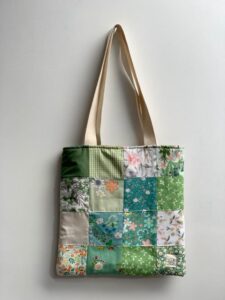
Materials and Preparation for Your Fabric Shoulder Bag Pattern
Before beginning your Fabric shoulder bag pattern, gather all the necessary materials and prepare a comfortable sewing workspace. Having everything within reach makes the process easier and helps prevent unnecessary interruptions. For the outer portion of the bag, choose a medium-weight cotton fabric, canvas, denim, or another material with enough structure to support everyday use. A coordinated fabric can be selected for the lining to give the inside a neat and attractive finish.
You will also need a sewing machine, matching sewing thread, fabric scissors, measuring tape, fabric pins or clips, a ruler, and a fabric marking pencil or chalk. An iron and ironing board are useful for pressing seams throughout the project. If you prefer a more structured bag, consider adding fusible interfacing to the outer fabric. This material provides additional support and helps the finished shoulder bag maintain its shape without making it unnecessarily stiff.
Start by deciding the approximate dimensions of your bag. A practical medium-sized design could measure around 14 inches wide, 12 inches tall, and 4 inches deep. These measurements are suggestions rather than strict requirements, so feel free to adjust them according to your needs. Remember to include seam allowances when preparing your fabric pieces. A seam allowance of approximately 1/2 inch is suitable for many basic sewing projects and makes the construction process easier to manage.
For the main body, cut two matching rectangles from your chosen outer fabric. Then cut two additional rectangles of the same dimensions from the lining fabric. If you want a bag with a flat bottom and more storage space, prepare matching bottom corner sections that can be boxed during assembly. You should also cut a long strip of fabric for the shoulder strap. A finished strap approximately 2 inches wide is comfortable for many everyday bags, although its length can be adjusted depending on how you prefer to carry it.
Before sewing, place the fabric pieces on a flat surface and check that their edges are aligned. If you are using patterned fabric, pay attention to the direction of the print so that the design appears correctly when the bag is assembled. Apply fusible interfacing to the wrong side of the outer fabric if desired, following the manufacturer’s instructions. Pressing the interfacing carefully will help prevent wrinkles and create a more professional-looking result.
Finally, organize the prepared pieces into separate groups: outer fabric, lining, strap, and optional pocket pieces. Check your measurements one more time before moving to the sewing machine. This simple preparation stage is important because accurate cutting and careful organization make the remaining steps much smoother. A well-prepared Fabric shoulder bag pattern is easier to assemble and usually produces a cleaner finished accessory.
Step-by-Step Instructions to Sew the Main Bag
Begin assembling the outer body of your Fabric shoulder bag pattern by placing the two main outer fabric rectangles together with their right sides facing each other. Align the side edges and bottom edges carefully, then secure the pieces with pins or sewing clips. This positioning keeps the fabric from shifting while you sew and helps produce straight, even seams. Leave the top edge open because it will become the opening of your shoulder bag.
Using your sewing machine, stitch along both side edges and the bottom edge, maintaining an even seam allowance of approximately 1/2 inch. Backstitch at the beginning and end of each seam to secure the stitching. If your fabric tends to fray, finish the raw edges with a zigzag stitch or an overlock stitch. These finishing techniques help protect the seams and improve the durability of the handmade bag.
To create a wider bottom, you can use the boxed-corner technique. Keep the bag inside out and flatten one bottom corner so that the side seam lines up with the bottom seam, forming a triangle. Measure approximately 2 inches from the corner point, draw a straight line across the triangle, and sew along that line. Repeat the same process on the opposite corner. Trim the excess fabric carefully, leaving enough material beyond the stitching to maintain a secure seam.
Next, turn your attention to the lining. Place the two lining rectangles together with their right sides facing inward, just as you did with the outer fabric. Pin the sides and bottom, then sew along them using the same seam allowance. However, leave an opening of approximately 4 to 5 inches along the bottom seam. This opening will allow you to turn the entire bag right side out later. If you want an inside pocket, attach it to one lining piece before assembling the lining.
Once the outer bag and lining are assembled, check their dimensions and make sure the corners are properly shaped. Turn the outer bag right side out, but keep the lining with its wrong side facing outward. Insert the outer bag into the lining so that their right sides are touching. Align the top raw edges and match the side seams carefully. Pin around the entire top opening, making sure the fabric remains smooth and evenly distributed.
Sew around the top edge using a consistent seam allowance, joining the outer fabric and lining together. Remove the pins as you sew and avoid pulling the fabric through the machine. When the stitching is complete, carefully pull the outer bag through the opening left in the lining. Push the lining inside the bag, gently shape the corners, and press the top edge with an iron. Finally, close the opening in the lining with a neat machine stitch or an invisible hand stitch. This step gives your Fabric shoulder bag pattern a clean interior finish.
Creating the Shoulder Strap and Finishing Details
The shoulder strap is one of the most important elements of a Fabric shoulder bag pattern because it affects both comfort and appearance. To create a simple fabric strap, cut a long rectangle approximately 4 inches wide and 30 to 36 inches long. These measurements allow you to fold the fabric lengthwise and create a finished strap close to 2 inches wide. You can adjust the length depending on whether you prefer the bag to sit close to your shoulder or hang lower.
Fold the strap fabric in half lengthwise with the wrong side facing outward and press it to create a center crease. Open the fabric and fold both long raw edges toward the center crease. Press again, then fold the entire strip in half so that the raw edges are enclosed inside. This creates a strong, neat strap with multiple fabric layers. Pin along the length and sew close to both long edges using matching thread. A second row of stitching can be added for extra strength and a decorative finish.
Before attaching the strap, decide where you want it positioned. For a traditional shoulder bag, the strap can be attached to the upper side sections of the bag, with both ends evenly spaced from the side seams. Measure carefully to ensure that the strap is centered and does not twist. Insert approximately 1 inch of each strap end between the outer fabric and lining before sewing the top seam, or attach the completed strap afterward using reinforced stitching.
If the top opening has already been sewn closed, position the strap ends against the outside of the bag and fold the raw ends under. Stitch each end securely using a reinforced rectangular or box-and-cross pattern. This creates a strong attachment that helps distribute the weight placed inside the bag. Use matching thread for a subtle appearance or contrasting thread if you want to add a decorative detail to your handmade accessory.
You can also personalize the bag with practical features. An interior pocket is useful for organizing smaller belongings such as keys, cards, and lip balm. A magnetic snap or button closure can help keep personal items secure during everyday activities. Decorative topstitching, fabric appliqué, contrasting panels, and small fabric labels are other ways to make your project unique. Choose additions that complement the overall design without making the bag unnecessarily complicated.
The final stage involves checking the entire project carefully. Examine the side seams, bottom corners, lining, strap attachments, and top stitching to make sure everything is secure. Remove loose threads and press the finished bag gently to improve its shape. If the fabric is washable, follow its care instructions to keep the colors and structure looking attractive. Your completed Fabric shoulder bag pattern should feel comfortable, look neatly finished, and provide enough room for the items you normally carry.
Customization Ideas, Sewing Tips, and Frequently Asked Questions
One of the greatest advantages of a Fabric shoulder bag pattern is how easily it can be customized. You can experiment with floral cotton prints, neutral linen, denim, canvas, or colorful patchwork combinations. Each fabric creates a different appearance, allowing you to make a casual everyday accessory, a more elegant shoulder bag, or a playful handmade gift. Choosing complementary colors for the lining and outer fabric can also make the finished project look more coordinated.
For beginners, it is best to start with a medium-weight woven fabric that is easy to cut and sew. Very slippery or stretchy materials may be more difficult to control, especially when assembling the lining and strap. If you want a stronger structure, lightweight interfacing can help support the bag without adding excessive bulk. Always test your stitch length and tension on a small fabric scrap before beginning the main seams.
Another useful improvement is adding an adjustable strap. You can achieve this with fabric tabs and suitable hardware, such as a slider and rings. This feature makes the bag more versatile because its length can be changed depending on the way you want to wear it. If you prefer a simple project, however, a fixed fabric strap is perfectly suitable and requires fewer materials.
Storage organization is another detail worth considering. A divided interior pocket can separate smaller objects, while a larger pocket can accommodate a notebook or phone. You can also add an exterior pocket to the front panel before assembling the main body. When planning additional features, remember to position them carefully so that the finished bag remains comfortable and balanced.
Frequently Asked Questions
1. Is a fabric shoulder bag suitable for beginners?
Yes! This Fabric shoulder bag pattern is suitable for beginners who have basic experience with a sewing machine. The project introduces important techniques such as measuring, cutting, pinning, sewing straight seams, creating boxed corners, and attaching straps. Beginners can simplify the design by using rectangular fabric pieces and a fixed shoulder strap.
2. What is the best fabric for making a shoulder bag?
Cotton canvas, medium-weight cotton, denim, and linen blends are popular choices. Canvas and denim provide more structure, while quilting cotton offers a wide variety of prints and colors. The best option depends on the appearance, strength, and flexibility you want in your finished bag.
3. Do I need interfacing for this sewing project?
Interfacing is optional, but it is recommended if you want a bag with more structure. It helps the outer fabric maintain its shape and can improve the overall finish. Lightweight or medium-weight fusible interfacing is often sufficient for everyday fabric shoulder bags.
4. How long should a fabric shoulder bag strap be?
A strap measuring approximately 30 to 36 inches can work well for a basic shoulder bag. However, the ideal length depends on your height, the bag dimensions, and how low you want the bag to hang. It is a good idea to measure a comfortable existing bag before cutting your strap fabric.
5. How can I make my handmade shoulder bag stronger?
Use durable fabric, reinforced seams, quality thread, and secure strap attachments. Backstitch at important seam beginnings and endings, and reinforce the strap attachment points with additional stitching. Interfacing can also provide support, especially when the outer fabric is lightweight.
6. Can I add pockets to my fabric shoulder bag?
Absolutely! You can add an interior pocket, an exterior patch pocket, or multiple divided compartments. For an interior pocket, sew it onto one lining piece before assembling the lining. For an exterior pocket, attach it to the front panel before sewing the main bag body.
7. How do I create a flat bottom on my shoulder bag?
The boxed-corner technique is an easy way to create a wider bottom. Flatten each bottom corner so the side seam aligns with the bottom seam, measure the desired depth, and sew across the marked line. Repeat on the opposite side to create a balanced shape.
8. Can I make this bag without a sewing machine?
Yes, although it will take more time. You can sew the project by hand using small, consistent backstitches and strong sewing thread. Pay particular attention to the side seams, bottom corners, and shoulder strap attachments because these areas experience the most tension.
9. How do I wash and care for a fabric shoulder bag?
Always consider the care instructions for the fabric and any added materials or hardware. Many cotton bags can be gently hand-washed or machine-washed on a delicate cycle. Remove loose dirt, avoid excessive heat, and allow the bag to dry completely before storing it.
10. Can I change the size of the Fabric shoulder bag pattern?
Yes! You can make the bag smaller for carrying only essential items or larger for additional storage. Adjust the height and width of the main fabric rectangles while maintaining matching measurements for the lining. Remember to recalculate the strap length and boxed corners if you change the overall dimensions.
Conclusion
Creating a Fabric shoulder bag pattern is a rewarding sewing project that combines practicality, creativity, and personal style. Throughout this tutorial, we explored the materials needed, how to prepare and cut the fabric, assemble the outer body and lining, create boxed corners, attach a comfortable shoulder strap, and add finishing details. Each step contributes to a handmade accessory that can be customized to suit different needs and preferences.
With the right fabric, careful measurements, and secure stitching, you can transform simple materials into a beautiful shoulder bag for everyday use. You can also experiment with different prints, pockets, closures, and strap styles to develop new versions of the same basic design. The most important thing is to enjoy the sewing process, take your time, and allow your creativity to guide the final details.
Have you tried making a fabric shoulder bag before? What fabrics, colors, or decorative details would you choose for your own project? Leave your honest opinion in the comments and share your suggestions and creative ideas. Your feedback can inspire other sewing enthusiasts to try this Fabric shoulder bag pattern and create something special of their own!