
A handmade fabric pig can serve many purposes beyond being a cute decorative object. It can become a thoughtful handmade gift, a charming addition to a child’s bedroom, a farmhouse-inspired decoration, or even a playful addition to a collection of stuffed animals.
In this tutorial, you will learn how to prepare your materials, understand the basic construction of a fabric pig, cut the individual pattern pieces, assemble the body, and add the finishing touches that make your handmade pig look special. The instructions are designed to help you work comfortably, even if this is your first stuffed fabric animal. You can follow the suggested construction method and adjust the dimensions according to your preferences. Take your time with each step, pay attention to the stitching, and enjoy the creative process of turning ordinary fabric into an adorable handmade decoration.
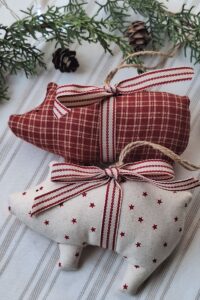
Materials and Preparation for the Fabric Piggy Pattern
Before starting your Fabric Piggy Pattern, it is important to organize all the necessary materials. Having everything within reach makes the sewing process easier and helps you avoid interruptions while assembling the project.
For the main body, choose a medium-weight cotton fabric, felt, linen, or another soft material suitable for small stuffed decorations. Pink fabric is a traditional choice for a pig, but you can also experiment with cream, peach, red, floral prints, or even playful patterned materials.
You will need fabric for the body, a small piece of contrasting fabric for the snout, matching sewing thread, scissors, pins, a sewing needle, and polyester fiberfill. A sewing machine can make the process faster, although the project can also be completed by hand using small, even stitches.
Prepare a paper template before cutting the material. The main pieces should include two matching body shapes, a separate snout, two ears, and four small leg pieces. You may also prepare an optional curly tail using a narrow fabric strip.
For a balanced appearance, draw the body as a rounded oval with a slightly raised back and a fuller lower section. The head and body can be incorporated into one continuous silhouette, making the Fabric Piggy Pattern easier to assemble.
Before cutting, wash and dry your fabric if necessary, especially if you are using cotton that may shrink. Ironing the material will also help you achieve cleaner cuts and more accurate seams.
Finally, place your pattern pieces on the fabric and secure them with pins or fabric weights. Remember to leave approximately 1/4 inch (6 mm) of seam allowance around the pieces unless your chosen template already includes it.
Cutting and Sewing the Main Fabric Pig Body
The first important construction stage is creating the main body. This part determines the overall shape and proportions of your finished fabric piggy, so take a little extra time to make the pieces symmetrical.
Start by placing the two main body fabric pieces together with their right sides facing inward. Align the edges carefully and secure them with pins. This positioning allows the seam allowances to remain inside the finished stuffed animal.
Using a sewing machine or a hand-sewing needle, stitch around the body outline. Follow the curved sections slowly, keeping the seam allowance consistent. Leave a small opening along the lower section so you can turn the fabric right side out and add the stuffing later.
After stitching, trim excess fabric around the curved areas without cutting through the seam. Small notches along inward curves can help the material lie smoothly when turned. Be especially careful around the head and lower body sections.
Turn the body right side out through the opening. Use a blunt turning tool or the rounded end of a pencil to gently shape the corners and curves. Avoid using sharp objects that could accidentally puncture the fabric or damage the stitches.
Now begin adding polyester fiberfill through the opening. Work with small amounts at a time, distributing the stuffing evenly throughout the body. This technique helps prevent unwanted lumps and creates a soft, rounded appearance.
Once the body has the desired shape, close the opening with a neat ladder stitch or another discreet hand-sewing method. Check the entire seam to make sure there are no visible gaps. At this stage, your Fabric Piggy Pattern should already resemble a soft little pig, ready for its decorative features.
Adding the Snout, Ears, Legs, and Decorative Details
The personality of a handmade pig comes from its small features. Adding the snout, ears, legs, and tail will transform the basic stuffed shape into a recognizable and charming fabric pig.
Begin with the snout. Cut two small oval pieces from pink or contrasting fabric, depending on the appearance you want. Place them together with the right sides facing inward, stitch around the edge, and leave a small opening. Turn the piece right side out and add a little stuffing if you want a raised, three-dimensional effect.
Position the finished snout near the front of the body. Use pins to check its placement before sewing it securely by hand. Make sure it is centered and sits naturally on the face. You can add two small embroidered nostrils using dark pink or brown thread.
Next, prepare the ears. Cut four matching ear-shaped fabric pieces, arranging them into two pairs. Sew each pair with the right sides facing inward, leaving the bottom edge open. Turn them right side out and gently press them into shape.
Attach the ears to the upper part of the head. You can position them upright for a playful appearance or fold them slightly forward for a softer expression. Secure each ear with small, firm stitches so it stays in place during handling.
For the legs, prepare four small fabric tubes or rounded shapes. Stitch the pieces, turn them right side out, and add a small amount of stuffing if desired. Attach two legs to the front underside and two to the back underside, checking that the pig can sit evenly.
Finally, create a small curly tail using a narrow strip of fabric. Sew the strip into a tube, turn it right side out, and shape it into a spiral before attaching it to the back. You can also embroider the eyes and add small decorative details. These finishing touches make every Fabric Piggy Pattern unique and give your handmade creation its own personality.
Finishing, Customization, and Care for Your Handmade Fabric Pig
Once all the main components are attached, carefully inspect your handmade pig. Check the seams, ears, legs, snout, and tail to make sure everything is securely fastened. This final inspection is especially important if the project will be handled frequently.
If you want to create a more decorative appearance, consider adding a small fabric bow around the neck. A contrasting ribbon, tiny flower, or decorative collar can make the finished pig look even more charming. Choose lightweight decorations that complement the fabric instead of overwhelming the design.
You can also experiment with different fabric combinations. A solid pink body with floral ears creates a traditional handmade appearance, while gingham or polka-dot fabrics give the project a cheerful farmhouse style. Using leftover quilting cotton is another excellent way to make a colorful fabric animal.
For a more personalized result, consider embroidering a name or a small decorative symbol on the side of the pig. Simple embroidery can add character without making the construction unnecessarily complicated. Keep embellishments appropriate for the intended use of the finished project.
When choosing the size, remember that a smaller pig can be used as a shelf decoration, handmade gift, or seasonal ornament. A larger version can become a soft decorative pillow or a cuddly stuffed animal. Adjust the pattern proportions while maintaining enough seam allowance for secure construction.
To care for your finished fabric piggy, follow the cleaning instructions appropriate for the materials used. If the fabric and stuffing are washable, gentle hand washing may be suitable. Avoid harsh cleaning products, excessive heat, and aggressive wringing, which can affect the shape and stitching.
Most importantly, enjoy the freedom to make your Fabric Piggy Pattern your own. Handmade crafts do not need to look identical to one another. Small variations in fabric, proportions, embroidery, and decorative details are part of what makes each creation special.
Frequently Asked Questions About the Fabric Piggy Pattern
1. Is the Fabric Piggy Pattern suitable for beginners?
Yes! This project is suitable for beginners who understand basic sewing techniques. The main skills involve cutting fabric, sewing simple seams, turning fabric pieces, and adding stuffing. Working slowly and following each stage carefully can help beginners achieve an attractive result.
2. What is the best fabric for making a fabric pig?
Cotton fabric is one of the easiest materials to work with because it is widely available, easy to cut, and suitable for small sewing projects. Felt, linen, and other medium-weight fabrics can also work well depending on the appearance you want.
3. Can I make a fabric pig without a sewing machine?
Absolutely. You can sew the entire project by hand using a needle and matching thread. A backstitch is useful for constructing the main body because it creates a strong seam. Small decorative details can be attached with simple hand stitches.
4. What stuffing should I use for a handmade fabric pig?
Polyester fiberfill is a popular option because it is lightweight, soft, and easy to distribute inside small fabric projects. Use small amounts at a time to avoid creating an uneven shape.
5. How do I make the pig’s snout look three-dimensional?
To create a raised snout, sew two oval fabric pieces together, turn them right side out, and add a small amount of fiberfill before closing the opening. Attach the finished piece securely to the front of the body.
6. Can I use different colors and printed fabrics?
Yes! One of the most enjoyable aspects of the Fabric Piggy Pattern is the opportunity to experiment with different combinations. Pink, peach, cream, gingham, floral prints, and polka dots can all create attractive results.
7. How can I make the ears stand upright?
Use two layers of fabric for each ear and sew them securely to the upper section of the head. You can also insert a small piece of interfacing between the layers to provide additional structure.
8. How do I make the fabric pig sit properly?
Position the four legs symmetrically along the lower body. Make sure the stuffing is distributed evenly and that the feet reach a similar height. Before permanently attaching the legs, place the pig on a flat surface and check its balance.
9. Can the fabric pig be used as a handmade gift?
Certainly! A handmade fabric pig can be a thoughtful gift for birthdays, craft lovers, children’s room decorations, and people who appreciate handmade items. Personalizing the colors and adding a small bow can make the gift even more special.
10. How can I make my fabric pig more durable?
Use strong thread, consistent seam allowances, and secure stitching around the body and attached pieces. Reinforce areas that may experience more handling, such as the ears, legs, and tail. Avoid leaving openings or loose threads.
11. Can I make different sizes using the same pattern?
Yes. You can enlarge or reduce the paper template to create different versions. Remember that changing the size may also require adjusting the snout, ears, legs, and tail so the proportions remain balanced.
12. Is the Fabric Piggy Pattern suitable for children?
It can be adapted into a decorative stuffed toy, but safety should always come first. For young children, avoid detachable buttons, beads, small ribbons, and other choking hazards. Embroidered eyes and securely sewn fabric details are preferable. Adult supervision is recommended during play, and the finished item should be inspected regularly for loose seams or damaged components.
Conclusion
Creating a Fabric Piggy Pattern is a lovely way to explore sewing, practice useful fabric-crafting techniques, and turn simple materials into an adorable handmade decoration. Throughout this tutorial, we covered the essential materials, pattern preparation, fabric cutting, body construction, stuffing, and the addition of important details such as the snout, ears, legs, and curly tail.
We also explored different ways to customize your fabric pig using colorful prints, decorative accessories, embroidery, and different sizes. Whether you decide to make a traditional pink pig or experiment with creative fabric combinations, the most important part is enjoying every stage of the process and creating something that reflects your personal style.
Remember that patience and attention to detail make a difference, especially when working with curved seams and small decorative pieces. With practice, you can develop your sewing skills and create several unique versions of this charming project.Have you ever made a fabric animal before? We would love to hear your honest opinion! Leave a comment sharing what you thought of this Fabric Piggy Pattern, tell us which fabrics and colors you would choose, and share any suggestions or creative ideas that could inspire other sewing enthusiasts. Your feedback and experiences make our crafting community even more inspiring!