
One of the best things about this Christmas bauble fabric coaster is that it can be made using fabric scraps, making it an excellent project for anyone who enjoys sewing and creative reuse.
This Fabric coaster pattern in the shape of a Christmas bauble is suitable for beginners who want to practice basic sewing techniques, as well as experienced crafters looking for a quick and enjoyable seasonal project. The construction involves creating a decorative ornament-shaped fabric piece, adding a soft inner layer for protection, and finishing the edges neatly. Although the exact dimensions can be adjusted according to your preferences, keeping the shape symmetrical will help the finished coaster look polished and professional. In this tutorial, you will learn how to select suitable materials, prepare your fabric, cut the pieces, assemble the layers, and add the final details that give the coaster its distinctive Christmas bauble appearance.
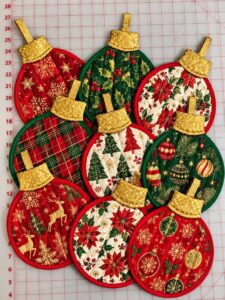
Materials and Preparation for Your Christmas Bauble Fabric Coaster
Before beginning your Fabric coaster pattern in the shape of a Christmas bauble, gather all the materials you need. Having everything prepared in advance makes the sewing process easier and helps you achieve a more consistent result. You will need two pieces of cotton fabric, preferably in complementary Christmas colors, along with a piece of batting or thin cotton padding. These materials will create a coaster that is attractive, comfortable to handle, and suitable for everyday use during the holiday season.
The first important material is 100% cotton fabric. Cotton is a popular choice for fabric coasters because it is easy to sew, widely available, and comes in countless colors and prints. You can use one fabric for the front and another for the back to create a reversible design. For example, a red fabric with small white snowflakes can look beautiful alongside a green fabric with delicate golden details. Choosing fabrics with similar weights will also help the layers sit evenly when stitched together.
You will also need batting or interfacing to give your Christmas bauble coaster a little structure. Thin cotton batting provides light cushioning, while fusible interfacing can help stabilize the fabric and prevent excessive movement during sewing. Avoid using very thick padding because the coaster should remain relatively flat and practical. A balanced construction will make it easier to place cups and mugs on the finished piece without creating an unstable surface.
Other useful supplies include fabric scissors, a ruler, sewing pins or clips, a fabric marking pen, matching thread, and a sewing machine. A rotary cutter and cutting mat can also help you achieve precise edges, especially if you plan to make several coasters at once. If you prefer hand sewing, a needle and strong sewing thread will work as well, although the process may take a little longer. Keeping your tools organized will make the project more enjoyable.
To create the recognizable Christmas bauble shape, begin by drawing a simple ornament template on paper. The main body should have a rounded or slightly oval shape, with a narrower upper section where the decorative cap will be placed. You can make the body approximately 4 to 5 inches wide and 5 to 6 inches tall, depending on the size of cups and mugs you normally use. Add a small rectangular or trapezoidal section at the top to represent the ornament’s metal cap.
Once your template is ready, place it over the fabric and trace the outline carefully. You will need two fabric shapes and one corresponding piece of batting or interfacing. Remember to include a seam allowance of approximately 1/4 inch around the main shape if you plan to sew the pieces right sides together. Marking the outline clearly will help you maintain the original design while cutting. Take your time with this stage because accurate preparation makes the assembly process much easier.
Step-by-Step Instructions for Sewing the Fabric Coaster Pattern
Start by placing the two cotton fabric pieces together with their right sides facing each other. Position the batting or interfacing according to the construction method you have chosen. If you are using fusible interfacing, follow the manufacturer’s instructions to attach it to the appropriate fabric layer before assembling the coaster. Smooth the materials with your hands and secure the edges using sewing clips or pins. This preparation helps prevent the fabric from shifting while you sew.
Next, stitch around the ornament shape, following the marked outline and maintaining a consistent seam allowance. Leave a small opening along one straight section near the lower side of the coaster. This opening will allow you to turn the project right side out later. Use a shorter stitch length around the curved sections to help maintain the shape. When approaching the narrower top portion, slow down and carefully guide the fabric beneath the presser foot.
After sewing, trim away excess fabric around the seam allowance. Pay special attention to the curved areas because too much fabric can create bulky edges when the coaster is turned. You can make small clips into the seam allowance around the curves, taking care not to cut through the stitches. At the narrow corners and top section, remove a little excess fabric to reduce bulk. These small adjustments will help the finished fabric Christmas ornament coaster look smooth and well-shaped.
Now carefully turn the coaster right side out through the opening. Use a blunt turning tool or the end of a small wooden stick to gently shape the rounded edges and the narrow upper section. Avoid using sharp objects that could damage the stitching. Once the entire piece has been turned, use your fingers to distribute the fabric evenly and create a clean ornament silhouette. Press the coaster with an iron at an appropriate temperature for your fabric, paying attention to the edges and corners.
The next step is to close the opening. Fold the raw edges inward so they align with the existing seam, then secure them with pins or clips. You can close the opening using a neat hand-sewn ladder stitch or sew close to the edge with your sewing machine. For a more professional appearance, add topstitching around the entire perimeter of the coaster. This decorative stitching also helps keep the layers together and creates a defined outline around the Christmas bauble shape.
Finally, create the small decorative cap at the top of the ornament. You can use a small piece of contrasting cotton fabric, felt, or decorative ribbon. Cut the cap into a rectangular or slightly curved shape and attach it securely with stitching. If desired, add a small embroidered line or a simple decorative detail to make the top resemble the metal fitting of a traditional Christmas bauble. Check that all stitching is secure and that the coaster lies flat before considering the project complete.
Creative Decoration Ideas and Finishing Details for Your Christmas Coaster
One of the most enjoyable parts of making a Fabric coaster pattern in the shape of a Christmas bauble is choosing the decorative details. You can keep the design simple with two coordinating fabrics, or create a more elaborate appearance using small fabric appliqués. Stars, hearts, snowflakes, and tiny Christmas trees are excellent choices. These details can be cut from felt or cotton and attached using a neat decorative stitch. Remember that the coaster should remain functional, so avoid placing thick decorations where cups and glasses will rest.
Another beautiful option is to use fabric patchwork to create a unique ornament design. Instead of using one large piece of fabric for the front, combine several smaller pieces in different Christmas colors. For example, you could create a red-and-green patchwork body with a narrow strip of white fabric running through the center. This technique is especially useful for using leftover fabric scraps from previous sewing projects. Make sure the patchwork section is assembled securely and pressed flat before attaching it to the backing.
You can also experiment with decorative quilting to add texture and visual interest. Simple straight lines, diagonal stitching, or gentle curved patterns can make the coaster look more sophisticated. Quilting helps hold the fabric layers together and gives the finished piece a handmade appearance. If you are using a sewing machine, mark your quilting lines with a washable fabric pen before stitching. Keep the lines evenly spaced to create a balanced design that complements the ornament shape.
For a more traditional holiday style, consider adding embroidery details. Small stars, decorative dots, snowflakes, or simple geometric patterns can be embroidered onto the fabric before assembling the coaster. Metallic embroidery thread in gold or silver can add a festive appearance without requiring complicated techniques. If you are new to embroidery, begin with simple running stitches or French knots. These small details can make even a basic fabric coaster look special and carefully handcrafted.
Another idea is to create a coordinated collection of Christmas fabric coasters using different combinations of colors and prints. You could make one red bauble, one green bauble, one white bauble, and another with a gold-inspired pattern. Although the designs are different, using the same template will help the collection maintain a consistent appearance. A matching set can be displayed on a coffee table or used when serving guests during Christmas celebrations.
The finishing process is just as important as the decoration itself. Inspect the edges to make sure there are no loose threads, uneven stitches, or visible openings. Press the coaster one final time and check that it sits flat on a table. If you want to give the finished pieces as handmade gifts, stack several coasters together and tie them with a festive ribbon. A small handmade tag can add a thoughtful finishing touch. These simple details help transform an easy sewing project into a charming seasonal gift.
Frequently Asked Questions About the Fabric Coaster Pattern in the Shape of a Christmas Bauble
1. What fabric is best for making a Christmas bauble coaster?
Cotton fabric is one of the best choices because it is easy to cut, sew, and press. It also comes in many Christmas prints and colors, allowing you to personalize each coaster. Medium-weight cotton is particularly suitable because it provides a good balance between flexibility and durability. You can combine different cotton prints to create an attractive reversible design.
2. Can beginners make this fabric coaster pattern?
Yes! This Fabric coaster pattern in the shape of a Christmas bauble is suitable for beginners who have basic sewing skills. The main techniques include tracing a template, cutting fabric, sewing curved edges, turning the piece right side out, and finishing the opening. Beginners can start with a simple design and gradually experiment with quilting, appliqué, and embroidery.
3. What size should a Christmas bauble fabric coaster be?
A practical starting size is approximately 4 to 5 inches wide and 5 to 6 inches tall. However, you can adjust the measurements according to the cups and mugs you plan to use. Make sure the rounded body provides enough space for the base of a typical mug while keeping the decorative top relatively narrow.
4. Do I need batting to make fabric coasters?
Batting is optional, but it can improve the structure and softness of your coaster. Thin cotton batting is a good choice if you want a lightly padded finish. Alternatively, you can use interfacing to stabilize the fabric. Avoid excessive thickness because a coaster should sit flat and provide a stable surface for drinks.
5. Can I make reversible Christmas bauble coasters?
Absolutely! Using two different cotton prints for the front and back creates a reversible design. You can choose traditional Christmas patterns on one side and a simpler coordinating fabric on the other. This makes the coaster more versatile and gives you two decorative looks in one handmade item.
6. How can I make the edges look professional?
The best way to achieve neat edges is to use an even seam allowance, trim excess fabric carefully, and clip the curved seam allowances before turning the coaster right side out. Pressing the edges is also essential. Finally, add consistent topstitching around the perimeter to create a clean, polished finish.
7. Can I make these coasters without a sewing machine?
Yes. Hand sewing is a suitable alternative if you do not have access to a sewing machine. Use small, consistent stitches to join the fabric layers and close the turning opening. A ladder stitch is particularly useful for creating an almost invisible closure. The process may take longer, but the result can still be beautiful.
8. How can I decorate my Christmas bauble fabric coaster?
There are many possibilities! You can use contrasting fabrics, embroidery, appliqué, decorative quilting, and small felt details. Gold and silver thread can create a festive appearance, while traditional red, green, and white fabrics give the coaster a classic Christmas look. Choose decorations that do not make the drinking surface uneven.
9. Can I use leftover fabric scraps for this project?
Yes! This is an excellent project for using small fabric scraps. You can combine different cotton prints to create patchwork designs or use one fabric for the front and another for the backing. Just make sure that the pieces are large enough to accommodate the template and the required seam allowance.
10. How should I wash and care for fabric Christmas coasters?
Care depends on the materials used. If you have chosen washable cotton fabric and suitable batting, gentle machine washing may be possible. However, always check the care instructions for your materials first. Washing in cool water and allowing the coaster to air-dry can help preserve its shape. Avoid harsh detergents and excessive heat, especially if your coaster includes decorative embroidery or appliqué.
11. Can these Christmas bauble coasters be given as handmade gifts?
Definitely! A coordinated set of four or six coasters makes a thoughtful handmade Christmas gift. You can use different festive prints while keeping the same ornament shape throughout the collection. Arrange the finished pieces in a small stack, tie them with ribbon, and add a handmade gift tag for a charming presentation.
12. How can I keep the coaster from losing its shape?
Accurate cutting, appropriate interfacing, careful stitching, and proper pressing all help maintain the ornament silhouette. Avoid using fabric that stretches excessively, and make sure the batting is distributed evenly. Topstitching around the perimeter also helps the layers stay in place during regular use.
Conclusion
Creating a Fabric coaster pattern in the shape of a Christmas bauble is a delightful way to combine sewing, creativity, and holiday decoration in one simple project. Throughout this tutorial, we explored how to choose suitable cotton fabrics, prepare the necessary materials, create an ornament-shaped template, cut the fabric layers, sew the pieces together, and finish the coaster with neat stitching. We also looked at different ways to personalize the design through patchwork, quilting, embroidery, and festive decorative details.
The best part of this project is that you can adapt it to your own style, making each coaster unique while maintaining the traditional charm of a Christmas ornament. Whether you choose classic red and green fabrics or more contemporary holiday colors, the finished pieces can add warmth and personality to your home. They are also practical handmade gifts that can be enjoyed throughout the Christmas season.
Now it is your turn to get creative! Try this Christmas bauble fabric coaster pattern, experiment with different fabric combinations, and enjoy making your own festive collection. We would love to hear your sincere opinion about this tutorial. Leave a comment sharing your experience, tell us which colors you would choose, and suggest other Christmas sewing projects you would like to learn. Your ideas and suggestions can inspire even more creative handmade projects!