
The Crochet moon ornament pattern is a beautiful and creative way to bring a little magic, charm, and handmade personality into your home. Inspired by the soft glow of the night sky, this delicate crochet decoration is perfect for anyone who loves celestial themes, handmade ornaments, and charming DIY projects. Whether you want to decorate your Christmas tree, create a dreamy nursery accessory, or add a special touch to a bedroom, a crocheted moon can become a lovely detail that makes any space feel more welcoming. Best of all, this project can be adapted to different colors, sizes, and decorative styles, making it suitable for many occasions throughout the year.
One of the most enjoyable things about making a Crochet moon ornament pattern is that it combines simple crochet techniques with an attractive finished shape. You do not need to be an expert crocheter to create a beautiful moon. With basic stitches, a little patience, and the right materials, you can produce a decorative crescent moon that looks professional and charming. The project is also an excellent opportunity to practice increasing, decreasing, working in rows, and shaping crochet fabric. These techniques are useful for many other handmade projects, so every stitch contributes to developing your crochet skills.
Another wonderful advantage of this crochet moon ornament is its versatility. You can make a traditional golden crescent moon, a soft white moon for minimalist decorations, or a colorful version with embroidered stars and tiny details. It can be used as a Christmas ornament, a nursery decoration, a handmade gift, or part of a larger celestial collection featuring stars, clouds, and other night-sky elements. If you enjoy making personalized crafts, this pattern gives you plenty of opportunities to experiment with textures and embellishments. In this tutorial, you will learn how to prepare your materials, understand the basic crochet terminology, shape your crescent moon, and finish your ornament with a neat and attractive appearance.
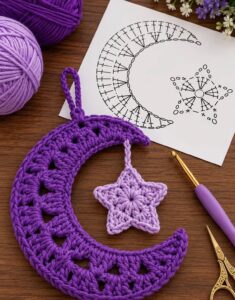
Materials and Basic Techniques for the Crochet Moon Ornament Pattern
Before beginning the Crochet moon ornament pattern, it is important to gather all the necessary supplies. Having everything within reach makes the process easier and helps you maintain consistent stitches throughout the project. For a small decorative moon, you will need approximately 30 to 50 grams of medium-weight cotton or acrylic yarn, depending on the size you choose. Cotton yarn creates a defined stitch texture, while acrylic yarn provides a softer and slightly fluffier appearance.
Choose a crochet hook that matches your yarn recommendation. A hook between 3.0 mm and 4.0 mm is a useful starting point for a small ornament. If you crochet very loosely, consider using a slightly smaller hook to create a firmer fabric. Consistent tension is particularly important when making decorative shapes because uneven stitches can affect the final outline of the crescent moon.
You will also need a yarn needle, scissors, stitch markers, and a small amount of polyester fiberfill if you want to create a stuffed moon. For the hanging loop, prepare a short piece of matching yarn or a thin decorative cord. Optional materials include embroidery thread, small felt stars, and a little ribbon. Avoid heavy decorations that could distort the finished ornament.
Understanding the crochet abbreviations will make this Crochet moon ornament pattern easier to follow. The instructions below use standard US crochet terminology. Here are the main abbreviations:
- CH (Chain): The basic foundation stitch used to begin many crochet projects.
- SC (Single Crochet): A compact stitch that creates a firm and even fabric.
- INC (Increase): Two single crochet stitches worked into the same stitch to make the piece wider.
- DEC (Decrease): Two stitches combined into one to reduce the stitch count.
- SL ST (Slip Stitch): A joining stitch commonly used to finish rounds or move across stitches.
- FO (Fasten Off): Cutting the yarn and securing the final loop.
For this particular crochet crescent moon pattern, you will work in rows rather than making a complete circle. This approach allows you to create a curved crescent silhouette by gradually increasing and decreasing the number of stitches. It is a beginner-friendly construction method that makes the shaping process easier to understand.
Step-by-Step Crochet Moon Ornament Pattern Instructions
Start by making a foundation chain of 3 stitches. Insert your hook into the second chain from the hook and work 1 SC. Work another SC into the next chain. You should now have 2 stitches. CH 1 and turn your work. This small beginning forms the first section of your moon and provides a foundation for the following increases.
Row 2: Work 2 SC into the first stitch, then work 1 SC into the next stitch. You will have 3 stitches in total. CH 1 and turn. Remember that the turning chain does not count as a stitch in this pattern. Keeping track of your stitch count will help maintain the intended crescent shape.
Row 3: Work 1 SC into each stitch across the row. You should have 3 SC. CH 1 and turn. This simple row creates a little height without increasing the width. Maintaining even tension is important because the finished moon should have a smooth surface without noticeable gaps.
Row 4: Work 2 SC into the first stitch, 1 SC into the next stitch, and 2 SC into the last stitch. You will have 5 stitches. CH 1 and turn. These increases begin creating the wider outer curve of the moon. If you want a larger ornament, you can repeat this type of increase over additional rows.
Row 5: Work 1 SC into each stitch across. You should have 5 stitches. CH 1 and turn. This row helps establish the shape and gives the fabric a more balanced appearance. Check that your stitches are neither too tight nor too loose.
Row 6: Work 2 SC into the first stitch, 1 SC into each of the next 3 stitches, and 2 SC into the last stitch. You will have 7 stitches. CH 1 and turn. Your moon is now beginning to develop a noticeable curved silhouette.
Row 7: Work 1 SC into each stitch across, giving you 7 stitches. CH 1 and turn. Continue keeping the edges neat and consistent. If the fabric starts curling slightly, do not worry immediately; some minor movement is normal during crochet shaping.
Row 8: Work 2 SC into the first stitch, 1 SC into each of the next 5 stitches, and 2 SC into the last stitch. You will have 9 stitches. CH 1 and turn. This is another important increase row that gradually expands the body of the crescent moon.
Row 9: Work 1 SC into each stitch across. You should have 9 stitches. CH 1 and turn. At this stage, you can begin seeing the general shape of your ornament. Lay the piece on a flat surface occasionally to check whether the edges are developing evenly.
Row 10: Work 2 SC into the first stitch, 1 SC into each of the next 7 stitches, and 2 SC into the last stitch. You will have 11 stitches. CH 1 and turn. This is the widest section of the example moon. If you prefer a smaller decoration, you can stop increasing after Row 8.
Row 11: Work 1 SC into each stitch across. You will have 11 stitches. CH 1 and turn. This straight row gives the wider section a little more height and helps create a balanced decorative shape.
Row 12: Begin decreasing by working 1 SC in the first stitch, then use a single crochet decrease over the next two stitches. Continue with SC stitches across the row, working a decrease near the end to reduce the stitch count gradually. For a symmetrical version, aim for 9 stitches. CH 1 and turn.
Row 13: Work 1 SC into each stitch across. You should have 9 stitches. CH 1 and turn. Keep the decreases gentle because sudden changes in stitch count can make the moon look angular instead of smoothly curved.
Row 14: Work a decrease over the first two stitches, 1 SC into each of the next 5 stitches, and a decrease over the final two stitches. You will have 7 stitches. CH 1 and turn. The moon is now narrowing toward its upper tip.
Row 15: Work 1 SC into each stitch across. You should have 7 stitches. CH 1 and turn. This row maintains the shape while preparing the piece for the final decreases.
Row 16: Work a decrease at the beginning, 1 SC into each of the next 3 stitches, and another decrease at the end. You will have 5 stitches. CH 1 and turn.
Row 17: Work 1 SC into each stitch across. You should have 5 stitches. CH 1 and turn. Continue working with an even hand so the tip does not become too tight or twisted.
Row 18: Work a decrease at the beginning, 1 SC into the next stitch, and another decrease at the end. You will have 3 stitches. CH 1 and turn.
Row 19: Work a decrease over the first two stitches and 1 SC into the final stitch. You will have 2 stitches. CH 1 and turn.
Row 20: Work a decrease over the remaining two stitches. Fasten off and leave a yarn tail long enough for sewing if you plan to make a second matching piece.
The instructions above create a simple tapered crochet shape. To obtain a recognizable crescent moon, make a second matching piece and position the two shapes together with their tips pointing in the same direction. Slightly adjust the alignment to create the curved inner opening characteristic of a crescent. You can also use a crescent-shaped template to guide the outline when arranging the pieces.
Assembly, Decoration, and Creative Ways to Use Your Crochet Moon Ornament
Once both pieces of your Crochet moon ornament pattern are complete, place them together with the right sides facing outward. Align the edges carefully and use a yarn needle to sew around the perimeter with matching yarn. If you want a three-dimensional ornament, leave a small opening before finishing the seam.
Add a little polyester fiberfill through the opening. Distribute the filling evenly, paying particular attention to the curved areas and pointed ends. Avoid adding too much stuffing because excessive filling can stretch the stitches and change the shape. Once the moon has a soft, even appearance, close the remaining opening with a neat sewing stitch.
If you prefer a flat decoration, you can simply sew the two pieces together without adding stuffing. This version is lightweight and works especially well for Christmas tree decorations, garlands, gift wrapping, and wall displays. You can also place a thin piece of felt between the crochet layers to provide additional stability.
To create the hanging loop, cut approximately 12 to 15 centimeters of yarn or decorative cord. Fold it in half and attach both ends securely to the top of the moon. Reinforce the attachment with several stitches so that the ornament can hang without pulling loose. Make sure the loop is centered to prevent the decoration from tilting.
Now comes the fun part: decorating your moon. Embroider small stars, dots, or delicate facial features using contrasting yarn. Gold embroidery thread looks beautiful against cream or white crochet, while silver thread creates a softer celestial effect. If you prefer a minimalist appearance, leave the moon plain and allow its handmade texture to become the main decorative feature.
You can also experiment with different color combinations. A golden yellow moon is perfect for traditional Christmas decorations, while pale blue, lavender, and white create a dreamy nursery theme. A collection of moons in different sizes can be combined with crocheted stars and clouds to make a charming celestial garland. These ornaments also make thoughtful handmade gifts because each one can be customized to match the recipient’s favorite colors.
FAQ About the Crochet Moon Ornament Pattern
1. Is the Crochet moon ornament pattern suitable for beginners?
Yes. This project is suitable for beginners who already understand basic crochet stitches such as chain and single crochet. The pattern also introduces increases and decreases, which are essential techniques for creating shaped crochet pieces. Working slowly and counting stitches after each row will make the process easier.
2. What type of yarn is best for a crochet moon ornament?
Cotton and acrylic yarn are both excellent options. Cotton provides a firm structure and clearly defined stitches, making it ideal for decorative ornaments. Acrylic yarn is softer and often available in a wider variety of colors. Choose a yarn that feels comfortable to work with and matches the appearance you want.
3. How long does it take to complete a crochet crescent moon?
A small ornament may take approximately one to three hours, depending on your crochet experience, yarn thickness, and finishing details. Beginners may need additional time to understand the shaping instructions and assemble the two pieces.
4. Can I make the moon without stuffing?
Absolutely. A flat version is a wonderful alternative if you want a lightweight decoration. Simply sew the two crochet pieces together without adding fiberfill. This version is particularly useful for garlands, gift decorations, and Christmas tree ornaments.
5. How can I make my crochet moon larger?
You can use thicker yarn and a larger crochet hook or add more increase rows before beginning the decreases. If you modify the stitch counts, remember to adjust the decreasing section accordingly so the crescent remains balanced.
6. How do I prevent the edges from looking uneven?
Count your stitches at the end of every row and make sure your increases and decreases are positioned correctly. Using stitch markers at important shaping points can also help. Consistent tension and careful assembly make a significant difference in the final appearance.
7. Can I use this crochet moon ornament as a Christmas decoration?
Yes. A golden or white crocheted moon looks lovely on a Christmas tree. You can combine it with crocheted stars, snowflakes, and other handmade decorations to create a coordinated seasonal display.
8. How do I attach the hanging loop securely?
Use matching yarn or a strong decorative cord. Sew both ends into the upper part of the ornament using a yarn needle. Make several reinforcing stitches and gently test the loop before hanging the decoration.
9. Can I add a face to my crochet moon?
Yes. You can embroider closed eyes, a small smile, or tiny decorative details using embroidery thread. Embroidered features are a simple way to personalize the ornament. If the decoration will be used around young children, avoid small detachable embellishments.
10. How should I wash and store my crochet moon ornament?
Check the yarn manufacturer’s care recommendations before washing. In general, gentle hand washing with mild detergent is a suitable option for many cotton and acrylic projects. Allow the ornament to dry completely before storing it in a clean, dry container. Avoid placing heavy objects on top of it because this can flatten the shape.
11. Can I sell ornaments made using this pattern?
You can create handmade ornaments for personal use or consider selling finished pieces, provided you follow any applicable pattern and material-use restrictions. If you plan to sell them, pay attention to finishing quality, durability, and accurate product descriptions. Always be transparent about the materials and handmade nature of each item.
12. What can I make to match my crochet moon ornament?
Crocheted stars, clouds, little hearts, and celestial garlands are excellent matching projects. Using the same yarn colors and stitch style will help create a coordinated collection. You can also make several moons in different sizes to create a decorative hanging arrangement.
Conclusion
The Crochet moon ornament pattern is a lovely handmade project that combines simple crochet techniques, creative possibilities, and beautiful decorative results. Throughout this tutorial, you learned how to choose the right materials, understand the essential crochet abbreviations, work through the step-by-step crescent shaping instructions, and assemble and decorate your finished moon. You also discovered how different yarn colors, embroidery details, and hanging loops can transform a basic crochet shape into a personalized ornament for many occasions.
Whether you are making your first crochet decoration or adding another design to your handmade collection, this project offers an enjoyable way to practice your skills and create something special. A crocheted moon can brighten a Christmas tree, decorate a bedroom, become part of a celestial garland, or serve as a thoughtful handmade gift.
Now that you know how to make this Crochet moon ornament pattern, it is time to choose your favorite yarn colors and start creating! We would love to hear your honest opinion about this tutorial. Did you find the instructions easy to follow? Would you choose a classic golden moon or experiment with different colors and decorations? Leave your sincere feedback and suggestions in the comments. Your ideas can inspire other crochet enthusiasts and help make future patterns even more enjoyable.