
The Log Cabin Quilt Block Pattern is a timeless quilting design that combines simple fabric strips to create a beautiful geometric block with a distinctive layered appearance. Loved by beginners and experienced quilters alike, this traditional pattern is an excellent way to transform small pieces of fabric into an eye-catching handmade project. Its characteristic construction begins with a central square and gradually builds outward using strips arranged around the center. The result is a charming design that can be customized with countless colors, prints, and fabric combinations.
One of the most appealing features of the Log Cabin Quilt Block Pattern is its versatility. Although the traditional design often uses light fabrics on one side and darker fabrics on the other, modern quilters can experiment with bright colors, seasonal prints, floral fabrics, neutral combinations, or even contrasting shades. Each fabric strip contributes to the overall appearance, allowing you to create a block that reflects your personal style. Whether you want to make a traditional quilt, a decorative pillow, a table runner, or a wall hanging, this block offers many creative possibilities.
This tutorial explains how to make a beautiful Log Cabin Quilt Block Pattern step by step, from selecting the fabrics to assembling and finishing the block. You will learn how to prepare the center square, measure and cut fabric strips, sew each section in the correct order, and press the seams for a neat result. The instructions are suitable for beginners who want to learn the fundamentals of patchwork while also offering useful techniques for experienced quilters. With careful measurements and a little patience, you can create a balanced quilt block that looks professional and can become part of a much larger quilting project.
Materials and Fabric Preparation for the Log Cabin Quilt Block Pattern
Before starting your Log Cabin Quilt Block Pattern, organize all the materials you will need. Preparing your workspace in advance makes the quilting process easier and helps you maintain accuracy throughout the project. You will need cotton quilting fabric, a rotary cutter, a cutting mat, a quilting ruler, sewing thread, pins or clips, an iron, and a sewing machine. A fabric marker and small scissors can also be helpful.
Cotton quilting fabric is an excellent choice because it is easy to cut, sew, and press. Choose two main color groups to create the traditional light-and-dark appearance. For example, you can use cream, white, and pale beige fabrics for one half of the block, combined with navy blue, burgundy, or dark green fabrics for the opposite half. This contrast helps emphasize the distinctive structure of the Log Cabin Quilt Block Pattern.
The central square is the starting point of the design. Traditionally, this square is often red, yellow, or another noticeable color, although there are no strict rules. For a beginner-friendly block, consider using a center square measuring 2.5 inches by 2.5 inches. This provides enough room to work with the surrounding fabric strips while keeping the overall design manageable.
Next, prepare your fabric strips. A convenient starting width is 1.5 inches, including the seam allowance. You can cut strips in different lengths according to the dimensions of your growing block. It is helpful to prepare several strips in both light and dark fabrics before beginning so that you can concentrate on sewing rather than repeatedly stopping to cut more material.
Accurate cutting is essential for a successful Log Cabin Quilt Block Pattern. Place your fabric on a cutting mat, align the quilting ruler with the fabric grain, and use a rotary cutter to create straight edges. Measure twice before cutting, especially when working with narrow strips. Even small inaccuracies can accumulate as you add more sections to the block.
Before sewing, arrange your fabrics in the order you intend to use them. Place the central square in the middle and organize the light and dark strips around it. This simple preparation helps you visualize the finished design and avoid accidentally placing similar colors next to each other. Once everything is organized, you are ready to begin constructing your quilt block.
Step-by-Step Instructions to Sew Your Log Cabin Quilt Block Pattern
Start by placing the central square on your sewing table with the right side facing upward. Select the first fabric strip and position it along one side of the square, with the right sides of the fabrics together. Align the raw edges carefully and secure them with a pin or clip. This first strip establishes the foundation for the entire Log Cabin Quilt Block Pattern.
Using your sewing machine, stitch the two pieces together with a quarter-inch seam allowance. A consistent seam allowance is particularly important in quilting because it helps the block maintain its intended measurements. After sewing, open the fabric strip and press it away from the center square. Pressing each seam as you work helps keep the block flat and organized.
Now select the second strip and place it along the next side of the growing block. For the traditional construction method, continue sewing around the center in a spiral sequence. Position the strip with the right sides together, align the edges, sew with a quarter-inch seam allowance, and press the strip outward. The block will gradually become larger as you add each new section.
Continue with the third strip, attaching it to the next available side. At this stage, you will begin to see the characteristic log cabin structure. The fabric strips form a series of rectangular sections around the center square, creating a layered geometric appearance. Keep checking the alignment before stitching to ensure that the edges remain straight.
Add the fourth strip to complete the first round around the center. Once all four sides have been covered, take a moment to inspect your work. The central square should remain visible, and the surrounding strips should form a neat frame. If the block appears slightly uneven, check whether the seams were pressed correctly or whether a strip shifted during sewing.
Continue building the block by adding more fabric strips in the same sequence. Alternate between your light and dark fabrics to create the traditional contrast. For example, you can place light strips along two adjacent sides and darker strips along the opposite sides. This arrangement creates the familiar visual balance associated with a classic Log Cabin Quilt Block Pattern.
As you add each strip, measure the length needed rather than assuming every piece will have the same dimensions. The growing block determines the length of the next strip. Place the fabric along the appropriate edge, mark the required length, cut it accurately, and then sew it in place. This method reduces unnecessary fabric waste and helps maintain a clean outline.
Press every seam after stitching. You can use a dry iron or steam if appropriate for your fabric. Many quilters prefer pressing seams away from the center, although the best direction may depend on the fabric arrangement and the desired final construction. The most important point is to keep the block flat and avoid creating unnecessary bulk.
Once your block reaches the desired size, trim the outer edges using a quilting ruler and rotary cutter. Check that all four sides are straight and that the corners form clean right angles. If you are planning to join several blocks together, consistent sizing is especially important. A carefully trimmed Log Cabin Quilt Block Pattern will be much easier to assemble into a larger quilt.
Finally, inspect the entire block for loose threads, uneven seams, or small gaps. Remove any excess threads and press the completed block one more time. You now have a finished log cabin block that can be used individually or combined with additional blocks to create a beautiful patchwork design.
Color Combinations, Variations, and Creative Uses for Log Cabin Quilt Blocks
One of the most exciting aspects of the Log Cabin Quilt Block Pattern is the freedom to experiment with colors. The traditional light-and-dark arrangement creates a strong visual contrast, but modern interpretations can use almost any palette. Soft pastel fabrics produce a delicate appearance, while bold colors create a more contemporary design. You can also choose fabrics from a coordinated collection to ensure that every section works harmoniously.
A classic variation is the Traditional Log Cabin Block, which features a noticeable central square surrounded by alternating light and dark strips. This arrangement creates a balanced appearance and highlights the geometric structure. It is a wonderful option for quilters who appreciate traditional patchwork techniques and want to make a timeless design.
Another popular variation is the Courthouse Steps Log Cabin Block. Instead of following the usual spiral arrangement, this variation adds strips in pairs on opposite sides of the center. The result is a more symmetrical design with rectangular layers. It is an interesting alternative for anyone who wants to explore different ways of arranging the same basic fabric shapes.
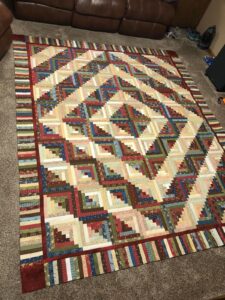
You can also experiment with the Barn Raising Layout, a traditional arrangement that uses multiple log cabin blocks to create larger geometric patterns. When several blocks are positioned together, the light and dark sections can form diagonal lines, squares, diamonds, or larger visual structures. Planning the layout before sewing all the blocks together helps you achieve the intended effect.
Fabric selection can completely change the personality of your quilt. Floral prints, small geometric patterns, polka dots, stripes, and solid fabrics can all work beautifully. If you prefer a coordinated appearance, select fabrics with similar undertones. If you enjoy a more playful style, combine different prints while keeping a consistent color palette.
The Log Cabin Quilt Block Pattern is not limited to traditional bed quilts. Finished blocks can be transformed into decorative pillow covers, table runners, placemats, wall hangings, tote bag panels, and seasonal decorations. A single block can become an attractive cushion front, while several blocks can be joined to create a larger home accessory.
Another creative possibility is making a scrappy log cabin quilt. This technique uses leftover fabric pieces from previous sewing projects. Instead of choosing identical strips, you can combine different cotton scraps to create a colorful and unique block. To keep the design visually balanced, try grouping fabrics by light and dark values rather than focusing only on their individual colors.
For a more modern appearance, consider using solid fabrics in contrasting shades. Black and white, navy and cream, or gray and mustard combinations can emphasize the geometric lines of the pattern. You can also experiment with a bright center square to create a focal point that attracts attention.
If you want to make a complete quilt, create several blocks using the same finished dimensions. Arrange them on a flat surface before joining them together. Move the blocks around until you find a layout that you like. Once you are happy with the arrangement, sew the blocks into rows and then join the rows to complete the quilt top.
Frequently Asked Questions About the Log Cabin Quilt Block Pattern
1. What is a Log Cabin Quilt Block Pattern?
A Log Cabin Quilt Block Pattern is a traditional patchwork design constructed by sewing fabric strips around a central square. The strips are added in a specific sequence to create a layered geometric appearance. The traditional version often uses light fabrics on one side and dark fabrics on the other.
2. Is the Log Cabin Quilt Block suitable for beginners?
Yes! It is an excellent project for beginners because it teaches important quilting skills, including accurate cutting, maintaining a consistent seam allowance, straight stitching, and pressing seams. Starting with a simple block makes it easier to understand the construction process.
3. What size should the center square be?
A 2.5-inch center square is a convenient starting point for a beginner-friendly block. However, you can use a smaller or larger square depending on the finished dimensions you want. The important thing is to keep the measurements consistent throughout your project.
4. What is the best fabric for a Log Cabin Quilt Block?
Quilting cotton is one of the most popular choices. It is stable, easy to cut, and suitable for piecing multiple fabric strips together. Choose fabrics that have similar weights to help the block lie flat.
5. How wide should the fabric strips be?
A 1.5-inch strip, including the seam allowance, is a practical option for many projects. You can use wider strips for a larger, bolder design or narrower strips for a more detailed appearance. Keep the strip width consistent if you want a uniform block.
6. Do I need a sewing machine to make this pattern?
A sewing machine makes the process faster and helps create consistent seams, but hand sewing is also possible. Use small, even stitches and take your time when joining each strip. Both methods can produce attractive results.
7. Why are light and dark fabrics used in the traditional design?
The contrast between light and dark fabrics emphasizes the geometric arrangement of the strips. This creates the characteristic appearance of the traditional log cabin design. However, you can choose any color combination that suits your preferences.
8. What is the difference between a traditional Log Cabin and Courthouse Steps block?
A traditional log cabin block usually follows a spiral construction sequence, adding strips around the center. A Courthouse Steps block adds strips in pairs on opposite sides, creating a more symmetrical arrangement.
9. How do I prevent my quilt block from becoming uneven?
Use accurate measurements, cut straight fabric strips, and maintain a consistent quarter-inch seam allowance. Press each seam after sewing and avoid stretching the fabric while handling it. Measuring the block periodically can also help identify problems early.
10. Should I press the seams open or to one side?
Many quilters press seams toward the darker fabric or away from the center. Others prefer pressing seams open to reduce bulk. The best option depends on the design, fabric thickness, and how you plan to assemble the finished quilt.
11. Can I use fabric scraps for this project?
Absolutely! The Log Cabin Quilt Block Pattern is an excellent way to use leftover quilting cotton. Scraps can be arranged by color and value to create an attractive patchwork effect. Make sure each piece is large enough to provide the required seam allowance.
12. How many blocks do I need to make a quilt?
The number depends on the finished size of the quilt and the dimensions of each block. A small baby quilt may require relatively few blocks, while a large bed quilt will need many more. Plan your layout and calculate the number of blocks before cutting all your fabric.
13. Can I make a Log Cabin block without a rotary cutter?
Yes. Fabric scissors and a ruler can be used to measure and cut the strips. A rotary cutter is convenient for achieving straight edges, but it is not essential for completing the project.
14. What can I make with a single Log Cabin Quilt Block?
A single block can be used to make a decorative pillow, a wall hanging, a small table mat, or a fabric panel for a bag. You can also frame a finished block as a handmade decorative piece.
15. How do I join multiple Log Cabin blocks together?
First, make sure all blocks have the same finished dimensions. Arrange them in your preferred layout, sew the blocks into horizontal rows, and then join the rows together. Press the joining seams carefully to keep the quilt top flat.
16. Can I create a modern Log Cabin Quilt Block Pattern?
Yes! Modern versions can use solid fabrics, bold contrasts, asymmetrical arrangements, and unexpected color combinations. You can also experiment with different strip widths to create a contemporary interpretation of this traditional quilting technique.
Conclusion
The Log Cabin Quilt Block Pattern is a beautiful example of how simple fabric strips can become an impressive patchwork design. Throughout this tutorial, you learned how to select suitable materials, prepare the central square, cut fabric strips, sew the sections in sequence, press the seams, and trim the finished block. You also discovered different color combinations, traditional variations, and creative ways to use your completed blocks.
Whether you are a beginner learning the fundamentals of quilting or an experienced sewing enthusiast looking for a timeless project, this pattern offers plenty of opportunities to explore your creativity. By paying attention to measurements, maintaining consistent seams, and choosing fabrics that complement one another, you can create beautiful blocks for quilts and many other handmade decorations.
Now gather your favorite fabrics, prepare your sewing tools, and enjoy creating your own Log Cabin Quilt Block Pattern. Remember that every block can have its own personality, and experimenting with colors and prints is part of the fun.If you enjoyed this tutorial, leave your honest opinion in the comments! We would love to know how your project turned out, which colors you chose, and whether you tried a traditional or modern arrangement. Feel free to share your suggestions and tell us which quilting patterns you would like to learn next. Your ideas and feedback help inspire more creative sewing projects!