
The Cat Fabric Coaster Pattern is a charming and practical sewing project that brings personality, warmth, and creativity to any home.
One of the best things about the Cat Fabric Coaster Pattern is its versatility. You can choose fabrics in different colors, prints, and textures to create cats with unique personalities.
This Cat Fabric Coaster Pattern is suitable for beginners who want to practice basic sewing techniques without taking on a complicated project. The construction involves preparing a template, cutting fabric pieces, adding batting or interfacing, sewing the layers together, and finishing the edges carefully. Each step is manageable, and you can work at your own pace. The finished coaster can be used every day, included in a handmade gift set, or displayed as part of a charming cat-themed decoration. In this tutorial, you will learn how to prepare the materials, assemble the fabric layers, sew the cat-shaped design, and add finishing touches that make your project look neat and professional.
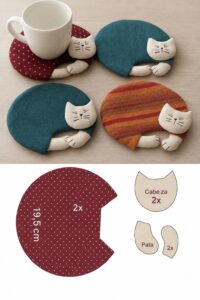
Materials and Preparation for Your Cat Fabric Coaster Pattern
Before beginning your Cat Fabric Coaster Pattern, gather all the materials you need. Having everything ready will make the sewing process easier and help you avoid unnecessary interruptions. The main materials include cotton fabric, lightweight batting, sewing thread, scissors, pins or clips, and a sewing machine or hand-sewing needle.
For the outer layers, choose two pieces of cotton fabric that complement each other. You can use the same fabric on both sides or select contrasting prints to create a reversible coaster. Cotton is a particularly good choice because it is easy to cut, sew, and maintain. Small floral prints, polka dots, gingham, and solid colors can all work beautifully.
The cat fabric coaster pattern begins with a simple paper template. Draw a cat silhouette with a rounded head, two pointed ears, and a slightly wider lower section. The shape should be large enough to accommodate a drinking glass or small mug. A finished coaster measuring approximately 4.5 to 5 inches wide is a practical starting point, although you can adjust the dimensions to suit your preferences.
Next, prepare the inner layer. A thin piece of cotton batting or quilt batting will provide light padding and help the coaster maintain its shape. You can also use a suitable heat-resistant interfacing if you want a firmer construction. Remember that fabric coasters are intended for ordinary drinkware and are not substitutes for certified heat-resistant kitchen mats.
Print or draw your template on paper and cut it out carefully. Check that both ears are symmetrical and that the bottom edge is wide enough to support a cup. If you want to make several matching coasters, use the same template for every piece to ensure consistent sizing.
Wash and dry your cotton fabric before cutting if the material is washable. This helps reduce the risk of unexpected shrinkage after the finished coasters are washed. Iron the fabric to remove wrinkles and make cutting more accurate. Smooth fabric also makes it easier to position the template without unwanted distortions.
Finally, organize your workspace and prepare your sewing machine with a suitable needle and matching thread. A standard straight stitch is sufficient for most of this project. Choose thread that blends with the fabric or use a contrasting color for decorative topstitching. With your materials prepared, you are ready to start assembling your Cat Fabric Coaster Pattern.
Step-by-Step Instructions for Sewing a Cat Fabric Coaster Pattern
Start by placing your paper cat template on the wrong side of the selected fabric. Trace around the outline using a washable fabric marker or another suitable marking tool. Repeat the process to create a second fabric silhouette. These two pieces will form the front and back of your coaster.
Cut both fabric pieces carefully, following the traced outline. Try to keep your scissors steady around the pointed ears and curved head. Accurate cutting is important because uneven edges can make the finished coaster look irregular. If necessary, pin the fabric layers together before cutting to prevent them from shifting.
Now cut one piece of batting using the same template. If your batting is slightly thick, you may prefer to trim it a little smaller than the fabric pieces. This can reduce bulk around the seam allowance and make turning the coaster easier. Place the batting between the two fabric pieces, with the right sides of the cotton fabric facing each other.
Pin or clip the layers together around the edges. Make sure the ears are aligned and that the lower sections match. Leave a small opening along a relatively straight section at the bottom or side of the coaster. This opening will allow you to turn the project right side out after sewing.
Using a sewing machine, stitch around the outline with a consistent seam allowance of approximately 1/4 inch. Sew slowly around the ears and curves, stopping with the needle down whenever you need to reposition the fabric. Avoid sewing across the turning opening. Backstitch briefly at both ends of the opening to reinforce the stitching.
After sewing, trim away excess batting near the seam without cutting through the stitches. Carefully clip small notches along curved sections and trim excess fabric around the pointed ears. These small adjustments help the fabric turn smoothly and reduce bulk. Be especially careful not to cut too close to the stitching line.
Turn the coaster right side out through the opening. Use a blunt turning tool or the rounded end of a small knitting needle to gently shape the ears and corners. Avoid using sharp objects that could puncture the fabric. Once the silhouette looks correct, arrange the layers and press the coaster with an iron at a temperature appropriate for the fabric.
Fold the raw edges of the turning opening inward and secure them with pins or clips. Close the opening with a neat ladder stitch by hand or a carefully positioned machine stitch. If you prefer a decorative finish, sew a line of topstitching around the entire silhouette. This helps keep the layers in place and gives your Cat Fabric Coaster Pattern a polished appearance.
At this stage, you can add facial details. Use embroidery floss to create two small eyes, a triangular nose, and delicate whiskers. You can also sew small fabric shapes onto the front before assembling the layers if you prefer appliqué details. Make sure decorative elements are securely attached and do not create uncomfortable raised areas where a cup will sit.
Customization, Finishing Touches, and Creative Ideas
One of the most enjoyable aspects of the Cat Fabric Coaster Pattern is the opportunity to experiment with colors and prints. You can create an entire collection of cats with different appearances. For example, use black fabric for one coaster, gray for another, and orange or cream fabric for additional designs. A coordinated collection can look beautiful when arranged together on a coffee table.
Fabric selection can also change the overall style of your project. Floral cotton creates a delicate and romantic appearance, while polka dots and colorful geometric prints produce a cheerful, modern look. If you prefer a minimalist decoration, choose neutral shades such as beige, white, charcoal, and soft gray. The cat silhouette itself will provide enough visual interest.
Another idea is to make reversible coasters. Select two complementary prints and use one on each side. This gives you two decorative options in a single handmade accessory. You can even create a different facial expression on each side, provided the details are securely attached and the surface remains suitable for supporting drinkware.
Appliqué is another useful technique for personalizing your design. Cut small fabric shapes for the inner ears, cheeks, or decorative patches and attach them to the front piece before assembling the coaster. A narrow zigzag stitch can help secure the appliqué edges. This method is particularly attractive when using contrasting colors.
If you enjoy embroidery, add simple details such as sleepy eyes, smiling expressions, whiskers, or tiny hearts. Embroidery is a good way to create personality without using complicated sewing techniques. Keep the decorative elements relatively flat so that cups and glasses can sit comfortably on the coaster.
You can also experiment with different sizes. A smaller cat silhouette can be used for espresso cups or decorative accessories, while a larger version may accommodate mugs and wider drinkware. If you decide to change the dimensions, remember to adjust the batting and fabric pieces together so that all layers remain properly aligned.
For a coordinated handmade gift, sew four or six coasters using different fabrics from the same color palette. Stack them neatly and tie them with a fabric ribbon. You could also include a small handmade storage pouch to keep the set organized. This makes the Cat Fabric Coaster Pattern a thoughtful gift for cat lovers, friends, family members, and anyone who appreciates handmade home accessories.
Proper care will help your coasters remain attractive for longer. Follow the washing instructions for your chosen fabric and batting. In most cases, gentle washing and air drying are appropriate, but always check the material manufacturer’s recommendations. Avoid excessive heat if your materials are not designed for high-temperature ironing or drying.
Frequently Asked Questions About the Cat Fabric Coaster Pattern
1. Is the Cat Fabric Coaster Pattern suitable for beginners?
Yes! This project is suitable for beginners because it uses basic sewing techniques such as tracing, cutting, pinning, straight stitching, and turning fabric. You do not need advanced quilting or embroidery experience to make a simple version. Start with a basic cat silhouette and add decorative details as your confidence improves.
2. What is the best fabric for making cat-shaped coasters?
Cotton fabric is one of the best choices because it is easy to handle, sew, and wash. Quilting cotton is particularly convenient because it comes in many colors and prints. You can also use suitable cotton scraps left over from other sewing projects.
3. What size should a fabric cat coaster be?
A practical starting size is approximately 4.5 to 5 inches wide. This generally provides enough space for many standard cups and glasses. However, you can make the coaster larger or smaller depending on the drinkware you plan to use.
4. Do I need batting for this sewing project?
Batting is recommended because it adds structure and a soft padded feel. Thin cotton or polyester batting can work well. If you prefer a firmer coaster, suitable interfacing can also be considered. Choose materials that are compatible with your fabric and intended use.
5. Can I make a Cat Fabric Coaster Pattern without a sewing machine?
Yes. You can sew the entire project by hand using a backstitch or another suitable hand-sewing technique. It may take longer, but the result can still be beautiful. Use small, consistent stitches to create durable seams.
6. How do I make the cat’s ears look neat?
The ears require careful stitching and trimming. Sew slowly around the pointed sections and avoid making the corners too bulky. After stitching, trim excess fabric close to the seam without cutting the stitches. A blunt turning tool can help shape the points.
7. Can I use leftover fabric scraps?
Absolutely! Small cotton scraps are ideal for this project. You can combine different colors and prints to make unique designs. Just ensure that every fabric piece is large enough to accommodate the template and seam allowance.
8. How can I decorate my fabric cat coaster?
You can add embroidered eyes, noses, whiskers, appliqué shapes, decorative stitching, or contrasting fabric details. Another option is to use patterned fabric that already creates an interesting appearance. Keep decorations flat and securely attached.
9. Are fabric coasters washable?
Most cotton fabric coasters can be washed, provided the batting, thread, and decorative materials are also washable. Use a gentle washing method and allow them to dry completely. Always check the care instructions for your specific materials.
10. Can I sell handmade cat fabric coasters?
Yes, handmade fabric coasters can be suitable products for a small craft business. You can offer individual pieces or coordinated sets in different colors and sizes. Focus on consistent construction, neat stitching, attractive presentation, and accurate descriptions of the materials used.
11. How many coasters should I make for a complete set?
A set of four is a popular choice for everyday use, while a set of six can be useful for larger households or entertaining guests. You can also create matching sets with different cat colors and expressions.
12. How can I prevent my fabric coaster from losing its shape?
Use suitable batting or interfacing, maintain an even seam allowance, and avoid pulling the fabric while sewing. Topstitching around the finished edge can also help hold the layers together. Store the coasters flat when they are not being used.
13. Can I make a reversible cat fabric coaster?
Yes! Simply choose two coordinating cotton fabrics for the front and back. Both sides can have different prints, allowing you to change the appearance whenever you want. Keep any decorative details secure and relatively flat.
14. What type of thread should I use?
Good-quality all-purpose polyester or cotton sewing thread is generally suitable for this project. Choose a color that complements your fabric. A matching thread creates a subtle finish, while contrasting thread can highlight the outline.
15. Can this project be used as a handmade gift?
Definitely! A set of cat-shaped fabric coasters is a thoughtful and practical gift for people who enjoy cats and handmade crafts. You can personalize each piece with different fabrics, embroidered expressions, and coordinated colors to make the gift more special.
Conclusion
The Cat Fabric Coaster Pattern is a delightful sewing project that combines creativity, practicality, and a love of handmade decorations. Throughout this tutorial, you learned how to select suitable materials, prepare a cat-shaped template, cut and assemble fabric layers, sew the silhouette, turn the project, and add decorative finishing touches. You also discovered different ways to customize your coasters with embroidery, appliqué, reversible fabrics, and coordinated color combinations.
Whether you are an experienced sewing enthusiast or a beginner exploring fabric crafts, this project offers a wonderful opportunity to create something useful and personalized. By following the instructions carefully and paying attention to the small details, you can make attractive cat-shaped coasters for your home, thoughtful gifts, or even a small handmade collection to sell.
Now it is your turn to get creative! Choose your favorite fabrics, prepare your template, and enjoy making your own Cat Fabric Coaster Pattern. Every handmade piece can have a different personality, making this project even more special.If you enjoyed this tutorial, please leave your honest opinion in the comments. We would love to know how your cat fabric coasters turned out! Share your suggestions, tell us which fabrics you would choose, and let us know what other sewing patterns you would like to see in future tutorials. Your feedback and creative ideas are always welcome!