
The Fabric wreath-style centerpiece pattern is a beautiful and creative sewing project that combines traditional holiday fabrics, decorative folded pieces, and a charming circular arrangement to create a festive decoration for your home.
One of the most appealing aspects of this Fabric wreath-style centerpiece pattern is that it can be made using ordinary sewing supplies and fabric scraps.
A handmade fabric centerpiece is also a wonderful way to personalize your Christmas decorations. Instead of purchasing a mass-produced table decoration, you can choose fabrics that match your home, coordinate with your table linens, or reflect your favorite holiday colors. The finished wreath can be displayed on a dining table, coffee table, sideboard, or another flat surface where its decorative shape can be appreciated. You can even experiment with different fabrics throughout the year to create versions for other celebrations and seasons. In this tutorial, you will learn how to select materials, prepare the fabric pieces, sew the dimensional sections, and assemble your own Fabric wreath-style centerpiece pattern step by step.
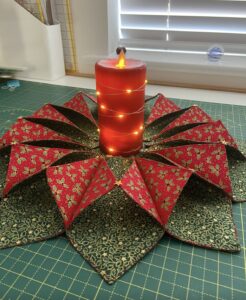
Materials and Preparation for Your Fabric Wreath-Style Centerpiece Pattern
The first step in making your Fabric wreath-style centerpiece pattern is choosing the right materials. For a Christmas-inspired design similar to the photograph, select two contrasting cotton fabrics. A bright red fabric with holly leaves, berries, or small Christmas flowers works beautifully for the decorative upper sections. For the contrasting sections, choose a dark green fabric with gold, cream, or subtle traditional Christmas details. The combination creates the distinctive festive appearance of the finished centerpiece.
You will need approximately half a yard of each main fabric, depending on the final size and the number of decorative sections you want to make. You should also have coordinating thread, fabric scissors or a rotary cutter, a cutting mat, a quilting ruler, sewing pins or clips, an iron, and a sewing machine. A fabric marking pen or tailor’s chalk will help you draw accurate cutting lines. If you prefer hand sewing, a needle and strong sewing thread can also be used, although machine sewing will make the process faster.
Before cutting anything, decide how large you want your centerpiece to be. A finished diameter of approximately 18 to 22 inches is a practical starting point for a decorative table arrangement. You can make it larger for a spacious dining table or smaller for a side table. Remember that the folded fabric sections will extend outward, so the dimensions of the individual pieces should be planned according to the overall circular shape rather than the size of the center opening alone.
Prepare the fabric by washing and drying it if necessary, following the manufacturer’s care instructions. This helps prevent unexpected shrinkage after the centerpiece has been completed. Once the fabric is dry, press it carefully with an iron to remove wrinkles. Smooth fabric is much easier to measure and cut accurately, especially when you are creating several identical pieces that need to fit together evenly.
For the dimensional wreath effect, plan to create approximately twelve to fourteen decorative fabric sections around the center. Each section will have a folded appearance, with the red and green fabrics creating alternating points and contrasting surfaces. You can adjust the number of sections according to your preferred design. More sections generally produce a fuller appearance, while fewer sections create larger, more pronounced folds.
Finally, organize your workspace and separate the fabrics into their respective groups. Keep the red fabric pieces together and place the green pieces in another pile. Labeling the pieces or arranging them in the order you intend to sew them will make assembly easier. Taking a few minutes to prepare everything properly will help you achieve a more balanced and professional-looking Fabric wreath-style centerpiece pattern.
Cutting, Folding, and Sewing the Decorative Fabric Sections
Begin by creating a paper template for the decorative sections. For a medium-sized centerpiece, you can start with rectangles measuring approximately 6 by 10 inches. These are suggested starting measurements, not fixed requirements, so you can adjust them depending on your desired finished dimensions. Make one sample section before cutting all the fabric to confirm that the proportions create the folded appearance you want.
Use your paper template to cut matching pieces from the red and dark green cotton fabrics. The exact number will depend on your chosen construction method and the number of sections in your wreath. For the alternating design shown in the photograph, prepare enough pieces to create a repeating red-and-green arrangement. Keep the fabric grain consistent where possible so that the finished points maintain their shape and do not stretch unevenly.
Place one red fabric piece and one green fabric piece with their right sides facing each other. Align the edges carefully and pin them together. Sew around the edges using an approximately 1/4-inch seam allowance, leaving a small opening along one side for turning. Backstitch at the beginning and end to secure the seam. Repeat this process for the remaining paired pieces, maintaining consistent seam allowances throughout the project.
Trim the corners carefully without cutting through the stitching. Turn each fabric piece right side out through the opening and gently push out the corners with a blunt turning tool. Avoid using sharp objects that could damage the fabric. Press each piece flat with the iron, folding the edges of the opening inward. Close the opening with a neat line of topstitching or an invisible hand stitch.
Now comes the most important part of creating the dimensional appearance. Take one prepared fabric unit and fold it diagonally or according to your chosen triangular template to form a pointed section. Arrange the red and green surfaces so that the contrasting colors remain visible. Press the fold gently with the iron, using the appropriate temperature for your fabric. Secure the folded shape with a few temporary pins or clips.
Repeat the folding process for all the prepared units. Check that the points are approximately the same size and that the red and green fabrics appear in a consistent order. This repetition is what gives the Fabric wreath-style centerpiece pattern its distinctive starburst appearance. If one section looks noticeably different from the others, adjust its fold before permanently attaching it. Consistency at this stage makes the final assembly considerably easier.
Assembling the Circular Wreath and Creating the Dimensional Design
Once all your decorative fabric sections are ready, prepare the base of the centerpiece. Cut a large circle from a sturdy cotton fabric, preferably using the dark green material to complement the contrasting sections. For an approximately 20-inch finished centerpiece, a base around 18 to 20 inches in diameter can be a useful starting point, depending on how far the decorative pieces extend beyond its edge. You can also add a lightweight layer of batting if you want a slightly padded appearance.
Mark the center of the circular base and draw a smaller circle around it to guide the placement of the folded sections. This inner marking will help you maintain an even arrangement while leaving enough open space in the middle for a decorative focal point. You can use a measuring tape to divide the outer placement area into equal sections. If you are making twelve decorative points, mark twelve evenly spaced positions around the circle.
Begin attaching the folded fabric sections to the base, working around the circumference. Place the first section at one marked position, with its pointed end facing outward and its wider folded portion closer to the center. Pin the base of the section securely. Position the next section beside it, allowing the folds to overlap slightly if necessary. This arrangement helps create the continuous wreath-like appearance seen in the photograph.
Continue placing the remaining sections around the circle, alternating the red and dark green fabrics. Pay attention to the direction of each fold so that the decorative points follow a consistent circular pattern. The red printed sections should stand out against the darker background, while the green portions help create depth between the folds. Before sewing, step back and inspect the arrangement from above to make sure the sections are evenly distributed.
When you are satisfied with the layout, sew the sections securely to the base. You can use a sewing machine for accessible edges or hand stitch the thicker folded areas if that gives you better control. Reinforce the attachment points with additional stitching where necessary, especially if the centerpiece will be handled frequently. Remove the temporary pins as you work and avoid pulling the fabric too tightly, since this could distort the circular shape.
After attaching all the sections, examine the centerpiece carefully. Adjust any folds that appear uneven and make sure the center opening remains reasonably symmetrical. If desired, add a small decorative fabric circle or covered button near the center to create a more finished appearance. The completed arrangement should have a dimensional, flower-like wreath effect, with the red and green sections radiating around the central space.
Finishing Touches, Decoration Ideas, and Care for Your Handmade Centerpiece
The finishing stage is where you can give your Fabric wreath-style centerpiece pattern its own personality. Inspect the outer edge and trim away loose threads or uneven fabric. If your base has unfinished edges, attach a coordinating fabric binding or bias tape around the circumference. A neatly finished edge helps the centerpiece maintain its shape and gives the entire project a polished appearance.
You can add small decorative details to enhance the Christmas theme. Tiny fabric stars, embroidered snowflakes, miniature bows, or small decorative buttons can be attached to selected sections. Gold-colored accents work particularly well with dark green and red fabrics because they complement traditional holiday colors. Keep embellishments securely attached and avoid adding too many decorations, as the dimensional folds should remain the main feature of the design.
The central opening is an important part of this project because it provides space for a decorative focal point. In the photograph, a tall red candle creates a striking contrast against the fabric wreath. For a safer arrangement, use a battery-operated LED candle or another flameless decorative centerpiece. Real flames should never be placed directly beside fabric, sewing materials, or decorative lights. If you use battery-operated fairy lights, follow their safety instructions and keep the wiring and battery compartment away from heat and moisture.
Another way to personalize the center is by using a small decorative bowl, a seasonal ornament, or a fabric-covered display piece. You can coordinate the central decoration with the colors of your dining room or Christmas table setting. A simple arrangement often looks more elegant than one with too many competing elements. Make sure any object placed in the center is stable and does not press against or damage the folded fabric sections.
When displaying your handmade centerpiece, place it on a clean, flat surface. It looks especially attractive on a dining table surrounded by simple table linens, Christmas dishes, or coordinated napkins. The wreath can also be used as a decorative accent on a coffee table or sideboard. Because the design is dimensional, displaying it from above allows the alternating colors and folded points to be fully appreciated.
To preserve your finished project, remove dust gently with a soft brush or a low-suction vacuum attachment. If the fabric becomes stained, check the care instructions for all materials and test a gentle cleaning method on an inconspicuous area first. Store the centerpiece flat in a clean, dry container when the holiday season ends. Avoid placing heavy objects on top of it, since pressure can flatten the decorative folds. With appropriate care, your handmade Fabric wreath-style centerpiece pattern can become a favorite Christmas decoration that you bring out year after year.
Frequently Asked Questions About the Fabric Wreath-Style Centerpiece Pattern
1. Is the Fabric wreath-style centerpiece pattern suitable for beginners?
Yes! This project is suitable for beginners who have basic sewing skills. The most important techniques are measuring, cutting, sewing straight seams, turning fabric pieces, and creating consistent folds. Working slowly and making one sample section before preparing the entire project can make the process much easier.
2. What type of fabric works best for this Christmas centerpiece?
Medium-weight cotton fabric is an excellent choice because it is easy to sew, comfortable to handle, and available in many festive prints. Quilting cotton is particularly useful for this project because it holds pressed folds reasonably well. Avoid extremely stretchy fabrics because they may make the decorative sections difficult to keep symmetrical.
3. How many fabric sections should I make for a full wreath effect?
Approximately twelve to fourteen sections are a good starting point for a medium-sized centerpiece. However, you can increase or decrease the number depending on the desired appearance and overall dimensions. The important thing is to space the sections evenly around the circular base.
4. Can I use leftover fabric scraps for this project?
Absolutely! Using fabric scraps is one of the best reasons to make this project. Small pieces of red, green, gold, and cream cotton can be combined to create a colorful patchwork-inspired centerpiece. Just make sure the pieces are large enough to accommodate your templates and seam allowances.
5. How can I make the folded fabric sections look more uniform?
Use a paper template and press every section carefully before attaching it to the base. Measure the folds rather than estimating them by eye. It is also helpful to arrange all the sections in a circle before sewing anything permanently, allowing you to correct differences in size or direction.
6. Can I make a larger or smaller fabric wreath centerpiece?
Yes. You can change the dimensions of the base and the individual fabric sections to create different sizes. For a smaller centerpiece, use narrower decorative pieces and fewer sections. For a larger version, increase the dimensions proportionally and make sure the circular base provides enough support.
7. Do I need a sewing machine to make this project?
A sewing machine is recommended because it produces consistent seams and saves time, but hand sewing is also possible. Use small, secure stitches and reinforce the areas where the folded pieces attach to the circular base. Hand sewing may take longer, but it can still produce a beautiful result.
8. Can I use this pattern for decorations other than Christmas?
Definitely! The same basic construction can be adapted for different seasons and celebrations. Choose pastel fabrics for spring, orange and brown prints for autumn, or blue and silver fabrics for a winter-themed centerpiece. Changing the fabric combinations allows you to reuse the same creative technique throughout the year.
9. How do I decorate the center of the fabric wreath?
You can use a flameless LED candle, a small decorative bowl, a seasonal ornament, or another stable centerpiece. A red LED candle creates a festive look similar to the photograph. Always avoid placing an open flame near fabric or decorative lighting.
10. How should I store the centerpiece after Christmas?
Clean it gently, allow it to dry completely if any cleaning is necessary, and store it flat in a dry container. Avoid folding the decorative points or placing heavy items on top. Proper storage helps preserve the dimensional shape and keeps the fabrics looking attractive for the next holiday season.
Conclusion
Creating a Fabric wreath-style centerpiece pattern is a wonderful way to combine sewing, creativity, and seasonal decoration in one rewarding handmade project. Throughout this tutorial, you learned how to choose coordinating Christmas fabrics, prepare the materials, cut and fold the decorative sections, sew the individual pieces, and assemble them into a beautiful circular arrangement. You also discovered how small details, such as decorative accents, neatly finished edges, and a carefully selected central ornament, can make the finished centerpiece even more special.
The best part of this project is that it can be adapted to suit your personal style. Whether you prefer traditional red and green Christmas prints or want to experiment with completely different colors, the basic technique offers plenty of creative possibilities. Take your time with the folds, pay attention to the spacing, and enjoy every stage of making something unique with your own hands.
Now we would love to hear from you! Have you tried making a fabric wreath-style centerpiece before? Which fabrics and colors would you choose for your version? Please leave your honest opinion, share your experience, and tell us your suggestions for improving or personalizing this project. Your ideas and feedback can inspire other sewing enthusiasts to create their own beautiful handmade decorations!