
A Crochet Christmas Star Pattern is a wonderful way to bring handmade charm, warmth, and creativity to your holiday decorations.
One of the best things about this Crochet Christmas Star Pattern is its versatility. You can make traditional golden stars, elegant white ornaments, colorful decorations, or rustic pieces using natural cotton yarn.
In this tutorial, you will learn how to make a beautiful crochet star step by step, from preparing your materials to shaping the five points and finishing the ornament. The instructions use common crochet stitches and are organized into clear rounds so that you can follow the process comfortably. We will also discuss useful techniques for achieving neat edges, maintaining consistent tension, and adding decorative details to your finished project. If you are searching for an easy and enjoyable Crochet Christmas Star Pattern, this guide will help you understand the construction of the star and give you the confidence to create several handmade decorations for your Christmas celebrations.
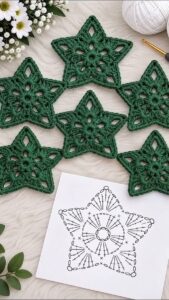
Materials and Crochet Techniques for Your Christmas Star
Before beginning your Crochet Christmas Star Pattern, gather all the necessary materials. Having everything ready will make the process easier and help you maintain a comfortable rhythm while crocheting. You do not need expensive supplies, and many of the materials may already be part of your crochet collection.
For this project, choose cotton or acrylic yarn in your favorite Christmas colors. Red, green, white, silver, and gold are classic choices, but pastel shades can also create beautiful modern decorations. Cotton yarn is particularly useful when you want a defined shape and visible stitches.
You will need a crochet hook suitable for your chosen yarn. A 3.0 mm or 3.5 mm hook is a good starting point for lightweight yarn, although you should always check the yarn label and adjust your hook if necessary. You will also need scissors, a yarn needle, stitch markers if desired, and a small amount of yarn for creating a hanging loop.
Understanding the crochet abbreviations is important before starting the pattern. This tutorial uses ch (chain), sl st (slip stitch), sc (single crochet), hdc (half double crochet), and dc (double crochet). These are basic techniques that help form the center and five pointed sections of the star.
The magic ring is another useful technique for this project because it allows you to create a tightly closed center without leaving a large opening. If you find the magic ring difficult, you can begin with a chain of four stitches and join it with a slip stitch to form a small ring. Both methods can work well for this design.
Before making the complete ornament, consider crocheting a small sample with your chosen yarn and hook. Your stitches should be firm enough to hold the star’s shape but not so tight that the hook becomes difficult to insert. Consistent tension will help the five points look balanced and symmetrical.
Step-by-Step Crochet Christmas Star Pattern
Now it is time to begin your Crochet Christmas Star Pattern. This design creates a traditional five-point star worked from the center outward. The first rounds establish the central shape, while the final round forms the five points individually. Follow the instructions carefully and count your stitches as you go.
Round 1 – Create the center: Start with a magic ring. Chain 2 (this does not count as a stitch), then work 10 double crochet stitches into the ring. Pull the yarn tail to close the center tightly. Join with a slip stitch to the first double crochet. You should have 10 stitches around the center.
Round 2 – Build the foundation: Chain 1 and work 1 single crochet into the same stitch. Chain 3, skip the next stitch, and work 1 single crochet into the following stitch. Repeat this sequence around the circle until you have created five chain-3 spaces. Join with a slip stitch to the first single crochet. These spaces will become the foundation for the five star points.
Round 3 – Shape the star points: Slip stitch into the first chain-3 space. Work the following stitches into that space: 1 single crochet, 1 half double crochet, 2 double crochet, 1 half double crochet, 1 single crochet, and chain 2. Slip stitch into the same space to secure the point. Repeat this sequence in each of the remaining four chain-3 spaces. You will now have five visible points forming the outline of your Christmas star.
Round 4 – Define the edges: To make the star look more polished, work slip stitches along the sides of each point where necessary. At the tip of each point, work 2 single crochet stitches into the chain-2 space. This creates a slightly stronger and more defined tip. Continue around the star, maintaining an even stitch tension. Join with a slip stitch when you reach the beginning of the round.
Finishing the ornament: Cut the yarn, leaving a tail long enough to weave in securely. Pull the yarn through the final loop and use a yarn needle to hide the remaining end on the back of the star. Check all five points and gently adjust their shape with your fingers. Your basic crochet Christmas star is now complete.
If you would like to make your star suitable for hanging, attach a small chain loop to one of the points. Join the yarn at the tip, chain 12 to 15 stitches, and secure the chain with a slip stitch in the same area. Fasten off and weave in the ends carefully. This simple addition transforms your crochet star into a charming Christmas tree ornament.
Finishing Touches, Variations, and Creative Decoration Ideas
One of the most enjoyable parts of making a Crochet Christmas Star Pattern is choosing how to decorate the finished piece. Even when you follow the same basic instructions, different yarn colors and finishing techniques can create completely different results. A metallic gold thread, for example, can give your star an elegant festive appearance, while traditional red and green yarn creates a more classic Christmas look.
You can also experiment with different yarn textures. Soft acrylic yarn produces lightweight ornaments, while cotton yarn gives the stitches a more defined appearance. If you want a slightly thicker decoration, consider using a heavier yarn and a proportionally larger hook. Remember that changing the yarn and hook size will also change the finished dimensions of your star.
For an extra decorative touch, add a small embroidered detail to the center. A few simple stitches in contrasting yarn can create a delicate flower-like effect or a decorative center. You can also sew a small button securely onto the middle of the star, provided the finished ornament will be used in a setting where small attached objects are appropriate.
Another lovely option is to create a two-color star. Crochet the center and foundation round in white, then change to red or green for the five points. To change colors neatly, complete the final yarn-over of the last stitch with the new color. Continue crocheting while keeping the unused yarn ends secure and weaving them in carefully afterward.
Blocking can help improve the appearance of your finished star, especially if the points look uneven. Lightly dampen the crochet piece, place it on a suitable flat surface, and gently shape all five points. Allow it to dry completely before removing it. Avoid stretching the stitches too much, as this can affect the original proportions of the ornament.
There are many ways to use your finished stars around the house. Attach them to Christmas gift wrapping, combine several stars into a festive garland, decorate a handmade wreath, or sew one onto a seasonal cushion cover. You can also make a collection in different sizes and arrange them together as a decorative centerpiece. These ideas allow your Crochet Christmas Star Pattern to become part of many different holiday projects.
Frequently Asked Questions About the Crochet Christmas Star Pattern
1. Is the Crochet Christmas Star Pattern suitable for beginners?
Yes! This Crochet Christmas Star Pattern is suitable for beginners who already know a few basic crochet stitches. You should be comfortable making chains, single crochet, double crochet, and slip stitches. The five-point construction may require a little practice, but following the rounds one at a time makes the project manageable. If you are completely new to crochet, practicing the individual stitches before beginning can make the experience much easier.
2. What is the best yarn for crocheting a Christmas star?
Cotton yarn is an excellent choice because it provides good stitch definition and helps the star maintain its shape. Acrylic yarn is another practical option because it is lightweight, widely available, and comes in many festive colors. Choose a yarn that is comfortable to work with and suitable for the finished decoration.
3. How many points should a crochet Christmas star have?
A traditional Christmas star usually has five points. This tutorial follows that classic design, creating five chain spaces during the foundation round and shaping one point in each space. You can experiment with other shapes, but the five-point star is especially recognizable and works beautifully as a Christmas ornament.
4. Why are my crochet star points curling?
Curling can happen when your stitches are too tight, when the number of stitches is incorrect, or when the yarn and hook combination creates a dense fabric. Check your stitch count and make sure you are following the instructions consistently. Light blocking can also help flatten the finished star and improve the appearance of its points.
5. Can I make this crochet star in different sizes?
Absolutely! You can change the size by selecting a different yarn weight and adjusting your crochet hook. Thicker yarn and a larger hook will generally produce a bigger star, while thinner yarn and a smaller hook create a delicate miniature ornament. Always maintain consistent tension so the five points remain balanced.
6. How can I make my crochet Christmas star shiny?
You can use metallic crochet thread, glitter-effect yarn, or a strand of metallic embroidery thread alongside your regular yarn. Another option is to add small decorative details using gold or silver thread after completing the star. Choose materials that are comfortable to work with and securely attached to the finished piece.
7. Can I use crochet Christmas stars as Christmas tree ornaments?
Yes! They are excellent Christmas tree decorations. Simply create a small hanging loop using a chain of approximately 12 to 15 stitches and attach it securely to one of the star’s points. You can make several stars in complementary colors to create a coordinated handmade decoration collection.
8. How do I keep my crochet Christmas star looking neat?
The most important factors are consistent stitch tension, accurate stitch counting, and careful finishing. Make sure the five points are shaped in the same way and weave in all loose yarn ends securely. If necessary, gently block the finished star to improve its shape before displaying it.
9. Can I make a padded or three-dimensional crochet star?
Yes. You can crochet two matching stars, place them together, and join their edges using single crochet stitches. Before closing the final section, add a small amount of fiberfill stuffing. Avoid overfilling the star because too much stuffing can distort the points. This creates a thicker ornament with a soft, dimensional appearance.
10. How long does it take to complete a crochet Christmas star?
The time depends on your experience, yarn choice, and working speed. A small, simple star may take approximately 20 to 40 minutes once you understand the pattern. Beginners may need more time while learning the stitch sequence and shaping the five points. Making several stars becomes faster as you gain confidence and become familiar with the instructions.
11. Can I wash my handmade crochet Christmas star?
That depends on the yarn used. Cotton and many acrylic yarns can be gently cleaned, but you should always follow the care instructions on the yarn label. For small ornaments, spot cleaning with a damp cloth is often a practical option. Allow the piece to dry completely before storing or displaying it.
12. Can I sell crochet Christmas stars made from this pattern?
You can create handmade crochet stars for personal use or consider selling your finished items. If you decide to sell them, make sure your product descriptions accurately represent the materials, dimensions, and handmade nature of each item. Always respect any applicable pattern licensing conditions when using patterns created by other designers.
Conclusion
This Crochet Christmas Star Pattern is a lovely way to create handmade decorations that bring creativity and a festive atmosphere to your home. Throughout this tutorial, you learned how to prepare your materials, understand the essential crochet abbreviations, create the central ring, form the five points, and finish your ornament with a neat appearance. You also discovered how to experiment with different yarns, colors, decorative details, and hanging loops to personalize every star.
The best part of this project is that a simple crochet technique can produce so many beautiful possibilities. Whether you make a single star for your Christmas tree or create an entire collection for gifts, garlands, and seasonal decorations, each finished piece can become a special part of your holiday celebrations.
Now that you have learned how to make your own crochet Christmas star, weould love to hear from you! Leave your honest opinion in the comments and share any suggestions you have for improving or personalizing this pattern. Have you tried different colors or yarn textures? Do you have another creative idea for using handmade crochet stars during Christmas? Your feedback and experiences can inspire other crochet lovers to try this beautiful project too!