
Butterfly crochet base for rug tutorial is a creative and inspiring approach that combines elegance, texture, and functionality in one beautiful handmade piece. This Butterfly crochet base for rug tutorial is perfect for beginners and experienced crocheters who want to explore a delicate yet structured design that transforms simple yarn into a stunning decorative rug. By learning this technique, you can create a unique home accessory that reflects both artistry and comfort.
In this detailed guide, the Butterfly crochet base for rug tutorial will walk you through essential concepts, materials, and step-by-step insights to help you confidently build your own rug. The butterfly motif brings a light, airy aesthetic that fits perfectly into modern, rustic, or cozy home décor styles. As you follow along, you’ll understand how each stitch contributes to the overall pattern and durability of the rug.
Beyond aesthetics, the Butterfly crochet base for rug tutorial also focuses on structure and longevity. Rugs require a solid base to withstand daily use, and this technique ensures that your creation remains both beautiful and practical. With patience and creativity, you can customize colors, sizes, and textures to suit your personal taste and space.
Understanding the Basics of Butterfly Crochet Design
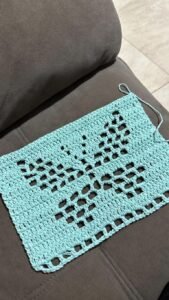
The foundation of the Butterfly crochet base for rug tutorial begins with understanding the butterfly motif itself. This design is typically formed using a combination of chain stitches, double crochet stitches, and strategic spacing to create the “wings” effect. The visual appeal comes from symmetry and repetition, making it both relaxing and rewarding to crochet.
In this Butterfly crochet base for rug tutorial, the base plays a crucial role. Unlike smaller crochet projects, a rug must be sturdy and well-balanced. This means choosing the right stitch density and maintaining consistent tension throughout your work. A solid base ensures that the butterfly design sits evenly and does not warp over time.
Another important aspect is yarn selection. For a durable rug, thicker yarn such as cotton or t-shirt yarn is often recommended. These materials provide strength and structure, which are essential in a Butterfly crochet base for rug tutorial. They also enhance the definition of the butterfly pattern, making it stand out more clearly.
Hook size is equally important. Using a hook that matches your yarn weight will help maintain proper tension and stitch clarity. In the context of a Butterfly crochet base for rug tutorial, a slightly larger hook can sometimes be beneficial to prevent stiffness while still keeping the rug firm.
Color choice can elevate your project. Many crocheters prefer contrasting colors to highlight the butterfly shapes, while others opt for a monochromatic palette for a subtle and elegant look. This flexibility makes the Butterfly crochet base for rug tutorial adaptable to different styles.
Finally, practice is key. Before starting your full rug, creating a small sample swatch using the butterfly pattern can help you understand the stitch flow and identify any adjustments needed. This preparation ensures a smoother experience when working on the complete Butterfly crochet base for rug tutorial.
Step-by-Step Construction of the Rug Base
Starting the base is one of the most important steps in the Butterfly crochet base for rug tutorial. Typically, you begin with a foundation chain that determines the width of your rug. This chain should be long enough to accommodate multiple butterfly motifs while maintaining balance in the design.
Once the foundation chain is complete, the next step in the Butterfly crochet base for rug tutorial is to build the initial rows using basic stitches such as single crochet or half double crochet. These rows act as a stable platform for the butterfly pattern that will be added later.
As you progress, you will introduce the butterfly stitches. These are created by working into specific stitches from previous rows, forming loops that resemble wings. In the Butterfly crochet base for rug tutorial, spacing is crucial here, as it ensures that each butterfly appears evenly and consistently.
Maintaining straight edges is essential when constructing the base. Uneven edges can distort the entire rug. In this Butterfly crochet base for rug tutorial, counting stitches at the end of each row helps prevent mistakes and keeps the shape uniform.
Joining new yarn or changing colors should be done carefully. Smooth transitions enhance the visual appeal of your rug. The Butterfly crochet base for rug tutorial often encourages color changes at the beginning of rows to keep the pattern clean and organized.
Finally, continue repeating the pattern until you reach your desired rug length. Consistency in stitch size and tension will ensure that your Butterfly crochet base for rug tutorial results in a professional-looking piece that lies flat and maintains its shape.
Enhancing Texture and Decorative Details
Texture plays a significant role in the Butterfly crochet base for rug tutorial. By combining different stitches, you can create a layered effect that adds depth and dimension to your rug. This makes the butterfly motif more prominent and visually appealing.
One way to enhance texture in the Butterfly crochet base for rug tutorial is by incorporating puff stitches or front post stitches. These techniques create raised areas that contrast beautifully with flatter sections of the rug.
Adding borders is another excellent way to elevate your design. A well-crafted border frames the rug and gives it a finished look. In the Butterfly crochet base for rug tutorial, simple scalloped edges or ribbed borders are popular choices.
You can also experiment with color gradients. Gradual transitions between shades can give your rug a soft, artistic feel. This approach works particularly well in the Butterfly crochet base for rug tutorial, as it enhances the illusion of movement in the butterfly wings.
Decorative elements such as tassels or fringes can be added to the edges for a playful touch. While not necessary, they can personalize your rug and make your Butterfly crochet base for rug tutorial truly unique.
Lastly, blocking your finished rug helps set the stitches and improve its overall appearance. This final step in the Butterfly crochet base for rug tutorial ensures that your work looks neat, even, and ready for use.
Tips for Durability and Long-Term Use
Durability is essential in any rug project, and the Butterfly crochet base for rug tutorial is no exception. Choosing strong, washable yarn ensures that your rug can withstand regular use without losing its shape or color.
Reinforcing high-traffic areas is a smart strategy. In the Butterfly crochet base for rug tutorial, adding extra rows or tighter stitches in these areas can extend the life of your rug significantly.
Proper care is also important. Washing your rug gently and allowing it to air dry helps maintain its structure. The Butterfly crochet base for rug tutorial benefits from careful handling to preserve the intricate butterfly design.
Avoid stretching the rug excessively during use. This can distort the pattern and weaken the stitches. Following the guidelines in the Butterfly crochet base for rug tutorial helps prevent such issues.
Storage matters as well. When not in use, keep your rug in a dry, clean place. Folding it neatly or rolling it can prevent creases and damage, ensuring your Butterfly crochet base for rug tutorial remains in excellent condition.
Finally, regular inspection allows you to fix minor issues before they become major problems. Repairing loose stitches early keeps your rug looking beautiful and functional for years.
Butterfly Crochet Base for Rug Tutorial
What is a Butterfly crochet base for rug tutorial?
It is a step-by-step guide that teaches how to create a rug using butterfly-shaped crochet patterns combined with a मजबूत and stable base.
Is the Butterfly crochet base for rug tutorial suitable for beginners?
Yes, beginners can follow it by practicing basic stitches first and starting with smaller projects before making a full rug.
What type of yarn is best for this project?
Durable yarns like cotton or t-shirt yarn are ideal for a Butterfly crochet base for rug tutorial because they provide strength and definition.
How long does it take to complete a rug?
The time varies depending on size and skill level, but most Butterfly crochet base for rug tutorial projects can take several days to a few weeks.
Can I customize the pattern?
Absolutely. The Butterfly crochet base for rug tutorial allows for creativity in colors, sizes, and decorative elements.
How do I keep my rug from curling?
Maintaining even tension and blocking the finished piece are key steps in the Butterfly crochet base for rug tutorial to prevent curling.
Do I need special tools?
No special tools are required beyond a crochet hook, yarn, and basic accessories, making the Butterfly crochet base for rug tutorial accessible to most crafters.
Conclusion
The Butterfly crochet base for rug tutorial offers a perfect blend of creativity, technique, and functionality. Throughout this guide, you learned how to build a strong base, create elegant butterfly motifs, enhance texture, and ensure long-term durability. This project is not only a practical addition to your home but also a rewarding artistic experience.
By following the steps and tips shared in this Butterfly crochet base for rug tutorial, you can confidently create a beautiful rug that reflects your personal style. Take your time, enjoy the process, and don’t be afraid to experiment with colors and textures.
If you found this guide helpful, share your honest opinion and suggestions. Your feedback helps improve future tutorials and inspires more creative crochet ideas.