
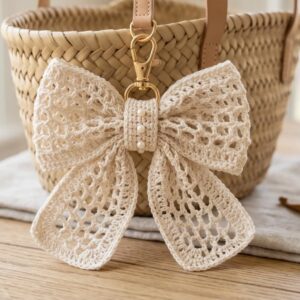
Crochet bow keychain pattern projects are the perfect combination of elegance, creativity, and practicality. This charming accessory is small enough to complete in a single crafting session, yet beautiful enough to decorate keys, handbags, backpacks, cosmetic pouches, or gift packages.
One of the greatest advantages of making a Crochet bow keychain pattern is that it requires only a small amount of yarn, making it ideal for using leftover materials from larger crochet projects.
Another reason this project has become increasingly popular is its endless customization possibilities. You can create delicate pastel bows for spring, festive holiday versions in red and green, elegant neutral-colored bows for everyday accessories, or playful rainbow combinations for children. Decorative beads, embroidered details, glitter yarn, miniature flowers, pearls, or tiny buttons can all transform a simple Crochet bow keychain pattern into a unique handmade accessory that reflects your personal style.
Materials and Essential Crochet Stitches
Selecting the right materials is the first step toward creating a beautiful Crochet bow keychain pattern. Mercerized cotton yarn is highly recommended because it provides excellent stitch definition and helps the bow maintain its shape over time. Lightweight acrylic yarn also works well if you prefer a softer finish.
A crochet hook between 2.5 mm and 3.5 mm is suitable for most lightweight yarns. Choosing a slightly smaller hook than recommended helps produce tighter stitches, creating a firm and professional-looking bow.
Additional supplies include a yarn needle, sharp embroidery scissors, stitch markers, polyester fiberfill if you prefer lightly padded bows, and a metal keychain ring with a sturdy chain attachment.
The stitch abbreviations used throughout this project are:
MR = Magic Ring
ch = chain
sl st = slip stitch
sc = single crochet
hdc = half double crochet
dc = double crochet
inc = increase
dec = invisible decrease
FO = fasten off
Foundation Row: Chain 21 stitches. Beginning in the second chain from the hook, crochet one single crochet into each chain across. Turn your work carefully at the end of every row to maintain even edges.
Rows 2 through 10: Chain 1, work one single crochet into every stitch across. Repeat until a neat rectangle has been formed. This rectangle becomes the main body of the crochet bow.
Step-by-Step Crochet Bow Keychain Pattern
After completing the rectangle, fasten off while leaving a long yarn tail for assembly. Fold the rectangle in half lengthwise to check that both sides align evenly before continuing.
Using the yarn needle, sew the two short ends together neatly to create a continuous loop. Weave in any loose ends while keeping the seam centered at the back of the bow.
Flatten the loop so the seam rests in the middle of the back. Pinch the center together carefully with your fingers to form the classic bow shape with two rounded loops on each side.
Create the center wrap by chaining approximately 10 stitches. Wrap this narrow strip tightly around the middle of the bow several times until the desired shape is achieved. Secure the ends with invisible stitches on the back.
If you prefer a fuller appearance, insert a tiny amount of polyester fiberfill into each loop before tightening the center wrap. This optional step creates a soft three-dimensional effect.
Attach a short crocheted chain or sturdy yarn loop to the back of the bow and securely fasten the metal keyring. Reinforce this connection with several additional stitches since keychains experience frequent daily movement.
Creative Customization Ideas
One of the most enjoyable aspects of creating a Crochet bow keychain pattern is experimenting with colors. Soft pink, lavender, cream, baby blue, and mint green create elegant bows, while bold red, black, mustard, and emerald green produce a modern style.
Striped bows are another fun variation. Alternate colors every two rows to create cheerful horizontal stripes that add extra personality without changing the basic construction method.
You can also use gradient yarn that changes color naturally as you crochet. This creates beautiful transitions and ensures every finished bow has a unique appearance.
Decorative embellishments such as pearls, rhinestones, miniature flowers, tiny crochet hearts, or embroidered initials allow you to personalize each keychain for gifts or special occasions.
Seasonal versions are especially popular. Red and white bows look festive during the holidays, pastel colors suit spring celebrations, and metallic yarn creates elegant accessories for parties and weddings.
Many crocheters enjoy creating matching accessory sets that include a bow keychain, hair clip, zipper pull, bookmark, or bag charm. Coordinated collections often attract more attention at handmade markets and make thoughtful gift sets.
Tips for Professional Results and Long-Lasting Durability
Maintaining even stitch tension is essential when making miniature crochet accessories. Consistent stitches help the bow remain symmetrical and create a polished finished appearance.
Always weave in yarn ends securely using a yarn needle instead of simply tying knots. Proper finishing prevents the keychain from unraveling during regular use.
Blocking the completed bow lightly with steam or gentle shaping can improve its symmetry. Allow it to dry completely before attaching the metal keyring.
Choose high-quality metal hardware that resists rust and wear. Strong keyrings not only improve durability but also enhance the professional appearance of handmade products.
To clean your Crochet bow keychain pattern, gently hand wash it with cool water and mild soap. Remove excess moisture by pressing it inside a towel and reshape the bow before allowing it to air dry naturally.
As your crochet skills continue to grow, experiment with larger bows, layered bows, textured stitches, decorative edging, or miniature appliqués. Every variation teaches valuable crochet techniques while expanding your collection of charming handmade accessories.
FAQ
Is the Crochet bow keychain pattern suitable for beginners?
Yes. Beginners who know basic stitches such as chain, single crochet, and slip stitch can complete this project successfully with a little patience.
Which yarn is recommended?
Mercerized cotton yarn is the preferred option because it produces crisp stitches and helps the bow maintain its shape beautifully.
How long does this project take?
Most crocheters complete the bow keychain within one to two hours depending on their experience and the amount of decorative detail added.
Can I sell finished crochet bow keychains?
Yes. Handmade bow keychains are popular items at local craft fairs, gift shops, and online handmade marketplaces because they are affordable, attractive, and practical.
How can I make the bow stiffer?
Using cotton yarn, a smaller crochet hook, and wrapping the center tightly will naturally create a firmer bow. Light fabric stiffener may also be applied if desired.
What other accessories can match this project?
Matching crochet bows can be used as hair clips, bookmarks, zipper pulls, gift toppers, bag charms, or decorative appliqués for larger crochet projects.
Conclusion
The Crochet bow keychain pattern is a delightful project that combines simplicity, elegance, and creativity into one charming handmade accessory. Throughout this tutorial, you learned how to select the appropriate materials, understand the essential crochet stitch abbreviations, crochet the bow step by step, assemble the finished piece, personalize it with decorative details, and care for it properly to ensure long-lasting beauty.
Because this project requires only a small amount of yarn and can be completed quickly, it is ideal for beginners, experienced crocheters, handmade gifts, and craft fair collections alike. With countless color combinations and embellishment possibilities, every bow you create can become completely unique.
We hope this guide inspires you to make your own beautiful keychains and continue exploring new crochet techniques. If you enjoyed this tutorial, please leave your honest opinion, share your crafting experience, and send your suggestions for future crochet patterns. Your feedback is always appreciated and helps inspire even more creative projects for the crochet community.