
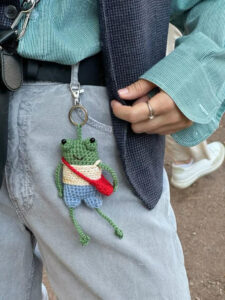
Crochet frog keychain pattern is a charming and practical project for anyone who enjoys creating small handmade accessories with personality.
One of the biggest advantages of this Crochet frog keychain pattern is that it uses only a small quantity of yarn while teaching several useful crochet skills.
Throughout this tutorial, the Crochet frog keychain pattern will be explained clearly with crochet abbreviations, stitch counts, approximate yarn quantities, assembly instructions, and finishing tips. The suggested finished frog measures approximately 2.5 to 3.5 inches tall, depending on the yarn, hook size, tension, and whether the legs are stretched or curled. Beginners should read through the entire pattern before starting, while experienced crocheters can easily customize the size, facial expression, and colors to create their own unique frog keychain.
Materials, Crochet Abbreviations, and Preparation
For this Crochet frog keychain pattern, choose a smooth cotton, cotton-blend, or acrylic yarn in green for the main body. You will also need a small amount of white yarn for the eyes, black yarn or embroidery thread for facial details, and optionally pink yarn for cheeks. DK or light worsted-weight yarn is especially suitable because it creates a compact frog without making the keychain too heavy.
A crochet hook between 2.5 mm and 3.5 mm usually works well. Choose a hook slightly smaller than the yarn label suggests because amigurumi stitches should be firm enough to prevent the stuffing from showing through. You will also need scissors, a yarn needle, a stitch marker, a small quantity of polyester fiberfill, and a metal keychain ring or lobster clasp.
The crochet abbreviations used throughout the pattern are MR = magic ring, ch = chain, sl st = slip stitch, sc = single crochet, inc = increase, dec = decrease, st = stitch, sts = stitches, and FO = fasten off. An increase means working two single crochet stitches into the same base stitch, while a decrease means combining two stitches into one.
The magic ring is especially useful for miniature crochet animals because it creates a tightly closed center. To make one, wrap the yarn into a loop, insert the hook through the loop, pull up the working yarn, and secure it with a chain. Crochet the required stitches into the ring, then gently pull the loose tail until the center closes.
Before beginning your frog, check your tension by crocheting a small circle of single crochet stitches. The stitches should sit close together without becoming so tight that inserting the hook is difficult. Firm and consistent tension creates a smoother surface and gives the finished crochet frog keychain a more professional appearance.
For a classic frog, prepare approximately 20 to 30 yards of green yarn, 3 to 5 yards of white, and a small amount of black yarn. These quantities are approximate because yarn thickness and personal tension can change the amount required. Leftover yarn from previous projects is often more than enough to complete one frog.
Crocheting the Frog Head and Body Step by Step
Start the Crochet frog keychain pattern with green yarn. Round 1: Make an MR and work 6 sc into the ring. Pull the ring closed. Round 2: Work inc in every stitch around for a total of 12 sts. Round 3: Repeat (1 sc, inc) six times for 18 sts. Use a stitch marker to mark the first stitch of each round.
Continue shaping the head. Round 4: Repeat (2 sc, inc) six times for 24 sts. Rounds 5–8: Work 24 sc around without increasing. This creates the rounded center of the frog’s head. If you prefer a smaller frog keychain, you can reduce the number of plain rounds slightly.
Now begin decreasing the head. Round 9: Repeat (2 sc, dec) six times for 18 sts. Round 10: Repeat (1 sc, dec) six times for 12 sts. Add a small amount of fiberfill at this stage, distributing it evenly with your fingers so the head becomes rounded rather than overly firm.
For the lower body, continue in green. Round 11: Work 12 sc around. Round 12: Repeat (1 sc, inc) six times for 18 sts. Rounds 13–15: Work 18 sc around. This slightly wider section gives the frog a soft, rounded body that remains proportional to the larger head.
Begin closing the body by working Round 16: (1 sc, dec) six times, giving 12 sts. Add another small amount of stuffing. Avoid overfilling because a keychain should remain lightweight and slightly flexible. Round 17: Work dec six times for 6 sts, then FO and use the yarn needle to close the remaining opening.
Massage the finished body gently between your fingers to distribute the fiberfill evenly. The head should remain slightly larger than the lower body, which helps create the cute proportions commonly associated with amigurumi designs. At this stage, your Crochet frog keychain pattern has its basic shape and is ready for eyes, legs, and facial details.
Making the Frog Eyes, Legs, and Facial Features
The raised frog eyes are one of the most recognizable features of the Crochet frog keychain pattern. With green yarn, make an MR and work 6 sc into it. Round 2: Inc around for 12 sts. Round 3: Work 12 sc. FO, leaving a long tail for sewing. Make a second identical eye base.
For the white part of each eye, use white yarn and make an MR with 6 sc. Join with a sl st and FO, leaving a sewing tail. Sew each white circle onto a green eye base, then embroider a small black pupil in the center. You can position the pupils directly in the middle for a traditional expression or slightly toward one side for a playful look.
Stuff each green eye very lightly before sewing it onto the upper part of the head. Position the eyes close together but leave enough space for the shapes to remain distinct. Pinning the pieces temporarily can help you judge the expression before permanently sewing them in place.
For a simple front leg, join green yarn near the side of the body and ch 7. Starting in the second chain from the hook, work 6 sl sts back toward the body and FO securely. Repeat on the opposite side. If you prefer thicker legs, chain 7 and work 6 sc back along the chain instead.
Create the back legs with slightly longer chains. Join green yarn near the lower side of the body, ch 10, then work back with 9 sl sts or 9 sc. Repeat on the opposite side. For tiny frog toes, you can finish each leg with three short chains of 2 or 3 stitches before fastening off.
Complete the face by embroidering a small curved mouth with black yarn or embroidery thread. Optional pink stitches can be added to create cheeks. Keep the details simple because miniature facial features are usually more effective than elaborate embroidery. When the face is finished, weave every yarn tail securely into the body.
Attaching the Keychain and Customizing Your Crochet Frog
The final stage of the Crochet frog keychain pattern is creating a secure loop for the metal hardware. Join green yarn at the top center of the frog’s head, preferably between or slightly behind the eyes. Ch 8 to 12 stitches, depending on how long you want the attachment loop to be.
Slip stitch back into the same attachment area and fasten off. Thread the yarn tails through several nearby stitches using a yarn needle. Because keychains experience frequent movement, reinforce the loop with additional hidden stitches at its base rather than depending on a single crochet connection.
Insert the loop through a split key ring or attach it to a lobster clasp. Check that the metal hardware closes completely and does not contain sharp edges that could cut the yarn. Give the finished frog a gentle test pull before attaching it to keys or a bag.
You can easily personalize the Crochet frog keychain pattern with different colors. Lime green creates a bright playful frog, olive green gives it a natural woodland appearance, and pastel mint produces a softer style. You can even crochet fantasy frogs in pink, blue, purple, or yellow while keeping the same construction.
Small accessories can give each frog a different personality. A miniature crochet flower, tiny scarf, simple bow, small crown, or embroidered heart can transform the basic pattern. When adding decorative elements, keep them lightweight so they do not overwhelm the proportions of the miniature frog.
Once you understand the pattern, try making several frogs with different expressions and accessories. The same crochet frog keychain can become a backpack charm, zipper decoration, party favor, handmade gift, or small craft display item. The compact design also makes it ideal for using leftover yarn in your collection.
FAQ About the Crochet Frog Keychain Pattern
Is the Crochet frog keychain pattern suitable for beginners?
Yes. Beginners who already understand chains and single crochet can follow the pattern while learning increases, decreases, continuous rounds, stuffing, and basic amigurumi assembly.
How long does it take to crochet one frog keychain?
Many crocheters can complete one in approximately one to two hours. Beginners may take longer while counting stitches and assembling the small parts carefully.
What yarn is best for a crochet frog keychain?
Cotton and cotton-blend yarns are excellent because they provide clear stitch definition. Acrylic yarn also works well and is widely available. Smooth yarn is usually easier to crochet than very fluffy yarn for miniature amigurumi.
How much yarn do I need?
Approximately 20 to 30 yards of green yarn should be enough for most miniature versions, plus small amounts of white and black for the face and eyes.
What hook size should I use?
A hook between 2.5 mm and 3.5 mm works well for many DK and light worsted yarns. Use the smallest hook that allows you to crochet comfortably while maintaining tight stitches.
Why can I see stuffing between my stitches?
Your hook may be too large or your tension may be too loose. Try using a slightly smaller hook and maintaining firmer tension.
Can I make the frog without stuffing?
Yes. You can create a flatter version by using very little stuffing or leaving it completely unstuffed. However, the rounded amigurumi shape usually looks better with a small amount of filling.
Can I make the frog larger?
Yes. Use thicker yarn and a larger hook, or add additional increase rounds to the head and body. Remember that larger projects require more yarn and stuffing.
What does inc mean in the pattern?
Inc means increase. Work two single crochet stitches into the same base stitch. This technique expands the crochet circle.
What does dec mean?
Dec means decrease. Two stitches are combined into one, reducing the total number of stitches and helping shape the body.
Do I have to use a magic ring?
No. You can chain 2 and work the required starting stitches into the second chain from the hook. However, a magic ring creates a cleaner center.
How do I keep track of my rounds?
Place a stitch marker in the first stitch of each round. Move it upward each time you begin a new round. This is particularly useful when crocheting continuous spirals.
Can I use safety eyes?
Safety eyes can be used on decorative items intended for adults, but embroidered eyes are a simple alternative and avoid detachable small parts. For items accessible to very young children, secure embroidered features are preferable.
How do I make the keychain attachment stronger?
Create a reinforced crochet loop and sew its base securely into several nearby stitches. Do not attach the ring only through one delicate stitch.
Can I wash the finished frog keychain?
Washing depends on the yarn and hardware used. If necessary, gentle hand washing followed by air drying is usually the safest method for preserving the small shape.
Why does my frog look uneven?
Uneven tension, missed stitches, or incorrect stitch counts are common causes. Count every round and check your work before moving to the next section.
Can I add a tongue to the frog?
Yes. A tiny pink chain can be sewn near the mouth to create a playful tongue. Keep it short and lightweight so the keychain remains practical.
What other accessories can I add?
Mini flowers, scarves, bows, crowns, embroidered hearts, or simple hats can be added to personalize the finished frog.
Can I sell finished frogs made from this type of pattern?
Handmade frog keychains can be suitable for craft sales when produced responsibly with your own workmanship. Always describe materials accurately and consider the intended age group when selecting attachments or embellishments.
What can I use the frog for besides a keychain?
The finished frog can become a bag charm, zipper pull, backpack decoration, ornament, gift accessory, or decorative miniature.
Conclusion
The Crochet frog keychain pattern is a small but rewarding project that combines basic crochet stitches with classic amigurumi construction. Throughout this tutorial, you learned how to begin with a magic ring, increase the head evenly, shape the body with decreases, add stuffing, crochet raised frog eyes, create simple legs, embroider the face, and securely attach keychain hardware.
You also learned the meaning of important crochet abbreviations such as MR, sc, inc, dec, sl st, ch, and FO, along with practical tips for maintaining tight stitches and keeping the finished frog lightweight. These techniques are useful far beyond this single project and can help you create many other miniature crochet animals.
Another enjoyable part of the Crochet frog keychain pattern is the opportunity to customize it. Different yarn colors, facial expressions, leg styles, flowers, scarves, crowns, or bows can make every frog unique. Even small changes in eye placement can create a completely different personality.If you make this Crochet frog keychain pattern, please leave your sincere opinion and share your suggestions. Tell us which colors you used, what accessories you added, and whether you changed any part of the pattern. Your creative ideas and personal experiences can inspire other crochet lovers to make their own adorable frog keychains.