
Crochet peacock keychain pattern projects are a wonderful way to combine creativity, colorful yarn, and practical crochet techniques into one charming handmade accessory.
One of the greatest advantages of making a crochet peacock keychain is that it requires only small amounts of yarn.
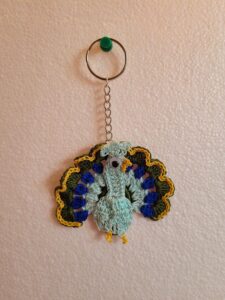
The Crochet peacock keychain pattern is also highly customizable. You can make a realistic peacock using shades of blue, green, and turquoise, or create a playful version with pastel colors, rainbow tones, or glitter yarn. Small adjustments to the tail, wings, eyes, and accessories allow every crocheter to create a one-of-a-kind project. The finished keychain can decorate backpacks, purses, handbags, keys, pencil cases, or even be used as a cute gift topper.
Choosing Materials for Your Crochet Peacock Keychain Pattern
Before beginning your Crochet peacock keychain pattern, gather all the necessary materials. Cotton yarn or high-quality acrylic yarn works very well because both provide excellent stitch definition and durability. Cotton produces crisp details, while acrylic offers softness and a wide range of vibrant colors.
Prepare several yarn colors before starting. Royal blue is commonly used for the body, while green, turquoise, yellow, and small amounts of white and black help create the decorative feathers, beak, and expressive eyes. Having all colors ready makes color changes much easier during the project.
Choose a crochet hook slightly smaller than normally recommended for your yarn. A hook between 2.25 mm and 3 mm usually creates tight stitches that prevent the stuffing from showing through. Tight stitches also help the finished keychain maintain its shape after frequent use.
Additional supplies include polyester fiberfill stuffing, stitch markers, embroidery needle, scissors, locking stitch markers, and a metal keychain ring with a short chain. Safety eyes may also be used if the keychain is intended only for decorative purposes.
If the keychain may be handled by small children, embroidered eyes are a safer alternative than plastic safety eyes. Embroidery also creates a softer handmade appearance while allowing you to personalize the facial expression.
Before crocheting the full project, make a small gauge sample using single crochet stitches. Consistent tension throughout the project ensures the body pieces fit together neatly and gives your Crochet peacock keychain pattern a professional finish.
Crocheting the Body Step by Step
Begin with the head using a magic ring. Crochet six single crochet stitches into the ring and pull it closed securely. Join the round or continue working in continuous spirals, depending on your preferred crochet method.
Round 2: Increase by crocheting two single crochet stitches into every stitch around. This creates twelve stitches and begins forming the rounded shape of the peacock’s head. Use a stitch marker to identify the beginning of each round.
Round 3: Alternate one single crochet followed by one increase around the circle. Continue increasing gradually over the following rounds until the head reaches the desired width. Even increases help create a smooth sphere without visible corners.
Once the head is complete, continue directly into the neck and body by reducing the number of increases. Crochet several rounds without increasing to create the narrow neck before gradually expanding again to shape the body. Stuff lightly as you work to maintain a smooth appearance.
After reaching the widest part of the body, begin decreasing evenly until only a small opening remains. Add additional stuffing before closing completely. Fasten off securely and weave the yarn tail inside the body using a yarn needle.
Crochet two small wings separately using simple oval shapes made with single crochet stitches. Sew them symmetrically onto each side of the body, making sure they sit evenly before securing them permanently.
Making the Tail, Beak, and Decorative Details
The tail is the highlight of every Crochet peacock keychain pattern. Begin by crocheting several narrow feather pieces individually. Each feather can be worked using a foundation chain followed by rows of single crochet, half double crochet, and double crochet to create a graceful curved shape.
Create multiple feathers in different shades of green, turquoise, and blue. Layering colors adds depth and gives the finished keychain a more vibrant appearance. Slight variations in feather length also create a natural flowing effect.
Once all feathers are complete, arrange them into a fan shape behind the body before sewing them securely. Take time to balance the feather placement evenly because this feature defines the overall appearance of the peacock.
Crochet a tiny cone-shaped beak using yellow yarn. Attach it carefully between the eyes using invisible stitches. Small embroidered nostrils can be added if desired to increase realism without making the design overly complicated.
The characteristic feather crest on top of the head can be made using several short chains finished with slip stitches or tiny picots. Attach each strand securely so it withstands regular use as a keychain.
Finish the facial details by embroidering the eyes if you are not using safety eyes. A few simple stitches can create a cheerful expression that brings personality to your completed Crochet peacock keychain pattern.
Assembly, Finishing Touches, and Care Tips
After completing all individual components, sew the head, wings, tail, and decorative features together carefully using matching yarn. Taking time during assembly results in a balanced and symmetrical finished project that looks professionally crafted.
Attach the metal keychain ring securely to the top of the head or upper back using a reinforced loop of yarn. Double stitching this attachment point increases durability and prevents the keychain from pulling loose with everyday use.
Weave every loose yarn end carefully into the interior of the project. Proper finishing greatly improves durability while giving the keychain a clean appearance from every viewing angle.
If desired, personalize the Crochet peacock keychain pattern with tiny embroidered flowers, miniature beads, decorative bows, or colorful tassels. Keep embellishments lightweight so they do not affect the balance of the finished accessory.
To keep your crochet keychain looking beautiful, hand wash it gently with cool water and mild detergent whenever necessary. Allow it to air dry completely before attaching it back to your keys or bag. Proper care helps preserve both the yarn and the stuffing.
As your crochet skills continue to grow, experiment with different feather designs, larger tails, textured stitches, metallic yarn accents, or alternative color combinations. Every new version of your Crochet peacock keychain pattern helps improve your techniques while creating charming handmade accessories for yourself or as thoughtful gifts.
FAQ
Is the Crochet peacock keychain pattern suitable for beginners?
Yes. Beginners who already know basic crochet stitches such as chain, single crochet, increases, and decreases can complete this project with patience and careful attention to detail.
Which yarn is best for a crochet keychain?
Cotton yarn and premium acrylic yarn are both excellent choices because they provide durability, vibrant colors, and beautiful stitch definition.
What crochet hook size should I use?
Most crochet peacock keychains work well with hooks ranging from 2.25 mm to 3 mm, depending on the yarn thickness and your personal tension.
Can I use leftover yarn?
Absolutely. Small amigurumi projects like this are perfect for using leftover yarn from previous crochet projects.
How do I attach the keychain ring?
Create a reinforced yarn loop through the top of the head or body and securely fasten the metal keychain ring using multiple strong stitches.
Should I use safety eyes?
Safety eyes work well for decorative keychains, while embroidered eyes are recommended if the item may be handled by young children.
How long does this project usually take?
Most crocheters can complete a Crochet peacock keychain pattern within a few hours, depending on their experience and the amount of decorative detail included.
Can I sell finished crochet peacock keychains?
Many crocheters sell their handmade keychains at local craft fairs or online marketplaces. Always ensure your finished products are original handmade creations and respect any applicable pattern licensing terms if using a third-party design.
Conclusion
Creating a Crochet peacock keychain pattern is a rewarding project that combines colorful yarn, creative shaping, and enjoyable crochet techniques into one practical handmade accessory.
Throughout this guide, you learned how to select the right materials, crochet the head and body step by step, create elegant feather details, assemble each component carefully, and finish your keychain with professional touches that improve both its appearance and durability. These techniques can easily be adapted to future amigurumi projects as your crochet skills continue to develop.
Whether you are making this keychain for yourself, as a thoughtful handmade gift, or to add to your craft collection, every stitch contributes to a unique creation filled with personality and charm. I hope this Crochet peacock keychain pattern has inspired you to begin your next crochet adventure with confidence. If you enjoyed this tutorial, please leave your honest opinion and share your suggestions in the comments. Your feedback is always appreciated and helps inspire even more creative crochet projects for the handmade community.