
Crochet pumpkin earrings pattern projects are the perfect combination of creativity, seasonal charm, and practical crochet skills.
One of the greatest advantages of making a Crochet pumpkin earrings pattern is that it requires only a small amount of yarn and a few basic supplies.
Learning how to crochet miniature accessories also helps develop precision, stitch consistency, and finishing techniques that can be applied to many other amigurumi and decorative crochet projects. Throughout this guide, you will discover which materials to prepare, how to crochet each pumpkin step by step, how to assemble the earrings securely, and how to personalize your finished design with creative decorative details. Whether you are making them for yourself, as gifts, or for seasonal craft fairs, this Crochet pumpkin earrings pattern offers endless possibilities.
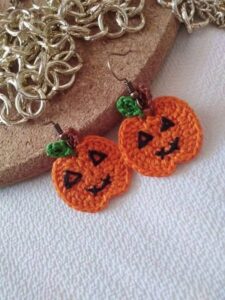
Materials and Essential Crochet Stitches
Before starting your Crochet pumpkin earrings pattern, prepare all your supplies so the crocheting process flows smoothly from beginning to end. Organizing your materials in advance allows you to focus entirely on your stitches without unnecessary interruptions.
For this project, you will need fine cotton crochet thread or lightweight yarn in orange, green, and brown, a 1.75 mm or 2.0 mm crochet hook, stitch markers, scissors, a yarn needle, jump rings, fishhook earring findings, embroidery needle, and small jewelry pliers. Fine cotton thread is recommended because it produces crisp stitch definition while keeping the earrings lightweight.
The pattern uses several beginner-friendly crochet stitches including the Magic Ring (MR), Chain (ch), Slip Stitch (sl st), Single Crochet (sc), Increase (inc), Invisible Decrease (dec), Half Double Crochet (hdc), and Fasten Off (FO). If you already know these stitches, you will find this project enjoyable and easy to follow.
Begin by creating a Magic Ring and work six single crochet stitches into the center. Pull the ring closed firmly to eliminate the opening. This creates the rounded center that forms the top of the pumpkin.
Round 2 consists of crocheting two single crochet stitches into every stitch around, resulting in twelve stitches. Continue increasing gradually over the following rounds until the pumpkin reaches the desired width while maintaining an even circular shape.
Work one or two rounds without increases to create gentle height before beginning the shaping process. Keeping your stitch tension consistent throughout every round helps produce two matching earrings with symmetrical proportions.
Step-by-Step Crochet Pumpkin Earrings Pattern
After establishing the pumpkin shape, begin decreasing gradually using invisible decreases. This technique creates smooth curves without leaving noticeable gaps, making the finished pumpkin appear neat and professionally crafted.
Lightly stuff the pumpkin if you prefer a slightly dimensional design, or leave it flat if you want delicate lightweight earrings. Both versions work beautifully depending on your personal preference and intended use.
To create the pumpkin stem, join brown yarn at the top center and crochet a short chain of three stitches. Work one or two slip stitches back along the chain to form a sturdy miniature stem that remains upright after assembly.
Next, attach green yarn beside the stem and crochet a tiny leaf using a chain of four stitches followed by slip stitches and single crochet to shape a delicate pointed leaf. This simple addition enhances the seasonal appearance of the finished earrings.
Fasten off all yarn securely and weave in every loose end carefully using a yarn needle. Trim any excess thread close to the stitches while ensuring the tails remain hidden inside the work for a polished appearance.
Finally, attach a jump ring through the top of the stem and connect it to the earring hook using jewelry pliers. Check that every metal connection is tightly closed before wearing or gifting your completed Crochet pumpkin earrings pattern.
Creative Ways to Personalize Your Pumpkin Earrings
One of the most enjoyable aspects of making a Crochet pumpkin earrings pattern is experimenting with different color combinations. Although classic orange pumpkins remain the traditional choice, cream, white, sage green, dusty blue, mustard yellow, and soft pink pumpkins create elegant modern alternatives.
Gradient yarn can produce subtle color transitions that add extra visual interest to miniature pumpkins. Self-striping thread also creates beautiful natural shading without requiring frequent color changes during crocheting.
Consider adding embroidered vertical lines using slightly darker orange thread to imitate the natural ridges found on real pumpkins. These tiny details significantly enhance the realistic appearance of each earring.
Small decorative embellishments such as miniature bows, tiny crocheted vines, beads, or embroidered flowers can transform your pumpkin earrings into unique handmade accessories suitable for different occasions throughout the autumn season.
Instead of creating identical earrings, make two pumpkins with slightly different facial expressions for a playful Halloween version. Tiny embroidered smiles or simple jack-o’-lantern faces add personality while remaining elegant enough for everyday wear.
The same Crochet pumpkin earrings pattern can also be adapted into keychains, zipper pulls, necklace pendants, backpack charms, ornaments, bookmarks, garlands, or decorative gift toppers simply by replacing the jewelry findings with alternative hardware.
Tips for Professional-Looking Crochet Earrings
Because miniature crochet projects contain relatively few stitches, maintaining consistent tension is extremely important. Even slight differences between stitches become much more noticeable in small accessories such as earrings.
Crochet both earrings simultaneously by completing one round on the first pumpkin and immediately repeating the same round on the second. This technique helps both earrings remain nearly identical in size, shape, and stitch count.
Count your stitches after every round. Accurate stitch counting prevents uneven shaping and helps maintain symmetrical pumpkins that complement each other as a matching jewelry set.
Choose lightweight cotton thread whenever possible. Fine thread creates elegant earrings that are comfortable to wear while providing crisp stitch definition and reducing unnecessary bulk.
When attaching the jump rings, reinforce the top stitches if necessary to prevent stretching during regular use. Strong attachment points greatly improve the durability of handmade crochet jewelry.
Before wearing or gifting your completed Crochet pumpkin earrings pattern, inspect every stitch, trim loose threads, verify the embroidery details, and ensure the jewelry hardware is firmly attached. These final finishing touches help your handmade earrings achieve a polished and professional appearance.
FAQ
Is the Crochet pumpkin earrings pattern suitable for beginners?
Yes. Anyone familiar with the Magic Ring, single crochet, increases, and decreases can complete this project successfully with patience and careful stitch counting.
Which yarn is best for crochet earrings?
Fine cotton crochet thread is the preferred choice because it creates lightweight earrings with beautiful stitch definition and excellent durability.
How long does one pair take to complete?
Most crocheters finish a pair of pumpkin earrings within two to three hours depending on experience and decorative details.
Can I make larger pumpkins?
Absolutely. Use thicker yarn with a larger crochet hook or continue adding increase rounds before shaping the pumpkin.
Should I stuff the pumpkins?
That depends on your preference. Flat pumpkins create lighter earrings, while lightly stuffed pumpkins produce a more dimensional appearance.
Can I wash crochet earrings?
Yes. Gentle hand washing with mild soap followed by air drying is generally recommended to preserve both the yarn and the jewelry hardware.
Can this pattern be used for other accessories?
Yes. The pumpkins work beautifully as keychains, zipper pulls, necklace pendants, ornaments, gift toppers, bookmarks, backpack charms, and seasonal decorations.
Are crochet pumpkin earrings suitable for selling?
Definitely. Handmade seasonal jewelry is popular at autumn festivals, craft fairs, and holiday markets because it is lightweight, affordable, and highly customizable.
Conclusion
Creating your own Crochet pumpkin earrings pattern is a rewarding project that combines seasonal creativity with practical crochet techniques. Throughout this guide, you learned how to prepare your materials, master the essential stitches, crochet each pumpkin step by step, assemble the earrings securely, personalize the design with decorative details, and apply professional finishing techniques for beautiful results.
Whether you choose classic orange pumpkins, elegant neutral shades, or playful Halloween-inspired designs, every completed pair becomes a unique expression of your creativity and craftsmanship.
Thank you for following this complete Crochet pumpkin earrings pattern tutorial. I hope it inspires you to create beautiful handmade jewelry for yourself, your family, or your friends while continuing to explore the wonderful world of miniature crochet projects. If you make these earrings, please leave your honest opinion, share your experience, and send your suggestions. Your feedback is greatly appreciated and helps inspire even more creative crochet tutorials in the future.