
Crochet pumpkin pie pattern is a delightful project for anyone who loves combining cozy crochet with the warm atmosphere of autumn.
Although the finished piece may look detailed, this Crochet pumpkin pie pattern is designed around familiar crochet techniques.
Throughout this tutorial, you will learn how to make a recognizable crochet pumpkin pie slice step by step using standard US crochet terminology. The instructions include a complete stitch key, suggested materials, approximate dimensions, shaping guidance, assembly tips, and several ideas for customizing the final piece. The primary keyword, Crochet pumpkin pie pattern, describes a crochet design that recreates the appearance of a pumpkin pie using yarn and crochet stitches. Rather than focusing only on appearance, this guide also explains why specific stitches and construction techniques are used so that you can understand the pattern and confidently adapt it to your own crochet style.
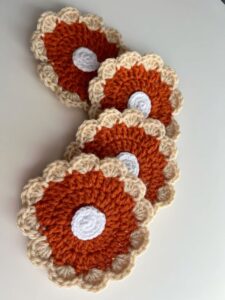
Materials, Crochet Stitch Key, and Pattern Preparation
For this Crochet pumpkin pie pattern, choose smooth DK or light worsted-weight yarn that provides clear stitch definition. You will need approximately 20–30 yards of pumpkin orange yarn, 10–15 yards of beige or golden brown yarn for the crust, and a small amount of cream or white yarn for the topping. You will also need a crochet hook between approximately 3.0 mm and 4.0 mm, scissors, a yarn needle, stitch markers, and a small amount of polyester fiberfill if you want to make a softly stuffed three-dimensional version.
Before starting, become familiar with the crochet stitch key used throughout the tutorial: ch = chain, st = stitch, sts = stitches, sl st = slip stitch, sc = single crochet, hdc = half double crochet, dc = double crochet, inc = increase, dec = decrease, BLO = back loop only, FO = fasten off. An increase means working two stitches into the same stitch. A decrease means combining two stitches into one. Instructions inside parentheses should be repeated or worked into the same location as indicated.
The pumpkin filling begins as a triangular piece worked in rows. This construction is useful because a real slice of pie naturally narrows toward the front and becomes wider toward the crust. Instead of trying to create the entire slice in one complicated round, you will gradually increase the width of the orange section. This makes the crochet pumpkin pie slice easier to shape and gives you more control over its final proportions.
Begin with the pumpkin-colored yarn. Make a slip knot and ch 2. For Row 1, work 2 sc in the second ch from the hook. You now have 2 sts. Ch 1 and turn. Row 2: inc in each st across [4 sts]. Ch 1 and turn. Row 3: inc in first st, sc across until 1 st remains, inc in final st [6 sts]. The increases at both edges begin creating the triangular shape.
Continue using the same shaping principle. Row 4: ch 1, turn, inc in first st, sc across to final st, inc in final st [8 sts]. Row 5: repeat [10 sts]. Row 6: repeat [12 sts]. Row 7: repeat [14 sts]. Row 8: repeat [16 sts]. If you want a larger slice, continue increasing by two stitches on each additional row until the pumpkin section reaches your preferred width.
At this point, the orange section should resemble a small triangle with a narrow front point and a wider back edge. Depending on yarn, hook size, and tension, a medium piece may measure approximately 3.5–5 inches (9–12.5 cm) from the point toward the back. Do not worry if the sides curl slightly while you work. Gentle shaping and final assembly will help create a cleaner pumpkin pie crochet pattern appearance.
Step-by-Step Crochet Pumpkin Pie Filling and Crust
Once the orange triangle reaches the desired size, work one final row without increasing. Ch 1, turn, sc in each st across. This straight row creates a stable edge where the crochet crust will be attached. If your triangle seems too narrow, add another increase row before making this straight edge. If it seems wide enough, continue directly to the crust section.
Change to your beige, tan, caramel, or golden brown yarn. Attach the new color at the beginning of the wide edge. Ch 1 and work 1 sc in each st across. Ch 1, turn. For the next row, work 1 sc in each st BLO across. Working through the back loops creates a subtle ridge between the orange filling and the crust, helping the two sections look visually separate.
For a thicker crust, work another row using hdc stitches. Ch 1, turn, hdc in each st across. The half double crochet is slightly taller and fuller than single crochet, which creates a soft raised edge. If you prefer a flatter pie appliqué, continue using single crochet instead. Both methods work, so choose the texture that best suits your version of the Crochet pumpkin pie pattern.
To give the crust a gently rounded appearance, add one more decorative row. Ch 1, turn, sc in first st, then repeat (sc in next st, 2 sc in next st) across, adjusting the final repeat if necessary. These small increases add fullness along the outer crust. Avoid adding too many increases because excessive stitches can create unwanted ruffling rather than a softly rounded pie edge.
For a flat decorative version, you can now FO, leaving a tail long enough to weave securely into the back. If you want a dimensional pie slice, make a second triangle using the same orange instructions, but keep the second piece relatively simple. You can use orange throughout the second triangle because it will form the bottom of the pie and will not be as visible once assembled.
Place the two triangular pieces together with their wrong sides facing inward. Using orange yarn, work sc stitches evenly around the sides, leaving the crust edge accessible. Before closing the final section, add a small amount of fiberfill. The goal is to create gentle thickness rather than a heavily stuffed toy. Finish the seam, secure the yarn, and shape the slice with your fingers until the edges look even.
Adding Whipped Cream, Texture, and Finishing Details
A small crochet swirl can transform the basic crochet pumpkin pie into an instantly recognizable autumn dessert motif. With cream or white yarn, begin with a magic ring. Round 1: ch 1, work 6 sc into the ring, join with sl st [6 sts]. Round 2: ch 1, work 2 sc in each st around, join with sl st [12 sts]. This creates a small circular base for the topping.
To create a slightly raised center, continue with Round 3: ch 2, work 2 hdc in each of the next 6 sts, then alternate 1 hdc and 2 hdc around the remaining stitches. The extra stitches encourage the piece to curve and develop a soft spiral shape. Fasten off with a long tail. Gently twist the crochet circle into a small mound and use the yarn tail to secure the layers together from underneath.
Position the whipped cream near the wide end of the orange filling, slightly in front of the crust. Sew it securely using the remaining yarn tail. Make several small stitches through the bottom layer of the cream and the surface of the pumpkin section. Avoid pulling too tightly, because excessive tension can flatten the topping. The goal is a soft, dimensional detail that complements the Crochet pumpkin pie pattern.
Texture can also be added to the pumpkin filling. Using a slightly darker shade of orange, embroider two or three short lines from the crust toward the center of the slice. Keep these stitches subtle rather than creating heavy stripes. Another option is to surface crochet several sl sts across the filling. These small details can suggest the warm color variations associated with baked pumpkin filling.
The crust can be customized as well. A light beige creates a soft, freshly baked appearance, while golden brown produces stronger contrast against the orange filling. You can even combine two shades by making the base of the crust in tan and the final row in a darker caramel color. When selecting yarn, keep the overall palette harmonious so that each section remains easy to identify.
After assembly, inspect the finished piece carefully. Weave every yarn tail through several stitches on the wrong side and trim the excess only when it feels secure. If you made a flat appliqué, gently block the piece according to the care recommendations for your yarn. If you created a stuffed version, shape it with your fingers instead of flattening it. Your handmade crochet pumpkin pie slice is now ready for decorating.
Creative Uses, Customization Ideas, FAQ, and Conclusion
One advantage of this Crochet pumpkin pie pattern is its versatility. A flat version can become an appliqué for a tote bag, kitchen-themed decoration, fabric banner, autumn garland, or seasonal wall hanging. Because the piece is relatively small, you can make several slices in coordinating colors without requiring large quantities of yarn.
A stuffed version can be displayed inside a decorative autumn basket with crocheted pumpkins, leaves, acorns, and other seasonal motifs. You can also create several pie slices and arrange them together to resemble a complete pie. When doing this, keep the dimensions consistent by using the same yarn, hook size, stitch count, and tension for every slice.
For an ornament, add a hanging loop before fastening off. Attach yarn to the crust and ch 15–20, depending on the desired loop size. Join the chain back to the same area with a sl st and secure it carefully. A small crochet pie ornament can be used on a seasonal decorative tree, garland, door decoration, or handmade gift package.
You can also experiment with size. For a miniature crochet pumpkin pie, stop the orange triangle after only four or five increase rows and use thinner yarn with a smaller hook. For a larger decorative piece, continue increasing the triangle for several additional rows. Keep the crust proportional by adding additional rows if the pumpkin section becomes significantly larger.
Color changes offer another simple way to personalize the design. Traditional pumpkin orange and golden beige provide a familiar autumn appearance, but muted terracotta, rust, cinnamon, cream, and warm brown can create a more modern palette. The whipped topping can be bright white, ivory, or pale cream depending on the overall style of your project.
The most useful approach is to treat this Crochet pumpkin pie pattern as a flexible foundation. Once you understand the triangular shaping, contrasting crust, and separate topping, you can experiment with your own details. Adjusting the number of rows, yarn weight, color palette, and finishing techniques can create many variations while keeping the essential pumpkin pie appearance.
FAQ – Frequently Asked Questions About the Crochet Pumpkin Pie Pattern
Is the Crochet pumpkin pie pattern suitable for beginners?
Yes. This project is suitable for confident beginners who understand basic stitches such as chains and single crochet. The pattern also introduces increases, simple color changes, half double crochet, and basic assembly. Beginners may find the triangular construction particularly helpful because the shaping follows a predictable increase sequence.
What type of yarn should I use for crochet pumpkin pie?
Smooth DK or light worsted-weight yarn is a practical choice because it creates clear stitches without making the project excessively bulky. Cotton provides excellent stitch definition and a firm structure, while acrylic yarn can create a softer piece. The best choice depends on whether you are making an appliqué, ornament, or stuffed decoration.
What hook size works best for this pattern?
A hook between approximately 3.0 mm and 4.0 mm works well with many DK and light worsted yarns. Always consider the yarn label and your personal tension. For stuffed pieces, using a slightly smaller hook can create tighter stitches and reduce visible gaps.
How can I make my crochet pumpkin pie larger?
Continue the increase sequence for additional rows. Each increase row adds stitches to both edges, gradually widening the triangle. You can also use thicker yarn and a larger hook. When enlarging the pumpkin filling, increase the size of the crust and whipped topping proportionally.
How can I make a miniature pumpkin pie?
Use thinner yarn and a smaller crochet hook, or simply stop the triangle after fewer increase rows. A miniature version is particularly useful for ornaments, garlands, gift embellishments, and other small decorative projects.
Why is my triangle curling?
A small amount of curling is common and may disappear after finishing. Strong curling can indicate that your tension is too tight. Try loosening your stitches or using a slightly larger crochet hook. For a flat appliqué, gentle blocking can help create a more even shape.
Can I make this pattern without stuffing?
Yes. The flat version is actually simpler because only one main triangle is necessary. Add the crust and whipped cream directly to the surface, weave in the ends, and gently shape the finished piece. Flat slices work particularly well for appliqués and garlands.
How much fiberfill should I add?
Use only enough fiberfill to create gentle dimension. Overstuffing can distort the triangular shape and make the edges difficult to close. Add small portions gradually and distribute them evenly before completing the seam.
Can I use safety eyes to turn the pie into an amigurumi character?
You can adapt the stuffed version into a decorative character if desired, although embroidered facial details are another simple option. If making items intended for very young children, carefully consider the suitability and security of all attached components and materials.
How do I keep the crust from becoming too ruffled?
Avoid making too many increases along the final crust row. If the edge begins to wave excessively, remove some increases and replace them with regular single crochet stitches. The ideal crust should have gentle fullness without creating a pronounced ruffle.
Can I use different colors for the filling?
Certainly. While orange is traditionally associated with pumpkin pie, crochet projects allow plenty of creative freedom. Terracotta, cinnamon, burnt orange, golden brown, and muted peach are attractive alternatives. You could also adapt the same construction to represent other types of pie.
How do I make several identical slices?
Keep notes about your yarn brand or weight, hook size, number of increase rows, final stitch count, and crust rows. Try to maintain similar tension throughout each piece. Following the same measurements is especially important if you plan to arrange several slices into one complete decorative pie.
Can this crochet pumpkin pie be washed?
That depends on the yarn and stuffing materials you choose. Always follow the care instructions associated with your yarn. Decorative pieces may only need occasional gentle cleaning, while frequently handled items may benefit from washable materials.
How can I make the whipped cream more dimensional?
Use additional increases in the outer section and gently spiral the finished circle before sewing it down. You can also use a slightly thicker cream-colored yarn. Avoid making the topping too large, as it should remain proportional to the pumpkin filling.
What can I make with finished crochet pumpkin pie slices?
They can become autumn ornaments, garland decorations, appliqués, table decorations, seasonal basket fillers, gift embellishments, or decorative crochet food pieces. Making several sizes can create an especially playful autumn display.
Conclusion
The Crochet pumpkin pie pattern is a creative way to combine basic crochet skills with a warm autumn-inspired design. Starting with a small foundation, you learned how strategic increases transform simple rows of single crochet into a triangular pumpkin filling. A contrasting yarn color then creates the crust, giving the project the recognizable appearance of a classic pie slice.This tutorial also covered the essential crochet stitch key, including ch, sl st, sc, hdc, inc, dec, BLO, and FO. Understanding these abbreviations is useful beyond this individual project because the same techniques appear in many crochet patterns. The gradual shaping method is particularly valuable for learning how increases influence the width and silhouette of crochet fabric.
You also learned how to create a separate cream-colored topping, assemble a dimensional version with fiberfill, add subtle surface details, and customize the crust. By changing yarn weight, hook size, row count, and color combinations, the same basic Crochet pumpkin pie pattern can produce everything from miniature ornaments to larger decorative pieces.The finished project can be adapted for autumn garlands, appliqués, handmade ornaments, decorative baskets, seasonal displays, and creative gift embellishments. Because each slice requires relatively little yarn, this pattern is also a useful way to transform leftover orange, brown, beige, and cream yarn into something cheerful and decorative.
Most importantly, do not be afraid to personalize your crochet pie. Try a darker crust, a larger whipped cream swirl, subtle embroidered details, different dimensions, or an entirely new autumn color palette. Small creative decisions are what make handmade crochet projects feel unique.If you make this Crochet pumpkin pie pattern, please leave your sincere opinion about the project and share your suggestions. It would be wonderful to know which colors you chose, how you used your finished pumpkin pie, and what variations or additional details you would like to see in future crochet patterns.