
Crochet skull pattern projects are a creative way to combine traditional crochet techniques with a bold decorative motif that works especially well for Halloween crafts, alternative décor, appliqués, bags, blankets, and handmade accessories.
One of the advantages of learning a crochet skull pattern is its flexibility. You can work a small skull with lightweight cotton yarn for an appliqué, use medium-weight yarn for ornaments and decorations, or experiment with thicker yarn to create a larger motif.
The tutorial below focuses on creating a flat skull motif with clearly defined eye openings and a simple jaw. Exact dimensions will vary depending on yarn thickness, hook size, tension, and personal adjustments, so checking your work as you crochet is important. The pattern uses standard US crochet terminology and explains the essential stitches before moving through the construction. Instead of treating the skull as one complicated design, think of it as a collection of familiar crochet techniques arranged strategically. Once you understand the structure, you can easily modify the crochet skull pattern to create smaller decorations, larger appliqués, repeated motifs, or customized seasonal projects.
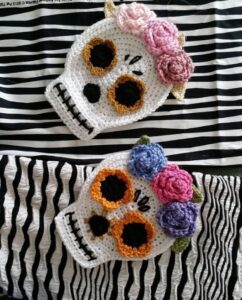
Materials, Crochet Stitch Key, and Preparation
For this crochet skull pattern, choose a smooth yarn that provides good stitch definition. A medium-weight cotton or cotton-blend yarn is particularly convenient because the finished motif tends to hold its shape well. You will need approximately 20–35 yards of yarn for a small to medium skull, although the amount depends on your gauge and desired dimensions. Choose a crochet hook that works comfortably with your yarn; a 3.5 mm to 4.5 mm hook is a practical range for many medium-weight yarns.
Before beginning, prepare a crochet hook, yarn, scissors, yarn needle, and a removable stitch marker. The marker is optional, but it can make counting easier while shaping the skull. If you plan to attach the finished crochet skull appliqué to another project, leave a slightly longer yarn tail when fastening off. That tail can later be used for sewing the motif securely to fabric or another crocheted surface.
The main abbreviation key is: ch = chain, sl st = slip stitch, sc = single crochet, hdc = half double crochet, dc = double crochet, st = stitch, sp = space, sk = skip, inc = increase, and dec = decrease. When the instructions say inc, work two stitches into the same stitch. When they say dec, combine two neighboring stitches into one using the appropriate decrease technique.
A chain stitch creates the foundation and also produces intentional openings. This is particularly important because the eye sockets in a crochet skull pattern are formed partly with chain spaces. A single crochet creates a firm, compact fabric, while half double crochet provides moderate height. The double crochet stitch is taller and helps the upper skull grow quickly without requiring too many rounds.
Tension matters when making a detailed crochet skull motif. If your stitches are extremely tight, the eye openings may become too small and the skull may curl. If the stitches are excessively loose, the motif can lose definition. Try to maintain relaxed, consistent tension throughout the project. Blocking can correct minor irregularities afterward, but consistent tension makes shaping much easier from the beginning.
A useful starting gauge is approximately 16–18 single crochet stitches across 4 inches, but achieving an exact gauge is not essential for a decorative motif. Instead, focus on proportion. The upper skull should remain wider than the jaw, both eye openings should appear reasonably balanced, and the outer edges should lie relatively flat. These visual checkpoints are more useful than strict measurements when creating a customizable easy crochet skull pattern.
Step-by-Step Crochet Skull Pattern: Building the Head and Eyes
Begin with a magic ring. If you prefer not to use a magic ring, chain 4 and join the first chain with a slip stitch to create a small circle. Round 1: Ch 2, work 12 dc into the ring, sl st into the first dc to join. [12 dc]. Pull the center closed gently. This circular foundation creates the upper center of the skull.
Continue increasing the circle. Round 2: Ch 2, work 2 dc into each st around, join with sl st. [24 dc]. The piece should now resemble a small flat disc. If it begins forming a cup, relax your tension slightly. If the edge becomes excessively wavy, your stitches may be too loose or your hook may be too large.
Now begin creating a slightly more oval skull shape. Round 3: Ch 1, sc in next 4 sts, hdc in next 4 sts, 2 dc in each of next 4 sts, hdc in next 4 sts, sc in remaining 8 sts, join. The taller stitches and increases help establish the rounded forehead while preparing the lower area for the facial features.
The eye sockets are the defining feature of this crochet skull pattern. Round 4: Ch 1, sc across the upper section until you reach the first eye position, ch 5, sk 4 sts, sc in next 3 sts, ch 5, sk 4 sts, then sc around the remaining stitches. Join with sl st. The two chain spaces become the foundation for the eye openings. Adjust their placement slightly if necessary so they appear symmetrical.
In the following round, strengthen the shape around those openings. Round 5: Ch 1, sc in each st until the first ch-5 sp, work 6 sc around the chain space, sc in each center st, work 6 sc around the second ch-5 sp, then sc around the remaining sts. Join. Crocheting around rather than directly into each chain produces smoother, more rounded eye sockets.
Check the shape before moving forward. Place the crochet skull motif on a flat surface and gently arrange the eye openings with your fingers. They should be large enough to remain visible but not so large that they dominate the entire face. Minor differences are normal in handmade crochet. If one eye is noticeably smaller, you can carefully adjust stitch placement during the next round rather than restarting the whole project.
Shaping the Nose, Cheeks, and Crochet Skull Jaw
The nose can be suggested with a small chain opening positioned between and slightly below the eyes. Work across the lower facial area until reaching the center. Ch 2, sk 1 st, sc into the next st, then continue working toward the opposite side. On the following pass, work one or two single crochet stitches around the chain space. This creates a small opening without making the center of the crochet skull pattern too fragile.
Next, begin narrowing the lower face. Rather than continuing in complete rounds, the jaw can be worked in rows. Position your yarn approximately below the outer edge of the first eye socket. Jaw Row 1: Ch 1, sc across approximately 12–14 central lower stitches, turn. The exact number can be adjusted according to the size of your skull. The goal is to create a section narrower than the rounded forehead.
Continue shaping the cheeks. Jaw Row 2: Ch 1, sc dec, sc across until 2 sts remain, sc dec, turn. You have now removed one stitch from each side. These decreases gradually create the characteristic transition from the cheekbones to the jaw. Avoid pulling the decrease stitches too tightly because that can cause the lower portion to curl.
For the next section, work Jaw Row 3: Ch 1, sc across, turn. Then work Jaw Row 4: Ch 1, sc dec, sc across until 2 sts remain, sc dec, turn. Depending on your original stitch count, you should now have a compact rectangular or slightly tapered lower jaw. This simple shaping keeps the crochet skull pattern for beginners manageable while still producing a recognizable silhouette.
To suggest teeth without complicated embroidery, create tiny spaces along the final edge. Work ch 1, sc in next st, ch 1, sk 1 st, sc in next st, repeating across the lower jaw as space allows. Alternatively, crochet the jaw as a solid section and add vertical embroidered lines afterward. The second method is often easier when making a very small crochet skull appliqué.
Finish the main construction by working slip stitches around any areas that need additional definition, but avoid adding too many stitches around the outer edge. Excess stitches can make the motif ripple. Fasten off and leave a yarn tail approximately 6–8 inches long. Thread the tail through a yarn needle and weave it securely through several stitches on the back of the work.
Finishing, Blocking, Customizing, and Using Your Crochet Skull
Blocking can significantly improve the finished appearance of a crochet skull pattern. Gently shape the forehead, eye sockets, cheeks, and jaw with your fingers. If your yarn is suitable for wet blocking, lightly dampen the motif and place it on a flat blocking surface. Arrange the skull into the desired shape and allow it to dry completely before removing it.
If you want greater definition around the eyes, use contrasting yarn to work a delicate surface slip stitch or embroidered outline. Black around a white skull creates dramatic contrast, while bright colors can produce a more cheerful interpretation. Keep additional decoration relatively light so the original stitch structure remains visible.
You can also transform the basic crochet skull motif by adding crocheted flowers. Small roses or simple five-petal flowers placed around the forehead can create a decorative botanical design. Another possibility is adding a small bow, colorful edging, or embroidered accents. These details allow one basic pattern to support many different creative styles without requiring you to learn an entirely new construction method.
For Halloween decorations, make several skulls and connect them with chains to create handmade bunting. The same motif can be sewn onto a crocheted bag, pillow cover, scarf, hat, or blanket square. If attaching it to another textile, pin the skull in position first and check that the eye openings remain symmetrical before sewing around the outer edge with small, discreet stitches.
To create a small crochet skull pattern, use thinner yarn and a smaller hook while following the same general construction. For a larger skull, use thicker yarn and an appropriately sized hook. You can also add extra rounds to the forehead, but remember that increasing the upper section may require enlarging the eyes and jaw proportionally. Maintaining those proportions is more important than following an exact final measurement.
Once you have completed the pattern a few times, experiment with stitch counts and shapes. Make the forehead taller, the eyes more rounded, or the jaw shorter. Crochet is naturally adaptable, and small adjustments are part of developing your own style. Keeping notes about hook size, yarn weight, stitch counts, and finished dimensions will make it easier to reproduce your favorite version of the crochet skull pattern later.
Frequently Asked Questions About the Crochet Skull Pattern
Is this crochet skull pattern suitable for beginners?
Yes. An adventurous beginner who already understands chain stitches, single crochet, double crochet, slip stitches, increases, and decreases should be able to complete the project. The eye openings and jaw shaping require careful counting, so beginners may want to use stitch markers and count each section before continuing.
What yarn works best for a crochet skull?
Cotton and cotton-blend yarns are excellent choices for a flat crochet skull appliqué because they provide clear stitch definition and tend to hold their shape. Acrylic yarn also works well, particularly for decorations, blankets, and larger projects.
How much yarn do I need?
A small or medium motif usually requires only a modest quantity of yarn. Approximately 20–35 yards should be enough for many versions, although thicker yarn, additional edging, or a larger finished skull will increase the amount required.
Why is my crochet skull curling?
Curling can happen when tension is too tight, when the hook is too small for the yarn, or when the stitch distribution does not provide enough room for the piece to lie flat. Gentle blocking often solves mild curling. More severe curling may require adjusting the hook size or adding stitches strategically.
How can I make the eye sockets larger?
Increase the number of chains used for each eye opening and skip a corresponding number of stitches. For example, a larger version might use ch 6 or ch 7 instead of ch 5. Keep both sides identical so the facial proportions remain balanced.
Can I make the skull smaller?
Yes. Using thinner yarn and a smaller hook is the easiest way to reduce the size without dramatically changing the pattern structure. You can also reduce stitch counts, but doing so requires adjusting the eye sockets and jaw proportionally.
Can I use this pattern to make Halloween decorations?
Absolutely. A Halloween crochet skull can become an ornament, garland element, appliqué, table decoration, bag embellishment, or part of a larger seasonal crochet project. Traditional black, white, gray, orange, and purple yarns work particularly well for Halloween themes.
How do I make the skull look more symmetrical?
Count stitches carefully and mark the central point of the face before creating the eyes. After completing each major section, lay the skull flat and compare both sides. Small adjustments can usually be made while crocheting the following row or round.
Can crochet skulls be added to granny squares?
Yes. A finished flat skull can be sewn onto a granny square, or you can build a square-shaped background around the completed motif. When creating repeated blocks for a blanket, use the same yarn, hook size, and stitch counts for every skull to maintain consistent dimensions.
Should I block the finished skull?
Blocking is recommended, especially for flat appliqués. It helps define the eye openings, straighten the jaw, smooth the forehead, and improve the overall silhouette. Always use a blocking technique appropriate for the fiber content of your yarn.
How can I create visible teeth?
The simplest technique is to embroider several short vertical lines across the finished jaw using contrasting yarn. Another method is creating small chain spaces along the final row. Embroidery usually provides more control when working with small motifs.
What can I make with several crochet skull motifs?
Several motifs can become a decorative garland, blanket border, set of appliqués, wall hanging, seasonal banner, or repeated decoration on handmade accessories. Changing yarn colors from one skull to another is an easy way to create a coordinated but varied collection.
Conclusion
Creating a crochet skull pattern becomes much easier when the project is separated into manageable stages. You begin with a circular foundation, expand and shape the forehead, create chain spaces for the eye sockets, add a small nose opening, and then narrow the lower section with decreases to form the cheeks and jaw. Simple stitches such as sc, hdc, dc, ch, sl st, increases, and decreases are enough to create a detailed-looking motif without relying on unnecessarily complicated techniques.
The most important elements are consistent tension, careful stitch counting, symmetrical placement of the eyes, and gradual shaping of the jaw. Once the basic construction is familiar, the pattern can be adapted with different yarn weights, hook sizes, colors, embroidered details, flowers, borders, or decorative accents. Your finished crochet skull motif can then become an appliqué, Halloween decoration, garland element, bag embellishment, blanket feature, or part of another creative crochet project.
Most importantly, use the pattern as a starting point for experimentation. Handmade projects do not need to look mechanically identical, and small variations can give each skull its own character. Try different colors, alter the proportions, experiment with the eye shapes, or develop your own decorative finishing techniques. If you make this crochet skull pattern, leave your sincere opinion about the project and share any suggestions or creative ideas you would like to see added. Your experiences and variations can inspire even more possibilities for future crochet projects.