
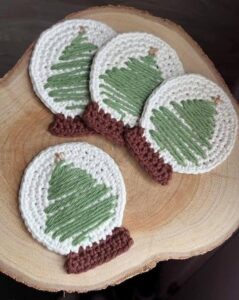
Crochet Snow Globe with Tree Pattern is a charming holiday crochet project that transforms simple stitches into a decorative winter scene filled with warmth and handmade character.
One of the most enjoyable features of the Crochet Snow Globe with Tree Pattern is the opportunity to experiment with traditional Christmas colors and textures.
This tutorial explains the complete process in crochet terms, including the crochet stitch key, materials, globe construction, Christmas tree, snow details, base, assembly, and finishing. The pattern is designed to be understandable without requiring advanced crochet experience, although careful stitch counting will help keep the round globe symmetrical. You will work the main globe in rounds, build the tree separately or directly onto the globe, and then finish the lower base before adding decorative details. The exact finished size will depend on yarn weight and hook size, but a medium version made with lightweight or worsted yarn can comfortably become a tree ornament or decorative appliqué. Read the entire Crochet Snow Globe with Tree Pattern once before beginning so that you understand how each section connects. Keeping your tension consistent throughout the project will make assembly easier and produce a cleaner, more professional result.
Materials, Stitch Key, and Preparation for the Crochet Snow Globe
For this Crochet Snow Globe with Tree Pattern, prepare yarn in white or pale blue for the globe, green for the tree, brown for the trunk or base details, and another color such as red, burgundy, gold, or dark green for the snow globe stand. Small scraps of yellow, red, white, or metallic-look yarn can be used for ornaments and stars. A 3.0 mm to 4.0 mm crochet hook is suitable for many light or medium-weight yarns, although you should always choose a hook that creates a firm fabric. You will also need scissors, a yarn needle, stitch markers if desired, and a small amount of polyester stuffing only if you want to create a lightly padded version. For a flat appliqué or ornament, stuffing is not necessary.
The main crochet stitch key includes the abbreviations used throughout the pattern. MR means magic ring, CH means chain, SL ST means slip stitch, SC means single crochet, HDC means half double crochet, DC means double crochet, INC means increase by working two stitches into the same stitch, DEC means decrease, ST means stitch, and STS means stitches. When instructions appear inside parentheses followed by a number, repeat the sequence for the indicated number of times. Understanding these basic abbreviations will make the pattern much easier to read and follow.
The round portion of the crochet snow globe begins with a magic ring because this method creates a neat center with almost no visible opening. If you prefer not to use a magic ring, make CH 4 and join the first chain with a SL ST to form a small circle. Work the first round of stitches into that ring. Both methods are suitable, but the magic ring generally produces a tighter and more polished center. Keep your starting tail long enough to weave securely into the back of the project.
To begin the globe, make an MR and work 6 SC into the ring. Pull the ring closed and either continue working in a spiral or join with a slip stitch depending on your preferred method. For Round 2, work INC in every ST around for a total of 12 stitches. For Round 3, work (1 SC, INC) around for 18 stitches. These gradual increases start forming the circular shape that will become the snowy background behind the Christmas tree.
Continue expanding the circle for Round 4 by working (2 SC, INC) around, giving approximately 24 stitches. For Round 5, work (3 SC, INC) around for approximately 30 stitches. If you want a larger crochet snow globe ornament, continue with another round using (4 SC, INC) around. The important goal is to maintain evenly spaced increases so that the circle remains flat rather than forming a bowl or developing waves around the edge.
Once the round section has reached your preferred size, place it flat on the table and check the shape. A small amount of natural movement is normal, but the piece should not be dramatically curled or ruffled. If it curls inward, your tension may be too tight or you may need additional increases. If the edge becomes excessively wavy, too many increases may have been added. Correcting these small issues before attaching the Christmas tree will make the final handmade crochet snow globe much easier to finish neatly.
Step-by-Step Crochet Christmas Tree and Snowy Globe Details
The Christmas tree is the focal point of the Crochet Snow Globe with Tree Pattern, and it can be made as a separate triangular appliqué before being sewn onto the globe. Begin with green yarn and CH 2. Work 2 SC into the second chain from the hook. Turn, CH 1, and work INC in the first stitch and 1 SC in the final stitch. The goal is to gradually increase the width as you work downward so the tree forms a recognizable triangle.
Continue creating the tree by turning at the end of every row and adding approximately one stitch at either the beginning or end of each new row. For example, work CH 1, INC, SC across on one row, then repeat the gradual increase process on the next. Continue until the tree has approximately 8 to 12 stitches across the bottom, depending on the size of your globe. A slightly imperfect triangular outline can actually look more natural because real evergreen trees are not perfectly symmetrical.
For a more textured crochet Christmas tree, you can create tiny branches by adding short chain spaces along the sides. After completing the basic triangle, attach green yarn near one lower corner and work SL ST, CH 2, SL ST into selected edge stitches. Repeat this decorative sequence at different points along both sides. These miniature loops create the impression of layered evergreen branches and add texture without significantly increasing the thickness of the finished ornament.
Create the tree trunk using brown yarn. Attach the yarn at the center of the bottom tree edge and work 3 SC across a small section. Turn, CH 1, and work another short row of 3 single crochets. Fasten off after two or three rows depending on the desired trunk length. When positioned on the globe, the trunk should extend slightly beneath the green tree but remain above the lower snow globe base.
Before sewing the tree onto the globe, experiment with its placement. Position it slightly above the bottom of the circular background so there is room for a snowy ground line beneath it. Thread a yarn needle with matching green yarn and carefully sew around the tree edges using small, discreet stitches. Keep the tree flat while sewing and avoid pulling the thread too tightly, as this can cause the globe to pucker.
Snow can be represented with white yarn using simple embroidered stitches around the tree. Make several tiny white knots or short straight stitches across the background to represent falling snow. You can also work a slightly curved line of white surface crochet beneath the tree to create a snowy landscape. These details help establish the classic winter scene and make the Crochet Snow Globe with Tree Pattern immediately recognizable as a festive holiday design.
Creating the Snow Globe Base, Decorations, and Professional Finishing
The lower stand gives the project its recognizable snow globe silhouette. Using your chosen base color, attach yarn across approximately one-third of the lower edge of the circular globe. Work a row of SC stitches across this section. Turn, CH 1, and work SC across again. Depending on the size of your globe, approximately 10 to 14 stitches can create a nicely proportioned stand.
For the next row, you can make the base slightly wider by working an increase at both ends. Work CH 1, INC, SC across until one stitch remains, INC in the final ST. This gentle increase creates the traditional trapezoid-shaped snow globe stand. Work another row evenly using SC across, then fasten off. If you prefer a wider decorative base, add one additional row using the same technique.
The crochet snow globe base can be customized with decorative embroidery. Use yellow or white yarn to stitch a tiny star, snowflake, heart, or simple line across the center. You can also embroider small dots using contrasting yarn. Keep embellishments relatively flat if the snow globe will be used as an ornament because bulky additions can make the project heavier and more difficult to hang evenly.
Decorate the tree with tiny yarn ornaments by making several small French-knot-style embroidery stitches in red, yellow, white, blue, or another festive color. A miniature star can be stitched at the top using five small straight stitches arranged in a star shape. Another option is to crochet a tiny yellow circle using an MR and 5 SC, fasten off, and sew it above the tree. Small details can make the Crochet Snow Globe with Tree Pattern look especially cheerful and personalized.
To create a hanging loop, attach yarn at the very top of the globe and CH 15 to CH 20, depending on the loop size you prefer. Join back into the same stitch with a SL ST and secure the yarn firmly. Weave the tail through several stitches on the back before trimming it. If the snow globe will be used as an appliqué rather than an ornament, simply omit the hanging loop.
Finish the project by weaving in every yarn tail securely. Gently shape the circular globe, tree, and stand with your fingers. If necessary, lightly block the finished piece according to the care requirements of your chosen yarn. Allow it to dry completely in the desired shape. Careful finishing can transform a simple crochet Christmas ornament pattern into a polished decoration that looks attractive from year to year.
Frequently Asked Questions About the Crochet Snow Globe with Tree Pattern
Is the Crochet Snow Globe with Tree Pattern suitable for beginners? Yes, this project can be completed by beginners who are comfortable with basic stitches such as SC, CH, SL ST, and INC. The most important skill is counting stitches carefully during the circular increase rounds. The decorative embroidery can be simplified if you are completely new to crochet. Beginners can start with a plain green tree and add more details after becoming comfortable with the basic construction.
What type of yarn is best for a crochet snow globe ornament? Cotton and acrylic yarn can both work well. Cotton provides excellent stitch definition and creates a firm flat ornament, while acrylic often feels slightly softer and is available in many festive colors. Medium or light yarn is especially practical because the small details remain visible. Using the same yarn weight throughout the project also helps keep the proportions balanced.
How can I make the Crochet Snow Globe with Tree Pattern larger? Continue adding increase rounds to the main circle before attaching the tree. For example, after (3 SC, INC) you can work (4 SC, INC) and then (5 SC, INC) if additional size is needed. You should also increase the dimensions of the tree and base proportionally. Using thicker yarn and a larger crochet hook is another simple way to produce a larger finished piece.
Why does my crochet snow globe circle curl or become wavy? Curling usually means that the circle needs slightly more room or that your tension is too tight, while heavy waves can indicate too many increases. Check that increases are evenly distributed throughout each round. Different yarn and tension combinations sometimes require small adjustments. Gently blocking the finished project may correct minor unevenness.
Can this pattern be turned into a Christmas garland? Yes. Make several crochet snow globe ornaments in different colors and join them with a long crochet chain. You can alternate snow globes with stars, simple chains, or other small handmade motifs. Keeping each piece relatively flat will help the garland hang neatly. A collection of snow globes with differently decorated trees can create an especially cheerful handmade Christmas display.
Can I make the snow globe without embroidery or extra decorations? Absolutely. The Christmas tree, circular globe, snowy ground, and stand are enough to make the design recognizable. Decorative snowflakes, ornaments, and stars are optional additions. A simple version can look elegant when made in carefully coordinated colors. This also makes the Crochet Snow Globe with Tree Pattern quicker to complete when you need several handmade decorations.
Conclusion
The Crochet Snow Globe with Tree Pattern combines simple crochet techniques with a cheerful winter theme, making it a versatile project for Christmas decorating and handmade gift giving. Throughout this tutorial, you learned how to choose suitable yarn and hook sizes, understand the main crochet stitch key, construct a flat circular globe using gradual increases, and create a triangular Christmas tree using simple rows of single crochet.
You also learned how to add a small tree trunk, create snowy details, crochet a traditional snow globe stand, and decorate the design with embroidered ornaments, falling snow, and a miniature star. These finishing touches can be adapted according to your personal style, making every handmade crochet Christmas ornament slightly different.Another advantage of this pattern is its flexibility. You can make a small version for a Christmas tree, enlarge the design for wall decoration, remove the hanging loop and use it as an appliqué, or create several pieces for a festive garland. Changing colors and decorative details allows you to create many variations while using the same basic Crochet Snow Globe with Tree Pattern.
Most importantly, this project shows how basic crochet stitches can become a detailed holiday decoration when they are combined thoughtfully. Take your time with the increases, keep your stitches even, and enjoy adding the small decorative elements that give your snow globe its personality. If you make this Crochet Snow Globe with Tree Pattern, please leave your sincere opinion about the project and share your suggestions for colors, decorations, or improvements. Your ideas can inspire even more creative variations of this cozy Christmas crochet pattern.