
A Crochet snowflake pattern for decoration is a beautiful way to bring the charm of winter into your home while creating something delicate, handmade, and timeless.
One of the best things about making a Crochet snowflake pattern for decoration is that it can be adapted to different skill levels.
Another reason this project is so enjoyable is its versatility. A Crochet snowflake pattern for decoration can become a Christmas tree ornament, a window hanging, a handmade gift embellishment, or even part of a larger winter-themed display. White yarn creates a traditional snowy appearance, while silver, pale blue, cream, and gold add a different decorative effect. You can also make colorful snowflakes to match your home’s interior design. In this tutorial, you will learn which materials to choose, how to understand the stitches, and how to follow a complete step-by-step crochet pattern to create a beautiful snowflake.
Materials, Crochet Stitches, and Preparation for Your Snowflake
Before beginning your Crochet snowflake pattern for decoration, organize all the materials you will need. Cotton yarn is an excellent choice because it provides good stitch definition and helps the finished snowflake maintain its delicate shape. Choose a fine or lightweight yarn if you want an elegant, detailed ornament. White is a classic option, but pale blue, silver, ivory, and metallic shades can also produce beautiful results.
For this project, you will need approximately 10 to 15 grams of lightweight cotton yarn, depending on the size of your snowflake. A crochet hook between 2.0 mm and 2.5 mm is a useful starting point, although you should always check the yarn label and adjust the hook to obtain a firm, even fabric.
You will also need a pair of sharp scissors, a yarn needle for weaving in loose ends, and rust-resistant blocking pins. A foam blocking mat or another clean, flat surface will help you shape the finished piece. If you want to create a hanging ornament, prepare a small piece of matching yarn for the hanging loop.
Understanding the basic crochet stitches will make the instructions easier to follow. The pattern uses chain stitch (ch) to create spaces, slip stitch (sl st) to join rounds, single crochet (sc) to build structure, double crochet (dc) to create the decorative points, and treble crochet (tr) to form the longer sections of the snowflake arms.
This tutorial uses US crochet terminology. If you are familiar with UK terminology, remember that a US single crochet is called a double crochet in UK patterns, while a US double crochet is called a treble crochet. Knowing this difference is important when following a Crochet snowflake pattern for decoration to avoid creating an incorrect shape.
Before starting, remember that crochet tension influences the final dimensions. If your stitches are too loose, the snowflake may look floppy and lose its defined points. If they are too tight, it may become difficult to work into the stitches. Aim for consistent tension and make a small practice sample if necessary.
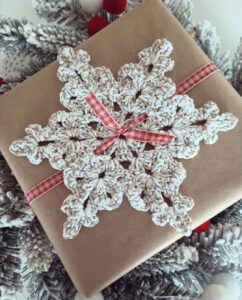
The finished snowflake should have six clearly defined arms, an open center, and symmetrical decorative points. Do not worry if your first attempt looks slightly uneven. Blocking, which involves gently shaping and drying the crochet piece, will help improve the appearance and create a more professional finish.
Step-by-Step Crochet Snowflake Pattern for Decoration
To begin your Crochet snowflake pattern for decoration, make a magic ring. This adjustable starting loop allows you to close the center neatly, avoiding a large hole in the middle of the ornament. If you prefer not to use a magic ring, you can chain four stitches and join them with a slip stitch to form a small circle.
Round 1: Chain 3. These chains count as the first double crochet. Work 11 double crochet stitches into the magic ring. Pull the yarn tail to close the center and join the round with a slip stitch into the top of the beginning chain. You should now have 12 double crochet stitches, including the initial chain.
Round 2: Chain 1 and work 1 single crochet into the same stitch. Chain 5, skip the next stitch, and work 1 single crochet into the following stitch. Repeat this sequence around the circle until you have created six chain spaces. Finish with a slip stitch into the first single crochet.
These chain spaces form the foundation for the six arms of your snowflake. Try to keep them approximately the same size. Consistent spaces are important because they determine how evenly the decorative points will be distributed around the center.
Round 3: Slip stitch into the first chain space. Work the following sequence inside that space: 1 single crochet, 1 half double crochet, 2 double crochet, 1 treble crochet, chain 3, and slip stitch into the third chain from the hook to form a small picot. Then work 1 treble crochet, 2 double crochet, 1 half double crochet, and 1 single crochet in the same space.
Move to the next chain space and repeat the entire sequence. Continue until all six spaces have been completed. Each section creates one main snowflake arm, giving the project its recognizable six-point silhouette. Make sure you work every group in the correct order to maintain symmetry.
Round 4: To add a more delicate decorative finish, slip stitch toward the outer tip of the first arm. Chain 4, slip stitch into the next available stitch, and repeat small chain arches along the edges of the snowflake. When you reach a tip, create a picot by chaining 3 and slip stitching into the first chain. Continue this decorative edging around all six arms.
After completing the final section, join with a slip stitch and fasten off the yarn. Leave a small tail for securing the end. Use your yarn needle to weave the loose ends carefully into the back of the stitches so they remain hidden.
At this stage, your Crochet snowflake pattern for decoration should have a recognizable six-point shape with a decorative center and delicate outer details. However, the snowflake may still look slightly curled or uneven. This is completely normal for crochet ornaments, especially when working with fine cotton yarn.
The next step is blocking. Gently dampen the snowflake with water and place it on a blocking mat. Spread the six arms evenly, carefully stretch the chain spaces, and pin each point into its intended position. Make sure the central section remains balanced while shaping the outer edges.
Allow the snowflake to dry completely before removing the pins. Once dry, the stitches should hold their shape more effectively, making the finished ornament look flatter, more defined, and ready for decoration.
Creative Ways to Decorate and Customize Your Crochet Snowflake
One of the most enjoyable aspects of a Crochet snowflake pattern for decoration is the opportunity to customize the finished piece. Although white cotton yarn is traditionally associated with snowflakes, you can experiment with different colors and textures to create ornaments that complement your home. Pale blue creates a winter-inspired appearance, while ivory and cream offer a softer, more traditional style.
Metallic yarn can add a subtle festive shine. Silver or gold thread may be incorporated into the entire snowflake or used only for the decorative edging. If you are working with metallic yarn, choose a comfortable hook size and avoid pulling the stitches too tightly, as some metallic fibers can be less flexible than cotton.
For Christmas tree decorations, add a small hanging loop made from matching yarn. Attach it securely to one of the upper points or to a chain space near the top of the snowflake. You can make several ornaments in different sizes and arrange them throughout the tree to create a coordinated handmade decoration.
Crochet snowflakes can also be used to decorate windows. Make a collection of small and medium-sized pieces and hang them at different heights using lightweight thread. When natural light passes through the open stitches, the delicate patterns become more noticeable, creating an attractive winter display.
Another creative idea is to use your snowflakes as gift embellishments. Attach a small crochet snowflake to a wrapped present, a handmade greeting card, or a fabric gift bag. This adds a personal touch without requiring complicated additional decorations. Recipients can keep the snowflake and reuse it in their own seasonal displays.
You can also combine several pieces to create a beautiful crochet snowflake garland. Make snowflakes using the same pattern but vary the yarn colors slightly. Connect them with a chain cord, leaving equal spaces between each ornament. This decoration works well across fireplaces, shelves, doorways, and Christmas party displays.
For a more elegant result, consider making a larger snowflake centerpiece. Crochet several individual motifs and arrange them on a decorative table runner or combine them into a larger winter-themed composition. If you want to make a coaster or table decoration, remember that the open lace design may not provide a completely flat surface for drinks or heavy objects.
The Crochet snowflake pattern for decoration can also be adapted by changing the yarn thickness and hook size. Thicker yarn produces a larger and more substantial ornament, while finer yarn creates a delicate lace effect. Keep in mind that changing the materials may alter the final dimensions and the appearance of the stitches.
For additional texture, you can experiment with picot stitches, chain arches, and small clusters of double crochet. These details create visual interest without requiring an entirely different pattern. However, avoid adding too many decorative elements to the same snowflake, as excessive details can make the six-point structure difficult to recognize.
Proper storage is important if you want your handmade snowflakes to last for many seasons. Make sure each piece is completely dry before storing it. Place the ornaments in a clean, dry container, preferably separated with tissue paper to prevent tangling or damage to their delicate points.
Troubleshooting, Care, and Frequently Asked Questions
Even a relatively simple Crochet snowflake pattern for decoration can present a few challenges, especially if you are new to working with lace-style crochet. One common issue is uneven points. This usually happens when the chain spaces or stitch groups have different tension. Count your stitches carefully and check each arm before moving to the next round.
Another frequent problem is a snowflake that curls instead of lying flat. This can happen when the hook is too small, the tension is too tight, or the finished piece has not been blocked. Blocking is especially helpful for openwork crochet because it allows the chain spaces and decorative points to spread evenly.
If your snowflake looks too loose, consider using a slightly smaller crochet hook. If it feels stiff and difficult to shape, try a larger hook. Making a small sample before completing several ornaments can help you determine which combination of yarn and hook produces the best result.
You may also notice that the center looks uneven or has a visible opening. To prevent this, close the magic ring firmly after completing the first round. If a small opening remains, use the yarn tail and a needle to secure the center from the back.
Frequently Asked Questions
1. Is the crochet snowflake pattern for decoration suitable for beginners?
Yes. This pattern is suitable for beginners who already know how to make chain stitches, slip stitches, single crochet, and double crochet. The six-point construction is repetitive, which makes it easier to understand as you progress. Beginners can start with a simple version and gradually experiment with more decorative details.
2. What is the best yarn for crocheting snowflakes?
Lightweight cotton yarn is one of the best choices because it provides excellent stitch definition and holds its shape well after blocking. Fine acrylic yarn can also work, but the final result may have a slightly different texture. Choose a yarn that allows you to see the individual stitches clearly.
3. What crochet hook size should I use?
A hook between 2.0 mm and 2.5 mm is a good starting point for lightweight cotton yarn. However, the ideal size depends on the thickness of your yarn and your personal tension. Always check whether the finished stitches look firm enough to support the decorative points.
4. Why does my crochet snowflake curl at the edges?
Curling usually happens because of tight tension, uneven stitches, or insufficient blocking. Gently wet the snowflake, spread its arms evenly, and pin the points into position until completely dry. This process helps the ornament maintain a flatter and more symmetrical appearance.
5. How do I make my crochet snowflake stiff?
For a firmer result, you can use a suitable fabric stiffening product according to its manufacturer’s instructions. Apply it carefully and shape the snowflake on a protected surface. Always test the product on a sample first, especially when using colored or metallic yarn.
6. Can I make different sizes using the same pattern?
Yes. You can change the yarn thickness and crochet hook size to produce different dimensions. Thinner yarn generally creates smaller and more delicate ornaments, while thicker yarn produces larger snowflakes. Keep your tension consistent to preserve the overall shape.
7. How many points should a traditional crochet snowflake have?
A traditional snowflake-inspired crochet motif often has six main points. This arrangement creates a balanced design inspired by the natural six-sided symmetry commonly associated with snow crystals. You can experiment with decorative branches, but keeping six main arms gives the ornament its familiar appearance.
8. Can I use crochet snowflakes as Christmas tree ornaments?
Absolutely. They are excellent Christmas tree decorations because they are lightweight, reusable, and easy to customize. Simply attach a small yarn loop to the finished snowflake and hang it securely from a tree branch.
9. How do I attach a hanging loop without damaging the snowflake?
Use a small piece of matching yarn and attach it through a strong stitch or chain space near one of the upper points. Secure both ends carefully on the back of the ornament. Avoid pulling too tightly, as this can distort the delicate crochet stitches.
10. How should I wash and store handmade crochet snowflakes?
If the yarn label allows it, gently hand-wash the snowflake using mild detergent and cool water. Avoid twisting or stretching the piece. Allow it to dry flat and reshape it if necessary. Store completely dry ornaments in a clean container away from moisture and excessive pressure.
Conclusion
Creating a Crochet snowflake pattern for decoration is a wonderful way to combine creativity, traditional crochet techniques, and seasonal decorating. Throughout this tutorial, you learned how to select suitable materials, understand the essential stitches, create the central circle, form six decorative arms, and finish your snowflake with a delicate picot edging. You also discovered how blocking improves the final shape and how different yarn colors and sizes can transform the appearance of each ornament.
The best part of this project is its versatility. Your handmade snowflakes can decorate Christmas trees, windows, gifts, garlands, and festive table arrangements. With a little practice, you can create an entire collection of unique ornaments that can be enjoyed year after year.
Now that you have learned this Crochet snowflake pattern for decoration, it is time to choose your favorite yarn and start creating! I would love to hear your sincere opinion about this tutorial. Did you find the instructions easy to follow? What colors would you choose for your snowflakes? Please leave your comments, share your suggestions, and tell us how you plan to use your handmade creations. Your feedback and ideas can inspire other crochet lovers to try this beautiful project!