
Crochet witch on a broomstick pattern is a charming Halloween crochet project that combines classic seasonal imagery with the warmth and personality of handmade amigurumi.
The finished crochet witch on a broomstick is made from several simple elements that come together at the end.
For this Crochet witch on a broomstick pattern, prepare medium-weight yarn in black, purple, skin tone, brown, yellow or orange, and a small amount of white or another contrasting color. You will also need a crochet hook appropriate for your yarn, polyester fiberfill, a yarn needle, scissors, stitch markers, and optional safety eyes. If the project will be given to a very young child, embroidered eyes are preferable to removable plastic pieces. The pattern uses US crochet terminology. The main abbreviations are MR (magic ring), ch (chain), sl st (slip stitch), sc (single crochet), hdc (half double crochet), dc (double crochet), inc (increase), dec (invisible decrease), BLO (back loop only), and FO (fasten off). Numbers inside parentheses indicate the stitch count expected at the end of a round.
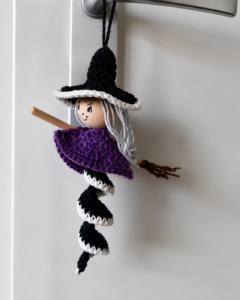
Materials, Crochet Key, and Preparing the Witch
Before beginning the actual crochet witch pattern, organize your colors and decide how you want the character to look. Black works beautifully for the hat and dress, while purple, orange, lime green, and deep gray can provide classic Halloween accents. The broom can be worked in medium brown with golden yellow bristles. Using the same yarn weight throughout the project makes assembly easier and helps keep the proportions balanced.
The most important stitch in this project is single crochet (sc) because it creates the dense fabric needed for amigurumi. Insert the hook into the next stitch, yarn over and pull up a loop, then yarn over again and pull through both loops. Keep the stitches reasonably tight so that the stuffing does not show through the finished fabric. If your stitches naturally feel loose, consider using a slightly smaller hook.
An increase (inc) means working two single crochet stitches into the same stitch. Increases expand the circumference of a round and are especially important when shaping the head. An invisible decrease (dec) combines two stitches while reducing visible gaps. Insert the hook through the front loop of the next two stitches, yarn over, pull through, then complete the single crochet. These two techniques create most of the shaping used throughout the witch.
Start the head with the skin-tone yarn. Rnd 1: Make 6 sc into a MR. (6) Rnd 2: Inc around. (12) Rnd 3: [1 sc, inc] x6. (18) Rnd 4: [2 sc, inc] x6. (24) Rnd 5: [3 sc, inc] x6. (30). These gradual increases form the upper curve of the witch’s head. Place a stitch marker in the first stitch of every round because the head is worked continuously rather than joined.
Continue with Rnd 6–10: sc around. (30). If using safety eyes, position them approximately between Rounds 8 and 9 with about five stitches between them. Begin decreasing with Rnd 11: [3 sc, dec] x6. (24), followed by Rnd 12: [2 sc, dec] x6. (18). Stuff the head gradually with polyester fiberfill, shaping it gently with your fingers rather than packing the stuffing too firmly.
Complete the head with Rnd 13: [1 sc, dec] x6. (12). Add enough stuffing to create a smooth shape and leave a long yarn tail for sewing. Small embroidered eyelashes, eyebrows, or a tiny smile can give the witch more character. For the hair, cut several strands of orange, brown, gray, or purple yarn, fold each strand in half, and attach them around the sides and back of the head with a simple lark’s-head style attachment.
Crocheting the Witch Body, Arms, and Legs
The body of the crochet witch on a broomstick pattern can be worked as a small dress shape. Using black or purple yarn, begin with Rnd 1: 6 sc in MR. (6). Rnd 2: inc around. (12). Rnd 3: [1 sc, inc] x6. (18). Rnd 4: [2 sc, inc] x6. (24). This wider section becomes the bottom portion of the witch’s dress.
Work Rnd 5–7: sc around. (24). You can alternate purple and black for one or two rounds if you want a striped Halloween dress. Next, begin narrowing the torso. Rnd 8: [2 sc, dec] x6. (18). Rnd 9–10: sc around. (18). Rnd 11: [1 sc, dec] x6. (12). Lightly stuff the body, keeping the bottom slightly softer so the witch can sit naturally against the broom.
For the first arm, use skin-tone yarn and make Rnd 1: 6 sc in MR. (6). Work Rnd 2–5: sc around. (6). Change to the dress color and crochet Rnd 6–9: sc around. (6). Fasten off, leaving a long sewing tail. Make the second arm in exactly the same way. The arms need very little stuffing because overstuffed arms may look bulky on a small amigurumi figure.
The legs can be slightly longer to wrap naturally around or hang beneath the crochet broomstick. With black yarn, make 6 sc in a magic ring and crochet approximately eight rounds of 6 sc. For striped stockings, alternate black, purple, orange, or green every one or two rounds. Make two identical legs and add only a tiny amount of stuffing near the upper section.
To create little shoes, change to black yarn at the end of each leg. Work 1 sc in each stitch around, then on the following round create a slight toe by working inc in the next 2 stitches, sc in the remaining stitches. Crochet one final round evenly and fasten off. A curved shoe tip can also be created during assembly by folding the front gently upward and securing it with a small yarn stitch.
Now assemble the main witch. Sew the head securely onto the narrow top of the body, making several passes around the neck so the head does not wobble. Attach the arms near the shoulders and angle them slightly forward because they will eventually appear to hold the broom. Sew the legs beneath the dress. Before cutting any yarn tails, check the proportions and make sure the character sits comfortably in the position you want.
Making the Pointed Witch Hat and Crochet Broomstick
The pointed hat is one of the defining features of any crochet witch on a broomstick pattern. Begin with black yarn and make Rnd 1: 4 sc in MR. (4). Rnd 2: sc around. (4). Rnd 3: [1 sc, inc] x2. (6). Rnd 4: sc around. (6). Rnd 5: [2 sc, inc] x2. (8). Continuing increases gradually rather than quickly creates the long pointed silhouette associated with a classic witch hat.
Continue with Rnd 6: sc around. (8), Rnd 7: [3 sc, inc] x2. (10), Rnd 8: sc around. (10), Rnd 9: [4 sc, inc] x2. (12), and Rnd 10: [1 sc, inc] x6. (18). Work another round evenly if you want a taller crown. The point can later be bent slightly to one side for a whimsical handmade appearance.
Create the brim with Rnd 11: BLO [2 sc, inc] x6. (24). Rnd 12: [3 sc, inc] x6. (30). Rnd 13: sc around. (30) and finish with a round of slip stitches if you want a firmer edge. A purple or orange chain can be wrapped around the base of the crown as a decorative hatband. Sew the hat lightly onto the witch’s head so it remains positioned correctly when the ornament is hanging.
For the crochet broomstick, use brown yarn. Ch 31, beginning in the second chain from the hook work 30 sl st back along the chain. Make another identical strip. Place both strips together and sew them along their length to create a thicker handle. Alternatively, crochet tightly around a safe flexible craft insert if the decoration is intended only for display, but a fully yarn-based broom is simpler and keeps the project soft.
The broom bristles can be made with golden yellow, tan, or light brown yarn. Cut approximately 15 to 20 yarn strands of equal length, around 4 to 5 inches each. Fold the strands around one end of the broom handle and secure them firmly with another length of yarn. Trim the ends until the bristles form a neat broom shape. For extra texture, separate some yarn plies gently with your fingers.
Position the witch above the broom before permanently sewing the pieces together. The body should rest near the center of the handle, with one leg on either side if possible. Sew the lower body discreetly to the broom and position the hands around or directly above the handle. Several small hidden stitches will create the impression that the crochet witch is genuinely riding through the air on her handmade broomstick.
Finishing, Decorating, and Customizing the Crochet Witch
Once the main construction is finished, examine your Crochet witch on a broomstick pattern from several angles. Small adjustments during finishing can significantly improve the final appearance. Hide all yarn tails inside the body using a yarn needle and make sure every sewn component is secure. Gently shape the hat, dress, broom bristles, arms, and legs with your fingers until the silhouette feels balanced.
Facial embroidery is an easy way to personalize the witch. A tiny stitched mouth can make her look cheerful, surprised, sleepy, or mischievous. Small embroidered eyebrows also change the expression dramatically. You can even add a few tiny freckles using brown embroidery thread. These details require very little yarn but can transform a basic amigurumi witch pattern into a character with its own personality.
The clothing can also be customized. Add a small crocheted belt around the dress, attach a miniature buckle made from yarn, or crochet a tiny cape using rows of double crochet. Purple and black create a traditional Halloween combination, while orange and black produce a brighter seasonal appearance. Green, burgundy, dark blue, and gray can create a more unusual fantasy-inspired witch.
If you want to turn the project into a hanging Halloween crochet decoration, attach a strong yarn loop to the upper portion of the hat or behind the witch’s head. Make sure the hanging point is centered above the combined weight of the witch and broom. Test the ornament before displaying it. If the broom tilts excessively, move the hanging loop slightly until the figure appears to fly horizontally.
You can also create several witches using different yarn colors and expressions. One could have orange hair and a purple hat, another gray hair and a black hat, and another green hair with an orange dress. A collection of small crochet Halloween decorations can be attached to a handmade garland alongside pumpkins, stars, moons, bats, and friendly ghosts for a coordinated seasonal display.
For the best finished result, remember that consistency matters more than absolute perfection. Maintain steady tension, count your stitches after each shaping round, and use stitch markers whenever necessary. Amigurumi projects often look unusual while the individual pieces are being made, but their personality appears during assembly. Taking a few extra minutes to position the eyes, hat, arms, and broom before sewing can make the finished crochet witch on a broomstick look much more polished.
FAQ About the Crochet Witch on a Broomstick Pattern
Is the Crochet witch on a broomstick pattern suitable for beginners?
It is best suited to confident beginners or intermediate crocheters. The stitches themselves are simple, but the project requires working in rounds, making increases and decreases, changing colors, stuffing pieces, and sewing several small components together.
What crochet hook should I use for this witch?
A 3.0 to 3.5 mm hook works well with many medium-weight yarns used for amigurumi. However, yarn thickness and personal tension vary, so choose a hook that produces dense stitches without making the fabric uncomfortable to crochet.
Can I make the crochet witch larger?
Yes. Using thicker yarn and a larger hook will naturally increase the finished dimensions. You can also add rounds to the body, legs, hat, and broom, although the proportions should be adjusted consistently.
Can I use cotton yarn instead of acrylic yarn?
Yes. Cotton yarn is excellent for crochet amigurumi because it provides clear stitch definition and holds its shape well. Acrylic yarn is also suitable and is often soft, lightweight, affordable, and available in many Halloween colors.
How much yarn is needed?
This is a relatively small project, so one full skein of each color is usually unnecessary. The main colors will require more yarn, while facial details, hair, hatbands, stripes, and other decorations can often be made from leftover yarn.
Why are my amigurumi stitches showing the stuffing?
The hook may be too large for your yarn, your tension may be too loose, or the piece may be overstuffed. Try a slightly smaller hook and add stuffing gradually rather than forcing large amounts into the piece.
Should I join each crochet round?
The head, body, arms, and many other amigurumi sections are normally worked in continuous spiral rounds. Use a stitch marker to identify the beginning of each round so you do not lose your position.
Can the witch be used as a child’s toy?
If the project is intended for a child, adapt it carefully for age-appropriate use. Embroidered facial features are preferable for very young children, and every component should be sewn securely. Avoid rigid inserts, loose embellishments, beads, buttons, or other small detachable components.
How can I make the witch look like she is actually flying?
Position the body at the center of the broom, angle the arms toward the handle, and place the legs naturally on either side. If you make it as a hanging decoration, carefully positioning the hanging loop can create a convincing horizontal flying pose.
What colors work best for a Halloween crochet witch?
Black, purple, orange, green, gray, and brown are classic choices. However, there are no strict rules. Pastel colors can create a cute witch, while burgundy, dark green, navy, and charcoal can produce a more rustic fantasy appearance.
How can I make the pointed hat hold its shape?
Use firm crochet tension and avoid making the crown too loose. The pointed section can be lightly shaped by hand. For a soft decorative amigurumi, the natural structure of dense single crochet is often enough to maintain the hat’s silhouette.
What else can I make with this pattern?
The basic witch can be adapted into a hanging ornament, Halloween garland element, decorative shelf figure, handmade gift, or seasonal centerpiece. You can also use the basic body construction to create other miniature fantasy characters by changing the hat, colors, hair, and accessories.
Conclusion
The Crochet witch on a broomstick pattern brings together several enjoyable amigurumi techniques in one playful Halloween project. Throughout this tutorial, you learned how to crochet and shape the head, create a dress-style body, make small arms and legs, construct a pointed witch hat, and build a simple crochet broomstick with textured yarn bristles. You also learned essential pattern abbreviations such as MR, sc, inc, dec, BLO, ch, and sl st, which can be useful in many future amigurumi projects.
The finishing process is just as important as the crochet itself. Carefully positioning the body on the broom, attaching the arms securely, shaping the pointed hat, adding hair, and embroidering the facial expression are the details that bring the little witch to life. Once you understand the basic construction, the pattern becomes easy to customize with different Halloween colors, hairstyles, striped stockings, dress details, hatbands, and facial expressions.
Most importantly, enjoy the handmade process and allow your witch to have a little personality of her own. Crochet projects do not need to look identical to be successful; small differences are part of what makes handmade decorations special. If you make this crochet witch on a broomstick pattern, leave your sincere opinion about the project and share your suggestions. What colors would you choose for your witch, and what other Halloween crochet character would you like to create next?