
Crocheted Demogorgon keychain pattern is a creative project for turning a flower-faced fantasy creature into a small handmade accessory.With a rounded head, five pointed petals, and a tiny body, this character offers plenty of personality without requiring a large amount of yarn.
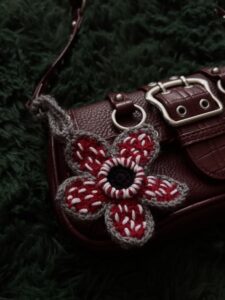
The most recognizable feature of this crochet monster keychain is its five-petal face, which surrounds a dark central opening.Instead of shaping a complicated hollow mouth, this version uses a flat black crochet disk attached to the front of a stuffed head.
Before beginning this Crocheted Demogorgon keychain pattern, read through the stitch key and identify the pieces you will need to make.The finished keychain should measure approximately 9–11 cm tall, although yarn thickness, hook size, and individual tension will affect its dimensions.
Use the stated measurements as a guide rather than a guaranteed result, especially if you substitute a different yarn weight.A firm fabric helps the miniature body retain its shape and prevents stuffing from showing between stitches.
1. Materials, Stitch Key, and Pattern Preparation
For this Crocheted Demogorgon keychain pattern, gather approximately 15–20 g of gray sport-weight yarn, small amounts of deep red and black yarn, and a little ivory embroidery thread. You will also need a 2.25 mm crochet hook, polyester stuffing, a tapestry needle, scissors, a stitch marker, and a keychain ring with a short chain or closed connector. Choose smooth yarn so the miniature stitches remain easy to identify.
The pattern uses US crochet terminology. The stitch key is: ch = chain; sc = single crochet; sl st = slip stitch; inc = work two single crochets into one stitch; dec = single crochet two stitches together; MR = magic ring; and st/sts = stitch/stitches. Numbers in parentheses show the stitch count after completing a round or row.
Instructions inside brackets are repeated the stated number of times. For example, [sc, inc] × 6 means work one single crochet followed by one increase, then repeat that sequence six times. You will use twelve stitches from the previous round and finish with eighteen stitches. Checking these totals regularly helps prevent a leaning body or an uneven head.
Work the head, body, arms, and legs in continuous rounds, without joining or turning. Place a marker in the first stitch of each round and move it upward as you progress. The face disk is also worked in a spiral, while the petals are crocheted in turned rows. For petal rows, the turning chain does not count as a stitch.
A precise gauge is less important than producing a dense, flexible fabric. Crochet a small sample and gently stretch it between your fingers; if large gaps appear, try a smaller hook. Avoid pulling every stitch excessively tight, which can make decreases difficult and strain your hands. Consistent tension will give your amigurumi keychain a cleaner finish.
Prepare long sewing tails whenever instructed, ideally 15–20 cm for the larger pieces. Set completed parts in separate groups so that matching limbs stay together. Before assembly, you should have one body, one head, two arms, two legs, one black face disk, and five edged petals. Keeping this simple inventory nearby makes the final construction much easier.
2. Crochet the Body, Head, Arms, and Legs
Begin the body with gray yarn. Round 1: work 6 sc into an MR (6). Round 2: inc in every stitch (12). Round 3: [sc, inc] × 6 (18). Rounds 4–6: sc around (18 each round). Round 7: [sc, dec] × 6 (12). Add a small amount of stuffing, shaping the body into a compact oval rather than a tightly packed ball.
Complete the body with Round 8: dec × 6 (6). Fasten off with a long tail, thread it through the front loops of the remaining six stitches, and pull the opening closed. Secure the yarn and keep the remaining tail for attaching the head. The narrower end becomes the top of the body, while the broader lower section provides space for both legs.
For the head, use gray yarn. Round 1: 6 sc into an MR (6). Round 2: inc around (12). Round 3: [sc, inc] × 6 (18). Round 4: [2 sc, inc] × 6 (24). Rounds 5–7: sc around (24 each round). Round 8: [2 sc, dec] × 6 (18). Begin stuffing, keeping the surface smooth and softly rounded.
Finish the head with Round 9: [sc, dec] × 6 (12). Add more stuffing if needed. Round 10: dec × 6 (6). Fasten off, close the opening through the remaining front loops, and weave in the end. Position this closure underneath the head during assembly. Choose a smooth area on the side of the sphere for the face disk.
Make two arms in gray. Round 1: 4 sc into an MR (4). Rounds 2–5: sc around (4 each round). Leave the arms unstuffed so they remain flexible and do not overwhelm the small body. Fasten off each arm with a sewing tail. Flatten the open top and sew its two sides together before attaching it to the body.
Make two legs in gray. Round 1: 6 sc into an MR (6). Rounds 2–4: sc around (6 each round). Add only a tiny pinch of stuffing to the bottom of each leg, leaving the upper opening flexible. Fasten off with long tails. Flatten each opening and sew across it, creating a stable attachment edge while preserving the rounded shape of the feet.
3. Make the Flower Face and Five Pointed Petals
Create the central face disk with black yarn. Round 1: 6 sc into an MR (6). Round 2: inc around (12). Round 3: [sc, inc] × 6 (18). Slip stitch into the next stitch and fasten off with a long sewing tail. This small circle forms the dark center of the flower-faced crochet monster and should sit flat against the head.
For the first red petal, chain 3. Row 1: starting in the second chain from the hook, sc in each chain (2). Row 2: ch 1, turn; inc, sc (3). Row 3: ch 1, turn; inc, 2 sc (4). Row 4: ch 1, turn; inc, 3 sc (5). Row 5: ch 1, turn; inc, 4 sc (6).
Shape the upper half of the petal with Row 6: ch 1, turn; dec, 4 sc (5). Row 7: ch 1, turn; dec, 3 sc (4). Row 8: ch 1, turn; dec, 2 sc (3). Row 9: ch 1, turn; dec, sc (2). Row 10: ch 1, turn; dec (1). Fasten off the red yarn and weave in its ends.
Add the gray petal edging by joining gray yarn at one corner of the narrow foundation edge. Work approximately one sc into each row end along the first side, place 3 sc into the single stitch at the tip, then work down the opposite side. Work across the two foundation stitches to finish the border. Slip stitch to the first edging stitch and leave a long sewing tail.
Repeat the petal instructions until you have five matching petals. The narrow foundation edge is the attachment base, and the opposite end is the pointed outer tip. Lay the pieces flat and compare their sizes before sewing. If an edging starts to ripple, reduce the number of side stitches slightly; if it curls inward, add a stitch where the edge feels tight.
For optional tooth-like embroidery, use short ivory stitches on the red surface near the inner half of each petal. Three small straight stitches per petal provide detail without crowding the miniature face. Secure the thread on the back, where it will be concealed during assembly. These marks are decorative; leaving them out creates a simpler version of the Crocheted Demogorgon keychain pattern.
4. Assemble the Character and Attach the Keychain
Start assembly by sewing the head to the narrow top of the body. Center it carefully and use several small stitches around the contact area, catching firm crochet stitches on both pieces. Make a second pass around the join for stability, then secure and bury the yarn tail. The head is intentionally larger than the body, creating the compact proportions associated with miniature amigurumi.
Attach both legs to the lower front of the body, with their inner edges almost touching. Sew across each flattened top and add a few anchoring stitches at the sides. Attach the arms just below the head, one on either side of the torso. Let them angle slightly downward. Check the figure from the front and back before securing the final knots.
Position the black face disk on the front of the head and stitch around its outer edge. Keep it centered and flat, using small stitches that do not distort the circle. Before adding the petals, identify five evenly spaced attachment points around the disk. A temporary arrangement with one petal pointing upward and four distributed around the sides helps establish a balanced five-petal face.
Sew each petal’s narrow base to the head immediately outside the black disk. Attach the lower third of each petal lightly against the head, leaving its outer section free to open outward. Keep the black center visible and avoid overlapping the petals excessively. Once all five are attached, adjust their angles with your fingers until the face has an even, flower-like shape.
For the keychain attachment, join gray yarn to a sturdy stitch at the crown, slightly behind the upper petal. Chain 8, then slip stitch into a neighboring crown stitch to form a loop. Fasten off with a long tail and reinforce both attachment points with several sewing passes. Thread the keychain connector through the loop, checking that the hardware closes completely.
Finish your crocheted character keychain by trimming stray fibers, burying all tails, and gently shaping the head and petals. Check every seam and give the attachment loop a firm, controlled pull before use. Keep the item away from babies and young children because the hardware and small components present choking hazards. For cleaning, remove detachable hardware when possible and gently spot-clean according to the yarn label.
Frequently Asked Questions
Is this Crocheted Demogorgon keychain pattern suitable for beginners?
It is suitable for confident beginners who already understand single crochet, increases, decreases, and basic sewing. The individual pieces are simple, but working four-stitch arm rounds and positioning five small petals requires patience. Practicing a small amigurumi ball first can make the head and body easier to complete.
How large will the finished crochet keychain be?
With sport-weight yarn and a 2.25 mm hook, expect approximately 9–11 cm in height, including the upper petal but excluding the metal chain. Your finished measurement may differ. For a smaller character, use finer yarn with an appropriately smaller hook, keeping the same stitch counts throughout.
Why are my petals different sizes?
Uneven tension, missed turning stitches, or inconsistent edging can change their dimensions. Count every row and remember that the turning chain does not count as a stitch. Make all five red centers before adding their gray borders so you can compare the shapes at each stage.
Can I use thicker yarn for this pattern?
Yes. Thicker yarn creates a larger character, although it may become bulky for everyday keys. Choose a hook that produces a dense fabric with your selected yarn. A larger version can work well as a bag accessory or decorative hanging, provided the attachment is appropriate for its weight.
How can I prevent stuffing from showing?
Use a slightly smaller hook, maintain consistent tension, and avoid overstuffing. Invisible decreases can also create a smoother finish: insert the hook through the front loops of the next two stitches, yarn over and pull through both front loops, then complete the single crochet.
Do I need to add the ivory embroidery?
No. The black center and five red petals already establish the main facial design. Ivory embroidery adds detail but is entirely optional. If you include it, keep the stitches short and secure the thread ends carefully so they do not loosen during handling.
Why does the head tilt forward?
The face pieces add weight to the front. Reinforce the neck with additional stitches, make sure the body has enough stuffing to support the head, and position the hanging loop slightly behind the crown. Check the balance with the hardware attached before finishing all your sewing tails.
Conclusion
This Crocheted Demogorgon keychain pattern teaches you how to combine counted amigurumi rounds, small tubular limbs, a flat face disk, and five shaped petals into a distinctive handmade accessory.
Careful stitch counting keeps the pieces consistent, while balanced placement and reinforced seams give the finished character a neat appearance.
Experiment with subtle color changes once you are comfortable with the construction. Leave your honest opinion about the pattern and share any suggestions for improving the instructions or personalizing the finished keychain.