
The Crocheted Sheep Pattern is an adorable handmade project that brings softness, charm, and creativity to the world of crochet. With its fluffy body, sweet little face, and delicate legs, a crocheted sheep can become a lovely decoration, a thoughtful handmade gift, or a charming addition to an amigurumi collection. This project combines simple crochet techniques with creative details to produce a cute farm animal that appeals to children and adults alike. Whether you are an experienced crocheter or someone looking for a new project to practice basic stitches, making a little sheep is a wonderful way to enjoy the art of handmade crafts.
One of the most attractive features of a Crocheted Sheep Pattern is the opportunity to experiment with different yarn textures. Soft, fluffy yarn can imitate the appearance of natural sheep’s wool, while ordinary cotton or acrylic yarn works beautifully for the face, ears, and legs. You can choose classic white and cream shades for a traditional sheep or explore pastel colors for a more playful design. The finished sheep can be made in different sizes, depending on your preferred yarn, crochet hook, and stuffing technique. It is also a versatile project that can be adapted into a small amigurumi toy, a nursery decoration, or a seasonal handmade ornament.
In this tutorial, you will learn how to make a Crocheted Sheep Pattern step by step, from preparing the materials to assembling the finished amigurumi. We will cover the body, head, ears, legs, and fluffy wool details, using standard US crochet terminology. You will also discover how to shape the different pieces, attach them securely, and add charming facial features that bring your little sheep to life. The instructions are organized into manageable stages so you can work at your own pace and personalize the design with your favorite colors and textures.
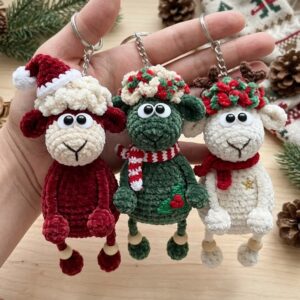
Materials and Basic Crochet Techniques for the Crocheted Sheep Pattern
Before beginning your Crocheted Sheep Pattern, gather all the necessary materials. You will need medium-weight yarn in white or cream for the body, beige or light brown yarn for the face, and a small amount of dark yarn for the facial details. You can also choose textured or boucle yarn to imitate the sheep’s fluffy wool. If you are a beginner, it may be easier to use ordinary yarn for the first version because it allows you to see each stitch clearly.
Choose a crochet hook that is appropriate for your yarn. For amigurumi projects, a slightly smaller hook than the one recommended on the yarn label often helps create a firm fabric. You will also need polyester fiberfill, a yarn needle, scissors, and stitch markers. If you plan to use safety eyes, choose suitable sizes and install them securely during construction. Embroidered eyes are another option, especially for decorations intended for young children.
The main stitches used in this Crocheted Sheep Pattern are chain stitch (ch), single crochet (sc), and slip stitch (sl st). You will also use single crochet increase (inc) to expand rounded pieces and single crochet decrease (sc2tog) to shape the head and body. These techniques are especially important when working in amigurumi because they help create smooth, three-dimensional shapes.
Most of the pieces in this pattern are worked in continuous rounds. This means you do not turn your work at the end of each round or join every round with a slip stitch. Instead, you continue crocheting in the same direction. Use a stitch marker to identify the first stitch of each round and move it as you progress. This will help you maintain accurate stitch counts and avoid mistakes.
For the fluffy body, you can use a textured yarn or create small bobble stitches with ordinary yarn. Bobble stitches are decorative stitches made by working several incomplete stitches into the same stitch and joining them at the top. They create raised sections that imitate soft wool. If textured yarn is difficult to handle, use smooth yarn first and add bobbles as a decorative alternative.
Before starting the main pieces, make a small crochet sample to test your tension. The fabric should be firm enough to prevent stuffing from showing through. If the stitches are too loose, try a smaller hook. If they are too tight, choose a slightly larger hook. A balanced tension will make the finished sheep more attractive and easier to assemble.
Step-by-Step Crocheted Sheep Pattern: Body, Head, and Legs
Start your Crocheted Sheep Pattern by making the body with white or cream yarn. Create a magic ring and work 6 single crochet stitches into it. Pull the yarn tail to close the center. In round 2, work 2 single crochet stitches into each stitch, giving you 12 stitches. In round 3, work 1 single crochet followed by an increase, repeating around for a total of 18 stitches.
For round 4, work 2 single crochet stitches followed by an increase, repeating around to reach 24 stitches. In round 5, work 3 single crochet stitches followed by an increase, repeating around to reach 30 stitches. Continue increasing gradually until you have approximately 36 stitches. The number of rounds can be adjusted depending on the size of sheep you want to make.
Once the body reaches the desired width, work several rounds of single crochet without increasing. For this pattern, work approximately 6 to 8 even rounds, depending on your yarn and preferred proportions. This creates the rounded middle section of the sheep. If you are using fluffy yarn, check the shape frequently because textured fibers can make individual stitches harder to see.
Begin decreasing the body gradually. Work 4 single crochet stitches followed by a decrease, repeating around. In the next decrease round, work 3 single crochet stitches followed by a decrease. Continue reducing the stitch count until the opening is small enough to add fiberfill. Stuff the body gradually, distributing the filling evenly to create a soft oval shape. Finish decreasing until the opening closes, then secure the yarn.
Next, make the head using beige or light brown yarn. Begin with a magic ring and work 6 single crochet stitches into it. Increase in every stitch in round 2 to reach 12 stitches. In round 3, alternate 1 single crochet and 1 increase to reach 18 stitches. Continue with a few rounds of single crochet without increasing to form the main part of the face.
To shape the muzzle, work a small rounded section at the front of the head. You can create this by increasing slightly in the lower front area and then working a few even stitches. Add a small amount of fiberfill before closing the head. If you want a more pronounced muzzle, crochet a separate oval piece and sew it onto the face using matching yarn.
For the ears, make two small pieces using the same beige yarn. Chain 6 stitches and work single crochet stitches along the chain, placing additional stitches at the ends to create a narrow oval. Continue for another round if you want wider ears. Fasten off, leaving a long tail for sewing. Attach one ear to each side of the head, positioning them slightly below the top.
To create the legs, use beige, brown, or dark gray yarn. Make a magic ring and work 6 single crochet stitches into it. Continue with 2 or 3 rounds of single crochet to form short cylindrical legs. Make four identical pieces and leave long yarn tails for assembly. If you want the sheep to stand upright, keep the legs relatively firm and make sure they are the same length.
Creating the Fluffy Wool, Assembly, and Finishing Details
The most recognizable feature of a Crocheted Sheep Pattern is its fluffy wool. There are several ways to create this effect, depending on the yarn and texture you prefer. One easy option is to use boucle or chenille yarn for the body. These yarns have a naturally soft appearance and can make the sheep look especially cuddly. If you are new to textured yarn, work slowly and use stitch markers to keep track of your rounds.
Another option is to create small bobbles across the body. To make a simple bobble, yarn over, insert the hook into the next stitch, yarn over again, and pull through. Repeat the process several times in the same stitch without completing the stitches individually. Yarn over and pull through all the loops on the hook to close the bobble. This creates a raised, rounded detail that resembles a small wool curl.
Continue placing bobbles at regular intervals around the body, leaving enough space between them to maintain a balanced appearance. You can alternate bobble rows with ordinary single crochet rows to avoid making the body too bulky. If you prefer a more subtle texture, use half double crochet stitches in selected sections instead.
Once the body is complete, position the head at the front of the oval shape. Use a yarn needle and the remaining yarn tail to sew it securely in place. Check the angle from different sides before finishing the seam. The face should sit naturally above the front portion of the body, leaving enough space for the fluffy wool around the neck.
Attach the four legs underneath the body. Position two legs toward the front and two toward the back, keeping the spacing even. Sew them securely with several small stitches. If your sheep is intended to stand on a surface, place it on a flat table while positioning the legs. This makes it easier to check whether the figure is balanced.
Finish the face by embroidering two small eyes with black or dark brown yarn. Add a tiny nose using pink, brown, or black thread. You can also embroider a short mouth beneath the nose to create a gentle expression. Avoid loose decorative components if the sheep is intended for young children. Secure embroidery ends inside the head.
Finally, weave in all loose yarn ends and inspect the entire project. Check the ears, legs, head, and decorative wool to ensure every component is firmly attached. Gently shape the body with your hands and adjust the stuffing if necessary. A little attention during the finishing stage can make a significant difference in the appearance of your handmade sheep.
Creative Variations, Care Tips, and Frequently Asked Questions About the Crocheted Sheep Pattern
One of the most enjoyable aspects of the Crocheted Sheep Pattern is the possibility of creating different versions of the same design. You can use white yarn for a traditional sheep, cream for a warm natural appearance, or pastel pink and blue for a playful decorative character. Choosing a consistent color palette helps the finished amigurumi look harmonious and attractive.
You can also experiment with different sizes. To create a miniature sheep, use thinner yarn and a smaller crochet hook. For a larger decorative sheep, choose thicker yarn and increase the number of rounds in the body and head. Remember that changing the yarn thickness will also affect the amount of stuffing and the dimensions of the finished project.
Another creative variation is making a sheep with a removable scarf. Crochet a narrow strip using a chain foundation and several rows of single crochet. Wrap it gently around the neck and secure it with a small bow. You can use red, green, or gold yarn to give the sheep a festive appearance during the Christmas season.
For a nursery decoration, consider making a small collection of farm animals using similar yarn colors and crochet techniques. Your sheep can become part of a charming handmade display alongside other amigurumi figures. If the project is intended for children, pay particular attention to secure assembly, embroidered facial features, and age-appropriate materials.
Proper care will help preserve your Crocheted Sheep Pattern for a long time. Cleaning instructions depend on the yarn used and any additional materials incorporated into the project. Many handmade amigurumi decorations can be cleaned gently with a damp cloth. Always check the yarn care instructions before washing, and allow the piece to dry completely before storing it.
Frequently Asked Questions
1. Is the Crocheted Sheep Pattern suitable for beginners?
Yes. This pattern is suitable for beginners who know basic crochet stitches, especially single crochet, increases, and decreases. The project is divided into separate pieces, making it easier to complete one section at a time. Beginners can use smooth yarn initially and experiment with textured wool after becoming more comfortable with the techniques.
2. What yarn is best for making a crocheted sheep?
Cotton and acrylic yarn are excellent options for the head, legs, and facial details. For the fluffy body, boucle, chenille, or other textured yarns can create a wool-like appearance. The best choice depends on the texture and size you want.
3. How do I make the sheep look fluffy?
You can use textured yarn, bobble stitches, or small crochet loops to imitate natural wool. Bobble stitches are especially useful when you want a raised texture while still using ordinary yarn. Distribute the details evenly for a balanced appearance.
4. How much yarn do I need for a crocheted sheep?
The amount depends on the size of the sheep, the thickness of the yarn, and the texture of the body. A small amigurumi sheep generally requires a relatively small quantity of yarn. It is a good idea to have extra material available for the ears, legs, and finishing details.
5. Can I make the sheep without safety eyes?
Absolutely. Embroidered eyes are a good alternative and allow you to create a personalized expression. They are also preferable for projects intended for young children because they avoid small detachable plastic components. Make sure the embroidery is secure.
6. How do I keep the sheep’s body round?
Follow the increase and decrease instructions carefully and count your stitches at the end of each round. Use consistent tension and distribute the fiberfill evenly. Avoid adding too much stuffing because it can stretch the stitches and distort the shape.
7. Can I use fluffy yarn for the entire sheep?
You can, but it may make the face and smaller details difficult to crochet. A practical approach is to use textured yarn for the body and smooth yarn for the face, ears, and legs. This combination creates contrast and makes the facial features easier to define.
8. How do I attach the head securely?
Position the head on the front upper section of the body and sew it using a yarn needle. Use small, close stitches around the entire opening. Before finishing, check that the head is centered and does not wobble.
9. Can I make a standing crocheted sheep?
Yes. Use four legs of equal length and attach them evenly underneath the body. Keep the stuffing firm enough to support the shape and check the balance on a flat surface before securing the final stitches.
10. What can I use to decorate my crocheted sheep?
You can add a scarf, a small bow, a flower, or a decorative collar. Embroidered details are another way to personalize the face. Choose lightweight decorations that do not interfere with the structure of the amigurumi.
11. Can I sell sheep made with this crochet pattern?
Yes, handmade sheep can be offered as decorative crochet products or gifts. Focus on consistent construction, secure stitching, attractive finishing, and clear descriptions of the materials and dimensions. If you use a pattern created by someone else, make sure you respect its applicable usage terms.
12. How should I clean and store my crocheted sheep?
Use the care instructions recommended for your yarn. Gentle surface cleaning is often suitable for decorative amigurumi. Store the sheep in a clean, dry place away from direct sunlight and excessive moisture to help preserve its color and shape.
13. How can I make a smaller or larger sheep?
To make a smaller sheep, use thinner yarn and a smaller crochet hook. To make a larger version, choose thicker yarn and increase the number of stitches and rounds proportionally. Keep the head, body, and legs balanced so that the finished figure maintains its proportions.
Conclusion
The Crocheted Sheep Pattern is a charming project that combines basic crochet techniques with creative textures and adorable finishing details. Throughout this tutorial, you learned how to prepare your materials, crochet the body and head, create the ears and legs, add fluffy wool details, and assemble the different pieces into a lovely handmade sheep. You also discovered how to personalize your creation with different yarn colors, decorative accessories, and alternative textures.
The most important parts of this project are maintaining consistent tension, following the increase and decrease instructions, distributing the stuffing evenly, and attaching every piece securely. With patience and a little creativity, you can make a sheep that is perfect for decoration, gifting, or adding to your handmade amigurumi collection.
Now I would love to hear your honest opinion! Did you enjoy this Crocheted Sheep Pattern? Would you make a traditional white sheep or experiment with different colors and fluffy yarn textures? Leave your comments and suggestions, and share any ideas you have for improving this project. Your feedback is always welcome and can inspire other crochet lovers to create even more beautiful handmade animals!