
Crocheted witch pattern is one of the most enchanting seasonal crochet projects for crafters who enjoy making decorative dolls and festive handmade creations.
One of the reasons crochet witches remain so popular is their versatility. They can be displayed on shelves, used as table decorations, added to seasonal wreaths, placed in gift baskets, or incorporated into Halloween centerpieces.
Throughout this complete guide, you will learn how to select suitable yarn, understand the essential crochet abbreviations, crochet each body section step by step, assemble the doll securely, create the iconic witch hat and dress, add decorative details, and finish your project professionally. By following these detailed instructions, you will complete a beautiful Crocheted witch pattern that is perfect for seasonal decorating and handmade gift giving.
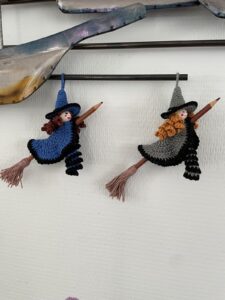
Choosing Materials and Understanding the Basic Crochet Stitches
Before beginning your Crocheted witch pattern, gather all the necessary materials. Medium-weight cotton yarn is highly recommended because it provides excellent stitch definition and creates a firm fabric that holds its shape well. Acrylic yarn is another excellent choice if you prefer a softer doll or want access to a wider variety of colors.
Suggested yarn colors include beige for the face and hands, black or purple for the dress, green for decorative accents, brown or gray for hair, and orange for small Halloween accessories. Feel free to customize the palette to match your own decorating style or the inspiration shown in the featured project.
A 2.5 mm to 3.5 mm crochet hook works well for most worsted-weight yarn when making amigurumi. Using a slightly smaller hook than recommended helps create tight stitches that prevent stuffing from showing through the fabric.
Useful crochet abbreviations include:
MR = Magic Ring
ch = chain
sl st = slip stitch
sc = single crochet
hdc = half double crochet
dc = double crochet
inc = increase
dec = decrease
st = stitch
Additional supplies include polyester fiberfill stuffing, safety eyes or embroidery thread, scissors, stitch markers, a yarn needle, and optional floral wire if you wish to pose the arms or hat.
Before beginning the complete doll, crochet a small practice swatch to check your stitch tension. Firm, even stitches help the finished witch maintain a smooth shape and professional appearance.
Step-by-Step Crocheted Witch Pattern
Head
Round 1:
MR.
Work 6 sc into the Magic Ring.
Pull closed securely.
Round 2:
Inc in every stitch.
12 sc.
Round 3:
Sc, inc.
Repeat around.
Continue increasing evenly until reaching approximately 36 stitches.
Work several rounds without increasing to build the head height.
Begin decreasing evenly while stuffing the head firmly.
Fasten off, leaving a long tail for sewing.
Body
Using dress color:
MR.
6 sc.
Increase gradually until reaching the desired body width.
Work several rounds evenly.
Stuff lightly before closing the upper opening.
Arms
MR.
6 sc.
Work several rounds without increases.
Stuff lightly if desired.
Make two identical arms.
Legs
MR.
6 sc.
Increase slightly.
Work evenly to desired length.
Create two matching legs and sew them evenly to the lower body.
Hat
Using black yarn:
MR.
8 sc.
Increase gradually over several rounds to form a cone.
Create the brim by working increases evenly around the final round.
Fasten off.
Hair
Cut multiple equal strands of yarn.
Attach each strand securely to the back of the head using a crochet hook or yarn needle.
Trim evenly or braid sections if desired.
Assembly
Sew the head securely onto the body.
Attach the arms and legs evenly.
Position the hat on top of the head.
Embroider the mouth, eyebrows, and optional rosy cheeks before weaving in all remaining yarn ends.
Creative Ways to Customize Your Crocheted Witch Pattern
One of the most enjoyable aspects of creating a Crocheted witch pattern is personalizing every detail. Change the hair color, dress style, or hat shape to give each witch its own unique personality while maintaining the same basic construction.
Decorative accessories such as miniature pumpkins, tiny broomsticks, black cats, spell books, stars, moons, or small cauldrons can be crocheted separately and sewn onto the finished doll for additional charm.
Experiment with textured yarns for the hair or use velvet yarn for the dress to create interesting visual contrast. Combining different yarn textures adds depth while making each finished witch feel truly one of a kind.
Embroider tiny details such as freckles, smiling eyes, decorative buttons, lace collars, or colorful striped stockings to enhance the doll’s whimsical appearance.
Several completed witches displayed together create beautiful Halloween shelf decorations, table centerpieces, or festive mantel displays. Mixing different heights and clothing colors creates a delightful handmade collection.
The Crocheted witch pattern can also be adapted into ornaments, keychains, appliqués, bookmarks, or wall hangings simply by adjusting the finished size and simplifying certain features.
Tips for Professional Crochet Results
Maintain consistent yarn tension throughout every section. Even stitches help create smooth shaping and improve the overall appearance of the finished doll.
Stuff each body part gradually rather than filling it all at once. Even stuffing eliminates lumps while helping the doll maintain balanced proportions.
Count your stitches carefully during every increase and decrease round. Accurate stitch counts ensure symmetrical shaping for the head, body, arms, and legs.
Use long yarn tails when sewing the body parts together. Strong assembly prevents the finished doll from loosening after handling or display.
Take time to position every feature before permanently sewing it into place. Small adjustments to the eyes, hat, or arms can dramatically improve the final expression and overall balance.
Practice making several versions of your Crocheted witch pattern using different colors, accessories, hairstyles, and clothing combinations. Every completed doll strengthens your crochet skills while expanding your collection of festive handmade decorations.
FAQ
Is this Crocheted witch pattern suitable for beginners?
Yes. The project mainly uses beginner-friendly amigurumi techniques such as single crochet, increases, decreases, and simple assembly, making it an enjoyable challenge for confident beginners.
Which yarn works best?
Medium-weight cotton provides excellent stitch definition and durability, while acrylic yarn offers softness and a wider range of colors.
Can I make a larger witch?
Absolutely. Use thicker yarn with a larger crochet hook or continue increasing additional rounds before working the straight body sections.
Why does my doll look uneven?
Uneven stitch tension, inconsistent stuffing, or incorrect stitch counts can affect the final proportions. Counting stitches carefully and stuffing gradually usually produces balanced results.
Can I wash the finished doll?
Yes. Cotton and acrylic dolls are generally suitable for gentle hand washing. Allow the doll to air dry completely while reshaping it if necessary.
Can I sell handmade crochet witches?
Certainly. Seasonal amigurumi dolls remain popular at autumn festivals, Halloween craft fairs, farmers’ markets, and online handmade shops.
What accessories can I add?
You can create miniature broomsticks, pumpkins, black cats, hats with decorative bands, scarves, spell books, stars, or tiny handbags to personalize every witch.
Can I use different colors?
Of course. Purple, emerald green, burgundy, cream, gray, navy, and mustard all create beautiful witches with unique personalities while following the same construction steps.
Conclusion
Creating this Crocheted witch pattern is a rewarding crochet project that combines traditional amigurumi techniques with the playful spirit of Halloween. Throughout this tutorial, you learned how to choose suitable materials, understand the essential crochet abbreviations, crochet each body section step by step, shape the doll correctly, create the signature witch hat, add decorative hair and facial features, assemble every piece securely, and apply professional finishing techniques that improve both appearance and durability. These valuable crochet skills can also be used in countless future amigurumi projects.
Whether you crochet a single witch as a seasonal decoration or create an entire collection with different personalities, outfits, and accessories, this Crocheted witch pattern offers endless opportunities for creativity. Every completed doll helps improve your stitch consistency, shaping techniques, and confidence while producing charming handmade decorations that can be enjoyed throughout the autumn season.
Thank you for reading this tutorial. I hope this Crocheted witch pattern inspires your next crochet project and encourages you to continue exploring creative handmade designs. If you decide to make this pattern, I would truly appreciate your honest opinion. Please share your experience, suggestions, and creative variations, as your feedback can inspire other crochet enthusiasts and help improve future tutorials.