
Mini Crochet Witch Hat Pattern is a charming seasonal project that turns a small amount of yarn into an adorable pointed witch hat with a structured brim, contrasting band, and decorative buckle.
One of the most appealing features of this Mini Crochet Witch Hat Pattern is the recognizable silhouette created by the tall pointed crown and wide circular brim.
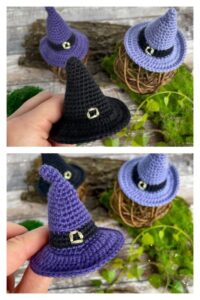
Another advantage of a mini crochet witch hat is that it requires relatively little material. Small leftover yarn balls are often enough, making this an excellent stash-friendly Halloween crochet idea. For a look similar to the reference project, choose purple or black yarn for the main hat and black yarn for the band. A small amount of gold, beige, or yellow yarn can create the buckle. The pattern is worked primarily in continuous or joined rounds, depending on your preference. Stitch markers are especially useful because the increases need to remain evenly distributed. Before beginning, read through the complete instructions and become familiar with the crochet abbreviations so that shaping the point, crown, band, and brim feels straightforward.
Materials, Crochet Key, and Preparation for the Mini Witch Hat
For this Mini Crochet Witch Hat Pattern, choose a medium-fine cotton or acrylic yarn that produces clearly defined stitches. DK or light worsted yarn works particularly well for a small decorative hat. You will need approximately 15–25 yards of the main color, 3–5 yards of black or another contrasting color for the band, and a very small amount of gold or yellow yarn for the buckle. A crochet hook between 2.5 mm and 3.5 mm generally creates a firm fabric suitable for miniature decorations.
The basic crochet key for this pattern uses standard US terminology. MR = magic ring, ch = chain, sl st = slip stitch, sc = single crochet, inc = increase, meaning two single crochet stitches worked into the same stitch, and BLO = back loop only. When the instructions show something such as “(2 sc, inc) × 6,” repeat the sequence of two single crochets followed by one increase six times. The number shown at the end of a round indicates the approximate total stitch count.
For the main hat, select a color that creates the mood you want. Purple produces a playful fantasy appearance similar to the pictured design, while black creates a more traditional crochet witch hat. Deep green, burgundy, orange, gray, and midnight blue can also work beautifully. Using one consistent yarn weight throughout the crown and brim helps prevent unwanted changes in size and texture.
The gauge does not have to be exact because this is primarily a decorative project. However, your stitches should be relatively tight so the pointed crown holds its shape. A useful approximate gauge is 20–24 single crochet stitches per 4 inches, although this will depend heavily on the yarn and hook combination. If your stitches appear loose or the crown collapses easily, try moving down one hook size.
The finished mini witch hat can measure approximately 3.5–5 inches across the brim and around 3–4 inches from the brim to the tip. These dimensions are only a guideline. Thicker yarn and a larger hook will naturally produce a larger hat, while thinner cotton and a small hook can create tiny ornaments or appliqués.
Before starting, gather a yarn needle, scissors, stitch marker, and optional fiberfill. Stuffing is not always necessary, but a tiny amount inside the crown can help maintain the pointed shape. If the hat will be used as a flat decoration, you can leave it completely unstuffed. For three-dimensional displays, light stuffing provides additional structure without making the hat look bulky.
Step-by-Step Crochet Pattern for the Pointed Crown
Begin the Mini Crochet Witch Hat Pattern at the very tip. Using your main color, make an MR and work 4 sc into the ring. Pull the ring closed carefully. Round 2: work 1 sc in each stitch around (4). Round 3: (1 sc, inc) × 2 (6). Round 4: sc around (6). These small opening rounds create the narrow tip that gives the witch hat its dramatic pointed appearance.
Continue increasing gradually rather than expanding quickly. Round 5: (2 sc, inc) × 2 (8). Round 6: sc around (8). Round 7: (3 sc, inc) × 2 (10). Round 8: sc around (10). Round 9: (4 sc, inc) × 2 (12). Keep your tension consistent, but avoid pulling the stitches so tightly that the crown becomes difficult to shape.
Round 10: sc around (12). Round 11: (5 sc, inc) × 2 (14). Round 12: sc around (14). Round 13: (6 sc, inc) × 2 (16). Round 14: sc around (16). At this point, the crochet witch hat pattern should begin looking like a narrow cone. You can gently bend the upper section slightly to one side if you prefer a whimsical crooked tip.
Round 15: (7 sc, inc) × 2 (18). Round 16: sc around (18). Round 17: (8 sc, inc) × 2 (20). Round 18: sc around (20). Round 19: (9 sc, inc) × 2 (22). Round 20: sc around (22). These slow increases are important because increasing too rapidly creates a short cone rather than the tall witch-hat silhouette.
Continue with Round 21: (10 sc, inc) × 2 (24). Round 22: sc around (24). Round 23: (3 sc, inc) × 6 (30). Round 24: sc around (30). Round 25: (4 sc, inc) × 6 (36). Round 26: sc around (36). This slightly faster expansion near the bottom helps create the broader base visible in miniature witch-hat designs.
If you want a softer or more curved crown, gently manipulate the finished crochet fabric with your fingers. A tiny amount of fiberfill can be inserted now, concentrating most of it near the lower crown and using very little near the point. Do not overstuff. The goal is to support the pointed crochet hat, not turn it into a rigid cone. Leave the working yarn attached because the band and brim can be added directly to the crown.
Creating the Black Hat Band, Buckle, and Wide Crochet Brim
Switch to black yarn to form the contrasting band. Round 27: sc around (36). Round 28: sc around (36). Round 29: sc around (36). Three rounds usually create a nicely proportioned band for this Mini Crochet Witch Hat Pattern. If your yarn is particularly thin, add a fourth round. For an all-black hat, you can create subtle contrast by using charcoal yarn or simply continue with the same black yarn.
Switch back to the main hat color for the brim. To establish a visible transition between the crown and brim, work the first brim round through the front loops if desired. Round 30: (5 sc, inc) × 6 (42). Round 31: (6 sc, inc) × 6 (48). The circle will immediately begin spreading outward. Flatten the brim gently after each round so you can monitor the shaping.
Continue Round 32: (7 sc, inc) × 6 (54). Round 33: (8 sc, inc) × 6 (60). Round 34: (9 sc, inc) × 6 (66). Depending on your tension and yarn, these rounds should create a generous brim similar to the hats in the reference image. If the brim begins becoming excessively wavy, reduce the number of increases. If it curls upward strongly, add a few evenly spaced increases.
For an even wider crochet witch hat brim, add Round 35: (10 sc, inc) × 6 (72). Then work one complete round of sc without increasing. This final plain round helps stabilize the outer edge. Finish with a sl st, cut the yarn, and weave the tail securely into the underside of the brim. The finished edge should look smooth and reasonably flat while still retaining a handmade softness.
To make the tiny buckle, use gold or yellow yarn. Ch 8 and join carefully with a sl st to create a miniature loop, or embroider a small rectangular outline directly onto the black band. Another method is to make a tiny chain rectangle and sew it to the center front. Keep the buckle proportional; an oversized buckle can overwhelm the miniature design.
After attaching the buckle, weave in every remaining yarn tail. Shape the brim with your fingers and adjust the pointed crown. If you used cotton yarn, gentle blocking can improve the shape considerably. Lightly dampen the piece, arrange the brim into a circle, position the crown as desired, and allow the mini crochet witch hat to dry completely before using it.
Finishing Ideas, Customization, FAQ, and Final Crochet Tips
The completed Mini Crochet Witch Hat Pattern can be customized in countless ways. Purple and black provide an unmistakable Halloween combination, but you could make an entire collection using lavender, orange, green, burgundy, or gray. Keeping the band black creates visual consistency when several hats are displayed together. You can also alternate buckle colors for additional variety.
For Halloween ornaments, attach a hanging loop to the top or back of the crown. Ch 15–25, depending on the desired loop length, and secure both ends firmly. These lightweight hats can then become part of seasonal garlands, decorative branches, wreaths, or handmade displays. Always make sure small decorations and loose components are kept appropriately away from very young children and pets.
If you want to turn the hat into an appliqué, omit stuffing and flatten the crown slightly. Sew the brim onto another crochet project, fabric decoration, bag, or handmade seasonal accessory. A flatter version also works well for scrapbook-style textile crafts and decorative banners.
The pattern can easily be enlarged. Simply use thicker yarn and a larger hook while maintaining the same basic construction. Alternatively, continue increasing the lower crown before starting the band, then add additional increase rounds to the brim. Remember that changing yarn thickness affects every dimension, so treat the stitch counts as a foundation rather than an absolute sizing system.
You can also experiment with surface details. Small embroidered stars, contrasting stitches, tiny crochet flowers, or decorative chains can transform the basic crochet witch hat into a personalized project. For a cleaner and more traditional appearance, keep the design simple with only the contrasting band and buckle.
Good finishing makes a noticeable difference in miniature crochet. Secure yarn tails carefully, position the buckle in the center, and check the brim from several angles. If one section appears uneven, gentle blocking can usually correct it. A well-shaped brim combined with a slightly curved pointed crown gives this small project its playful handmade character.
FAQ: Frequently Asked Questions About the Mini Crochet Witch Hat Pattern
Is this Mini Crochet Witch Hat Pattern suitable for beginners?
Yes. A confident beginner who understands single crochet, increases, magic rings, and working in rounds should be able to complete it. The most important skill is counting stitches accurately because the gradual increases determine the shape of the crown.
What yarn is best for a mini crochet witch hat?
Cotton, cotton blends, and acrylic yarn can all work well. Cotton usually creates crisp stitch definition and a firmer brim, while acrylic tends to produce a softer result. DK or light worsted yarn is a practical choice for a small decorative hat.
How can I make the witch hat point more curved?
Once the crown has been crocheted, gently bend the upper portion toward one side. If necessary, use a small amount of fiberfill lower in the crown while leaving the tip relatively soft. This allows the tip to bend naturally.
Why is my crochet brim becoming wavy?
A wavy brim usually indicates that there are too many increases for your particular tension. Because every crocheter works slightly differently, you may need to reduce the number of increases in one round. Try working a plain round of sc before adding more increases.
Why does my witch hat brim curl upward?
Curling can happen when the brim does not contain enough increases or when the tension is especially tight. Adding a few evenly distributed increases can help the fabric lie flatter. Gentle blocking may also correct minor curling.
Can I make the entire Mini Crochet Witch Hat Pattern in black?
Absolutely. An all-black version creates a classic Halloween appearance. You can still distinguish the band by using dark gray yarn, a different stitch texture, or a slightly different yarn finish.
How do I make a larger version of this pattern?
The easiest method is to use thicker yarn and a larger crochet hook. For more precise enlargement, continue adding gradual increase rounds to the crown before making the band, and then add additional increase rounds to the brim.
Do I need to stuff the crochet witch hat?
No. Stuffing is optional. If you want the hat to remain lightweight and flexible, leave it unstuffed. If you want a more defined three-dimensional crown, add only a small amount of fiberfill.
How long does a mini crochet witch hat take to make?
The time varies according to experience and yarn choice, but the project is relatively quick because it uses only a small number of stitches. Once familiar with the pattern, making several hats in different colors becomes much faster.
Can leftover yarn be used for this project?
Yes. This Mini Crochet Witch Hat Pattern is an excellent scrap-yarn project because each hat requires only a modest amount of yarn. Small leftover quantities are particularly useful for the band and buckle.
How can I make the brim firmer?
Use a slightly smaller hook, choose cotton yarn, and maintain consistent tension. You can also finish with a round of slip stitches around the outer edge. Blocking the completed piece can further improve the brim’s shape.
What can I do with finished mini witch hats?
They can become Halloween ornaments, garland decorations, gift toppers, appliqués, seasonal table decorations, or decorative additions to other handmade projects. Making several in coordinated colors can create a particularly attractive seasonal collection.
Conclusion
The Mini Crochet Witch Hat Pattern combines simple crochet techniques with creative shaping to produce a charming seasonal decoration. Throughout this tutorial, you learned how to begin with a narrow magic ring, gradually increase the stitches to create a pointed crown, add a contrasting black band, expand the lower section into a wide brim, and finish the project with a tiny decorative buckle. The gradual construction is what gives the hat its recognizable silhouette while keeping the crochet process manageable.
You also learned how yarn weight, hook size, tension, increases, and blocking can affect the final appearance. These details are especially important when working on miniature crochet because even a small change can noticeably alter the proportions. Once you understand the basic construction, you can adapt the crochet witch hat pattern by changing colors, adjusting the size, widening the brim, curving the point, or adding your own decorative details.
Whether you choose classic black, rich purple, soft lavender, or another Halloween-inspired combination, this small project offers plenty of room for creativity. Try making several versions and experimenting with different yarns and buckle styles. If you make this Mini Crochet Witch Hat Pattern, leave your sincere opinion about the project and share your suggestions. Your ideas, color combinations, modifications, and crochet experiences can inspire even more creative versions of this fun miniature witch hat.