
A DIY fabric bag sewing tutorial is one of the most enjoyable and practical sewing projects for beginners and experienced crafters alike.
Creating a fabric bag at home is more than just a hobby. A well-made handmade bag combines functionality and fashion while allowing you to choose the exact size, style, and materials you prefer.
Another reason why this sewing project remains popular is its versatility. Fabric bags can be designed for grocery shopping, school supplies, travel organization, beach outings, or even elegant daily fashion accessories. Using reusable bags also supports environmentally friendly habits by reducing the use of disposable plastic bags. As you follow this detailed DIY fabric bag sewing tutorial, you will discover practical sewing tips, fabric recommendations, construction methods, and creative ideas that can improve your sewing experience while helping you produce durable and attractive handmade bags.
Choosing the Best Materials for a DIY Fabric Bag Sewing Tutorial
Selecting the right materials is one of the most important parts of a successful DIY fabric bag sewing tutorial. The type of fabric you choose directly affects the durability, appearance, and functionality of the final project. Cotton canvas is one of the most recommended fabrics because it is sturdy, easy to sew, and available in countless prints and colors. Denim and linen are also excellent options for beginners who want strong and stylish handmade bags.
Before cutting your fabric, always wash and iron it properly. Pre-washing prevents future shrinkage and helps the finished bag maintain its original shape after cleaning. Ironing the fabric creates smooth surfaces that make measuring and cutting much more accurate. These preparation steps are often overlooked, but they play a major role in professional-looking sewing results.
The lining fabric is another important detail in a DIY fabric bag sewing tutorial. A lining adds structure, improves durability, and gives the inside of the bag a polished appearance. Lightweight cotton fabric works well for simple tote bags, while padded lining or interfacing can provide additional support for larger bags designed to carry heavier items.
Handles are essential for both comfort and durability. Some people prefer fabric handles made from matching material, while others use cotton webbing or leather straps for a stronger and more modern look. Reinforced stitching around the handle area is very important because this section receives the most tension during daily use.
Thread quality should never be ignored in sewing projects. Strong polyester thread is commonly recommended because it resists wear and maintains secure seams over time. Choosing thread colors that complement the fabric design can also enhance the final appearance of your handmade bag.
Basic sewing tools are equally important. Sharp fabric scissors, pins, measuring tape, clips, rotary cutters, and sewing needles all contribute to smoother construction. Having organized sewing supplies makes every step of a DIY fabric bag sewing tutorial easier and more enjoyable for beginners and experienced sewists alike.
Step-by-Step Sewing Process for a DIY Fabric Bag Sewing Tutorial
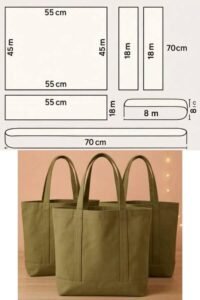
The first step in any DIY fabric bag sewing tutorial is measuring and cutting the fabric pieces accurately. Most basic fabric bags require two outer fabric panels, two lining panels, and handle strips. Using precise measurements ensures that all parts align correctly during sewing and helps create a symmetrical finished bag.
Once the fabric pieces are prepared, the next step is assembling the outer panels. Place the right sides of the fabric together and sew along the sides and bottom edges while leaving the top open. Beginners should sew slowly and maintain even seam allowances to achieve clean and professional-looking seams.
After sewing the outer section, repeat the same process with the lining fabric. If you plan to turn the bag inside out later, leave a small opening at the bottom of the lining. This opening will allow you to reverse the bag after attaching all sections together.
Creating boxed corners is a popular technique in a DIY fabric bag sewing tutorial because it gives the bag depth and allows it to stand upright. To form boxed corners, flatten each bottom corner into a triangle shape and sew across the corner evenly. This simple method dramatically improves the functionality of handmade bags.
The handles can now be attached to the outer fabric section. Carefully measure equal distances from the side seams to ensure balanced placement. Strong reinforcement stitching is recommended because handles must support the bag’s weight during regular use.
Finally, place the outer bag inside the lining with right sides facing each other and sew around the top edge. Turn the bag through the opening left in the lining, then stitch the opening closed neatly. Press the entire bag with an iron and add optional topstitching around the upper edge for a clean, polished finish.
Creative Design Ideas for a DIY Fabric Bag Sewing Tutorial
One of the most exciting parts of a DIY fabric bag sewing tutorial is experimenting with unique designs and decorations. Handmade bags provide endless opportunities for creativity because you can combine different colors, textures, and sewing techniques to create one-of-a-kind accessories.
Patchwork fabric bags are especially popular among sewing enthusiasts. By combining small fabric scraps into artistic arrangements, sewists can create colorful and visually interesting designs while reducing fabric waste. Patchwork projects also allow beginners to practice accurate sewing and pattern alignment.
Adding exterior pockets can increase the practicality of handmade bags. Large front pockets are useful for phones, notebooks, keys, or small daily essentials. Interior zipper pockets are another excellent addition for storing valuable items securely while maintaining an organized bag interior.
Embroidery and appliqué designs can transform a simple bag into a personalized fashion piece. Floral embroidery, geometric patterns, initials, or decorative stitching can all add charm and individuality to a handmade bag. These small decorative elements make every project feel unique and meaningful.
Many people also enjoy experimenting with different closures. Magnetic snaps, zippers, buttons, and drawstrings each create a different style and level of security. Choosing the right closure depends on the purpose of the bag and the user’s personal preferences.
Seasonal themes are another creative approach in a DIY fabric bag sewing tutorial. Bright floral fabrics work beautifully for spring and summer bags, while darker tones and textured fabrics create cozy autumn and winter styles. Changing fabrics according to the season keeps sewing projects exciting and fashionable throughout the year.
Tips to Improve Your DIY Fabric Bag Sewing Tutorial Results
Practicing straight stitching is one of the most valuable skills for beginners following a DIY fabric bag sewing tutorial. Consistent stitches improve durability and create a cleaner appearance. Taking time to practice on fabric scraps before starting the main project can significantly improve sewing confidence.
Using interfacing is highly recommended when creating structured bags. Fusible interfacing strengthens the fabric and prevents sagging, especially for larger tote bags. Lightweight interfacing works well for casual bags, while heavier interfacing creates more rigid and professional shapes.
Clipping seam allowances around corners and curves can help reduce bulk and create smoother edges. This small sewing technique is commonly used by experienced sewists to achieve cleaner results and more accurate shapes after turning projects right side out.
Pressing seams after every sewing step is another important habit. Ironing helps flatten bulky seams, improves alignment, and gives the finished bag a more polished appearance. Professional-looking sewing projects often depend heavily on careful pressing throughout the construction process.
Beginners should also avoid rushing through measurements. Accurate measuring and cutting save time later by reducing alignment problems and uneven seams. Precision is one of the key foundations of successful sewing projects and should always be prioritized.
Finally, patience is essential in every DIY fabric bag sewing tutorial. Small mistakes are part of the learning process, and each completed project helps improve sewing techniques and creativity. Over time, beginners develop greater confidence and can experiment with more advanced bag designs and sewing methods.
FAQ About DIY Fabric Bag Sewing Tutorial
What is the best fabric for a beginner fabric bag project?
Cotton canvas is often considered the best option for beginners because it is durable, easy to sew, and widely available in different colors and prints. Denim and medium-weight cotton fabrics are also excellent choices for simple bag projects.
Do I need a sewing machine for a DIY fabric bag sewing tutorial?
A sewing machine makes the process faster and creates stronger seams, but simple fabric bags can also be sewn by hand using durable thread and basic stitching techniques.
How can I make my fabric bag more durable?
Using interfacing, reinforced stitching, strong thread, and high-quality fabric can improve the strength and durability of a handmade bag. Double stitching around the handles is especially important.
Can beginners successfully complete a DIY fabric bag sewing tutorial?
Yes, many fabric bag projects are beginner-friendly and require only basic sewing skills. Simple tote bags are excellent starter projects because they involve straight seams and easy construction techniques.
How long does it take to sew a fabric bag?
A simple fabric tote bag can usually be completed within a few hours, depending on the complexity of the design and the sewer’s experience level.
What size should I make my handmade bag?
The ideal size depends on the intended purpose. Small bags work well for cosmetics or daily essentials, while larger tote bags are perfect for shopping, books, or travel items.
Can I wash handmade fabric bags?
Most fabric bags can be machine washed if pre-washed fabrics and durable stitching were used during construction. Gentle washing cycles are generally recommended to preserve the bag’s appearance.
What sewing tools are essential for fabric bag projects?
Basic tools include fabric scissors, pins, measuring tape, sewing needles, thread, a sewing machine, fabric clips, and an iron for pressing seams during construction.
Conclusion
This detailed DIY fabric bag sewing tutorial demonstrated how handmade fabric bags combine creativity, practicality, and sewing skill development into one rewarding project. From selecting durable fabrics and preparing materials to sewing structured seams and adding decorative details, every step contributes to creating a beautiful and functional handmade accessory. Fabric bag sewing is suitable for beginners while also offering endless opportunities for advanced customization and artistic expression.
By practicing the techniques explained in this article, you can confidently create reusable bags for shopping, travel, organization, or personal fashion use. Handmade bags also make thoughtful gifts because they can be personalized with unique fabrics, pockets, embroidery, and creative design choices. With patience and practice, each new sewing project becomes easier and more enjoyable.
We hope this complete DIY fabric bag sewing tutorial helped you better understand the sewing process and inspired you to start your own handmade bag project. Feel free to leave your honest opinion, share your sewing experiences, and suggest new ideas or techniques that could inspire other sewing enthusiasts in future projects.