
Fabric baby bib pattern is one of the most practical and rewarding sewing projects for beginners and experienced sewists alike.
One of the greatest advantages of making a Fabric baby bib pattern is the freedom to customize every detail. You can choose soft cotton fabrics, colorful prints, neutral tones, or seasonal designs to match any style.
This tutorial explains the complete process of making the project from start to finish using beginner-friendly techniques while also including professional tips that improve the final result. You will learn how to select suitable fabrics, prepare the pattern pieces, sew the layers together, turn and finish the bib neatly, and add secure closures. By following each step carefully, you will be able to create a polished handmade bib that is comfortable for babies and easy for parents to use every day.
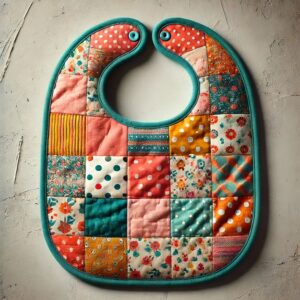
Choosing Materials and Preparing the Fabric Baby Bib Pattern
Before cutting any fabric, gather all the necessary supplies. Quilting cotton is one of the most popular choices because it is soft, breathable, easy to sew, and available in countless beautiful prints.
For the back layer, many sewists choose absorbent terry cloth, cotton flannel, or microfiber toweling. These materials help absorb moisture and keep baby’s clothing dry during feeding or teething.
You will also need fabric scissors, sewing clips or pins, coordinating thread, a fabric marking pen, measuring tools, and either snap fasteners or hook-and-loop tape for the closure.
Begin by printing or drawing your Fabric baby bib pattern on paper. A classic rounded bib shape with a gently curved neckline works well for babies of different ages. Carefully cut out the paper template before placing it on the fabric.
Fold the main fabric with the right sides together if your pattern requires symmetry. Pin the template securely and cut one front piece. Repeat the process for the backing fabric and any batting or absorbent middle layer if you plan to include one.
After cutting all pieces, lightly press the fabric using an iron. Removing wrinkles before sewing helps achieve more accurate seams and gives the finished bib a professional appearance.
Step-by-Step Instructions to Sew the Fabric Baby Bib Pattern
Place the front fabric and backing fabric with the right sides facing each other. If you are adding an absorbent inner layer, position it behind the outer fabric according to your chosen construction method.
Secure all layers using sewing clips or fine pins. Keeping the layers aligned prevents shifting while stitching around the curved edges.
Using approximately a ¼-inch seam allowance, sew around the entire bib. Leave an opening of about 2 to 3 inches along one side or the bottom edge so the project can be turned right side out later.
When sewing around the neck curve and rounded edges, stitch slowly and pivot gradually. Smooth curves create a much more polished finished project.
Trim the seam allowance slightly and carefully clip small notches around all curved sections. This simple step reduces bulk and allows the bib to lie flat once turned.
Turn the bib right side out through the opening. Use a blunt turning tool or a chopstick to gently push out the curved edges. Press the entire bib with an iron before closing the opening using a neat topstitch around the entire edge.
Personalizing Your Fabric Baby Bib Pattern
One of the most enjoyable parts of making a Fabric baby bib pattern is adding personal details that make every bib unique. Mixing complementary fabric prints creates charming combinations suitable for both everyday use and special occasions.
Appliqué designs such as stars, hearts, animals, flowers, or simple geometric shapes can transform a basic bib into a personalized keepsake. Embroidery with a baby’s name or initials also adds a thoughtful handmade touch.
Decorative topstitching not only strengthens the bib but also enhances its overall appearance. Contrasting thread colors can create subtle decorative accents without making the design too busy.
Many sewists enjoy creating reversible bibs by using two coordinating cotton prints instead of adding an absorbent backing. This doubles the number of styling options while making the project even more versatile.
If sewing for newborns, choose lightweight fabrics with soft finishes that will not irritate delicate skin. For older babies, slightly thicker absorbent fabrics provide additional protection during mealtime.
Making several bibs from the same fabric collection creates a beautiful matching gift set. Coordinated bibs are especially popular as baby shower presents and handmade nursery accessories.
Professional Sewing Tips for a Durable Fabric Baby Bib Pattern
Always prewash your fabrics before cutting. Cotton fabrics may shrink after the first wash, and prewashing helps prevent distortion after the finished bib is completed.
Use high-quality thread that matches the fabric weight. Strong thread improves durability and allows the bib to withstand frequent washing.
Take your time when pressing throughout the project. Pressing after each sewing step creates flatter seams and gives the finished bib a crisp, professional appearance.
When installing plastic snaps, make sure they are positioned evenly on both sides of the neckline. Proper alignment ensures the bib closes comfortably without twisting.
Reinforce the closure area with a small piece of interfacing if using lightweight fabric. This helps prevent tearing after repeated opening and closing.
Finally, inspect every seam carefully before considering the project complete. Removing loose threads, checking stitch quality, and giving the bib one final press greatly improve the overall presentation.
Frequently Asked Questions
Is this Fabric baby bib pattern suitable for beginners?
Yes. This project is beginner-friendly because it uses basic sewing techniques, simple curved seams, and only a few pattern pieces.
Which fabric is best for baby bibs?
Cotton quilting fabric paired with terry cloth or cotton flannel creates an excellent combination of softness, durability, and absorbency.
Can I make the bib reversible?
Yes. By using two attractive cotton fabrics, you can easily create a fully reversible bib that offers two different looks.
What is the best closure for a baby bib?
Plastic snaps are one of the most popular options because they are durable, secure, and easy for parents to use. Hook-and-loop tape is another beginner-friendly alternative.
Should I prewash the fabric?
Absolutely. Prewashing removes excess dye, softens the fabric, and minimizes shrinkage after the bib is finished.
How many bibs can I make from one yard of fabric?
Depending on the size of the pattern and fabric layout, one yard typically produces several baby bibs, making this a very economical sewing project.
Can I add extra absorbency?
Yes. Adding an additional layer of terry cloth, microfiber towel, bamboo fleece, or cotton batting increases absorbency without significantly increasing sewing difficulty.
Are handmade baby bibs good gifts?
Definitely. Handmade bibs are practical, thoughtful, reusable, and highly appreciated by parents because they combine functionality with a personal handmade touch.
Conclusion
Creating a Fabric baby bib pattern is an enjoyable sewing project that combines creativity with everyday practicality. Throughout this guide, you learned how to choose suitable fabrics, prepare the pattern, cut accurate pieces, sew the layers together, turn the bib neatly, topstitch the edges, install secure closures, and personalize the finished design with decorative details. These simple techniques allow you to create beautiful handmade bibs that are comfortable, durable, and designed for daily use.
Whether you are sewing for your own family, making thoughtful baby shower gifts, or expanding your handmade product collection, this project offers endless opportunities for creativity. With careful preparation, accurate stitching, and attention to finishing details, every Fabric baby bib pattern can become a professional-quality piece that lasts through many washes and everyday adventures.
Thank you for reading this tutorial. If you enjoyed this guide, please leave your honest opinion in the comments and share your suggestions for future sewing projects. Your feedback helps improve future tutorials and inspires even more creative ideas for sewing enthusiasts around the world.