
Fabric leaf coaster pattern projects are a beautiful way to combine creativity, practical sewing skills, and seasonal home décor.
One of the greatest advantages of making a Fabric leaf coaster pattern is that it requires only small pieces of fabric, making it an excellent scrap-busting project.
In this complete guide, you will learn how to recreate the leaf coaster shown in the photo by preparing an accurate template, cutting the fabric, assembling the layers, quilting realistic leaf veins, and adding professional finishing details. Every step has been carefully explained so that beginners can follow along with confidence while experienced sewists can enjoy customizing the project with their own creative touches. By the end of this tutorial, you will have the knowledge needed to make an entire coordinated collection of Fabric leaf coaster pattern designs for your home or as thoughtful handmade gifts.
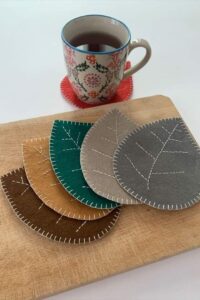
Choosing Materials and Preparing the Leaf Template
The first step in creating a beautiful Fabric leaf coaster pattern is selecting suitable materials. Cotton quilting fabric is one of the best options because it is easy to sew, presses well, and provides excellent durability for everyday use.
Choose fabrics that resemble natural foliage if you want a realistic appearance. Green, mustard, rust, burgundy, brown, and golden tones work especially well, while subtle prints can add extra texture without distracting from the overall leaf design.
Begin by drawing or printing a leaf template on sturdy paper. The template should include smooth curved edges and a slightly pointed tip. If the coaster in the photo features a maple, oak, or simple oval leaf, adjust your template accordingly so the finished project closely matches the desired shape.
Cut two identical fabric pieces using the template. One piece will form the front of the coaster, while the second will become the backing. Be sure to cut carefully around every curve to maintain clean edges during assembly.
Next, cut one layer of cotton batting that is slightly smaller than the fabric pieces. Trimming the batting slightly helps reduce bulk around the edges and makes the final topstitching much easier.
Prepare matching sewing thread, sewing clips or pins, fabric scissors, an iron, and a fabric marking pen. Having all of your supplies organized before sewing allows the project to progress smoothly and improves overall accuracy.
Sewing the Leaf Shape Step by Step
Place the two fabric leaf pieces with the right sides facing together. Position the batting behind one layer if you prefer to quilt after assembling, or quilt the top fabric and batting together first before joining the backing.
Secure the layers using sewing clips or fine pins, paying close attention to the pointed tip and curved sides of the leaf. Accurate alignment ensures both sides remain symmetrical after turning.
Using a sewing machine, stitch around the outer edge with a consistent seam allowance. Leave a small opening near the bottom of the leaf so you can turn the project right side out once the stitching is complete.
Trim the seam allowance slightly and carefully clip small notches around every curved section. These tiny cuts reduce bulk and help the coaster maintain smooth, rounded edges after turning.
Turn the coaster right side out through the opening. Use a blunt turning tool or a wooden chopstick to gently shape the pointed tip and rounded edges without damaging the stitches.
Press the entire coaster with a warm iron suitable for your chosen fabric. Fold the opening inward before pressing so it blends seamlessly into the surrounding edge. The coaster is now ready for decorative quilting.
Quilting the Leaf Veins and Adding Finishing Details
The quilting stage is what transforms a simple fabric shape into a realistic Fabric leaf coaster pattern. Begin by lightly marking the center vein with a disappearing fabric marker.
Sew a straight quilting line from the base of the leaf to the pointed tip. This central vein acts as the main guide for all of the smaller decorative veins that will be added next.
Working from the center outward, stitch diagonal veins toward each edge of the leaf. Alternate the direction slightly to imitate the natural structure found on real leaves. Keep the spacing even for a balanced appearance.
After quilting the veins, sew a narrow topstitch around the outer edge of the coaster. This closes the turning opening while strengthening the entire project for everyday use.
If desired, add decorative machine stitches around the border instead of a simple straight stitch. Subtle decorative stitches can enhance the handmade appearance without overpowering the elegant leaf shape.
Finally, trim any loose threads and give the coaster one final press. The finished result should closely resemble the leaf coaster shown in the photo, with crisp quilting lines, smooth edges, and a beautifully defined silhouette.
Creative Ideas for Personalizing Your Fabric Leaf Coaster Pattern
One of the most enjoyable aspects of a Fabric leaf coaster pattern is the opportunity to personalize every coaster according to your own decorating style.
Mix several coordinating fabric prints within one set to create the appearance of a colorful autumn forest. Combining solids with subtle prints adds visual depth while maintaining harmony across the collection.
Try making leaves in different shapes, such as maple, oak, birch, or simple rounded foliage. A varied collection creates an eye-catching centerpiece when displayed together on a dining table.
Experiment with contrasting thread for the quilting veins if you want the leaf details to stand out. Matching thread creates a softer appearance, while darker thread emphasizes the realistic vein structure.
These handmade coasters also make thoughtful gifts for birthdays, housewarming celebrations, holiday gatherings, teachers, neighbors, and friends who appreciate handcrafted home décor. Pair them with a favorite mug or tea towel for an especially charming gift set.
Once you have mastered the basic technique, consider enlarging the template to create matching placemats, table centerpieces, mug rugs, or decorative wall accents. Using the same construction methods allows you to coordinate multiple seasonal sewing projects throughout your home.
Frequently Asked Questions
Is the Fabric leaf coaster pattern suitable for beginners?
Yes. This project uses simple sewing techniques, basic curved seams, and straightforward quilting, making it an excellent choice for beginners who want to improve their sewing skills.
Which fabric works best?
Quilting cotton is the most recommended because it is easy to sew, durable, and available in a wide variety of beautiful prints and colors.
Should I use batting?
Yes. Cotton batting provides insulation, helps the coaster maintain its shape, and protects furniture from heat and moisture.
Can I wash the finished coaster?
Absolutely. Gentle machine washing or hand washing with mild detergent followed by air drying helps preserve the shape and stitching.
Can I sew this project entirely by hand?
Yes. While a sewing machine speeds up the process, careful hand stitching produces equally attractive results.
How do I make larger leaf coasters?
Simply enlarge your paper template before cutting the fabric while keeping both fabric pieces identical for proper assembly.
Can I use decorative quilting stitches?
Certainly. Decorative stitches can enhance the overall appearance while adding extra texture and personality to your finished coaster.
Can I sell finished coasters?
Yes. Handmade fabric coasters are popular at craft fairs, gift shops, and online handmade marketplaces, provided your finished products comply with applicable laws and marketplace guidelines.
Conclusion
Creating a Fabric leaf coaster pattern is a rewarding sewing project that combines practical craftsmanship with the timeless beauty of nature. Throughout this guide, you learned how to select suitable fabrics, prepare an accurate template, assemble the fabric layers, sew the leaf shape, quilt realistic veins, and apply professional finishing touches that closely recreate the coaster shown in the photo. These techniques are easy to learn, enjoyable to practice, and versatile enough to inspire many future sewing projects.
Because this project uses relatively small pieces of fabric, it is also an excellent way to reduce fabric waste while creating elegant home décor that can be enjoyed throughout the year. By experimenting with different leaf shapes, colors, quilting styles, and decorative stitching, you can create unique coaster collections that perfectly match your personal style or seasonal decorations.
Thank you for taking the time to read this Fabric leaf coaster pattern tutorial. I hope it inspires you to create your own beautiful handmade coasters while developing new sewing skills. If you enjoyed this article, please leave your honest opinion, share your experience with the project, and send your suggestions for future tutorials. Your feedback is greatly appreciated and helps inspire even more creative sewing ideas.