
Fabric wine bottle holder pattern is a practical and stylish sewing project that combines creativity with functionality.
One of the biggest advantages of making your own fabric wine bottle holder pattern is the opportunity to personalize every detail.
This project is ideal for anyone looking to improve sewing skills while creating something useful. Throughout this tutorial, you will learn how to prepare materials, measure accurately, cut fabric pieces, sew sturdy seams, add batting for structure, and assemble a professional-looking wine bottle holder. Every step focuses on producing a durable and attractive finished project while using simple sewing techniques that are easy to follow.
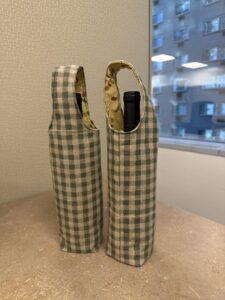
Choose Materials and Prepare Your Fabric
Selecting quality materials is the first step toward making a beautiful fabric wine bottle holder pattern. Medium-weight cotton, canvas, linen, quilting cotton, or lightweight denim all work well because they provide durability while remaining easy to sew. Coordinating fabrics for the lining can add a pleasant surprise inside the holder.
For one standard wine bottle holder, cut two outer fabric rectangles measuring approximately 14 x 8 inches (35 x 20 cm). Cut two lining pieces using the same measurements. Add two matching batting or fusible fleece pieces to create structure and protect the bottle.
If you prefer a sturdier finish, quilt the batting to the outer fabric before assembly. Simple straight quilting lines or diagonal stitching improve stability and add decorative texture without making the project difficult.
Choose thread that matches or complements the fabric. Polyester thread offers excellent strength for projects that may carry heavier bottles, while cotton thread creates a softer traditional finish.
Press all fabric pieces before cutting. Ironing removes wrinkles and ensures accurate measurements, helping each seam align perfectly during construction.
Gather sewing essentials including fabric scissors, rotary cutter, quilting ruler, pins or sewing clips, sewing machine, measuring tape, fabric marker, and an iron. Having everything prepared makes the sewing process smooth and enjoyable.
Sew the Main Body of the Wine Bottle Holder
Place the outer fabric pieces right sides together. Stitch along both long sides and the bottom edge using a ¼-inch (6 mm) seam allowance. Leave the top edge open.
Repeat the same process for the lining fabric, but leave a 3-inch (8 cm) opening along the bottom seam. This opening will later allow the project to be turned right side out.
To create the flat base, pinch one bottom corner so the side seam aligns with the bottom seam. Measure approximately 1½ inches (4 cm) from the corner and draw a straight line across. Sew along the line and trim the excess fabric. Repeat for all four corners, including both the lining and outer fabric.
Attach the batting or fusible fleece to the wrong side of the outer fabric if it has not already been quilted. Follow the manufacturer’s instructions when using fusible materials to ensure a secure bond.
Turn the outer body right side out while leaving the lining inside out. Insert the outer piece into the lining so that the right sides face each other. Carefully align all side seams and clip around the top edge.
Sew completely around the upper opening using a consistent seam allowance. This seam joins both layers together and creates a clean professional finish around the opening of the holder.
Add Handles and Decorative Details
A comfortable handle makes the fabric wine bottle holder pattern easier to carry while enhancing its appearance. Cut two fabric strips measuring approximately 14 x 3 inches (35 x 7.5 cm) for sturdy handles.
Fold each strip lengthwise with right sides together and sew along the long edge. Turn the tubes right side out, press flat, and topstitch both edges for additional durability and a decorative finish.
Position each handle evenly on opposite sides of the outer fabric before sewing the top edge. Ensure both handles are symmetrical so the bottle remains balanced when carried.
Decorative stitching can transform a simple holder into a premium handmade gift. Consider adding vertical quilting lines, decorative topstitching, or contrasting thread for subtle visual interest.
Appliqué designs, embroidered initials, decorative labels, or small fabric patches personalize the project even further. Seasonal motifs such as leaves, snowflakes, hearts, or flowers make thoughtful gifts for different occasions.
Before final assembly, test the fit by placing an empty wine bottle inside the outer section. The holder should fit snugly without being overly tight, allowing the bottle to slide in and out comfortably.
Finish the Project and Customize Your Design
After sewing around the top edge, gently pull the entire project through the opening left in the lining. This technique hides the seam allowances inside the finished holder.
Close the lining opening with either a narrow machine stitch or an invisible ladder stitch by hand. Press the lining neatly back into place inside the holder.
Topstitch around the upper edge about ⅛ inch (3 mm) from the edge. This step keeps the lining from shifting while giving the holder a crisp professional appearance.
Experiment with different fabric combinations to create unique versions of the fabric wine bottle holder pattern. Rustic linen paired with floral cotton creates a farmhouse style, while bold prints produce modern gift bags perfect for celebrations.
The finished holder can also be adapted for sparkling water bottles, olive oil bottles, specialty vinegar bottles, or reusable beverage containers by adjusting the width and height during the cutting stage.
With proper care, this reusable fabric holder can last for many years. Wash gently when necessary, press lightly after drying, and store flat until ready to use again. Its durability makes it an excellent sustainable alternative to disposable gift packaging.
FAQ
Is this fabric wine bottle holder pattern suitable for beginners?
Yes. The project mainly uses straight seams, simple measurements, and basic sewing techniques, making it an excellent beginner-friendly sewing pattern.
What fabric works best?
Medium-weight cotton, quilting cotton with batting, canvas, linen, lightweight denim, and home décor fabrics all provide excellent durability and structure.
Can I make it larger?
Absolutely. Increase the width and height of the pattern pieces to accommodate larger bottles, champagne bottles, or specialty beverage containers.
Do I need batting?
Batting is optional but highly recommended because it provides cushioning, improves the holder’s shape, and protects the bottle during transport.
Can I wash the finished holder?
Yes. Most cotton fabrics can be machine washed on a gentle cycle. Air drying and light pressing help maintain the holder’s shape.
Can I sell finished holders made from this pattern?
In most cases, yes. Handmade items created from your own sewing work can usually be sold at craft fairs, local markets, or online marketplaces, provided you respect any applicable pattern licensing if using a commercial template.
What decorations can I add?
You can personalize your holder with embroidery, appliqué, decorative quilting, fabric labels, lace, ribbons, buttons used as embellishments, or personalized monograms.
How long does the project take?
Most sewists can complete this fabric wine bottle holder pattern in approximately one to two hours, depending on experience and the amount of decorative detail added.
Conclusion
Creating a Fabric wine bottle holder pattern is a rewarding sewing project that combines beauty, practicality, and sustainability.
Throughout this guide, you learned how to select the best materials, prepare accurate fabric pieces, sew the outer body and lining, create a stable boxed base, attach comfortable handles, add decorative finishes, and complete a polished reusable bottle holder.
By mastering these techniques, you can confidently produce elegant handmade gifts for birthdays, holidays, weddings, housewarming parties, and many other special occasions. As you continue practicing, feel free to experiment with different fabrics, colors, quilting designs, and embellishments to make every project unique. If you enjoyed this tutorial, please leave your honest opinion in the comments and share your suggestions or ideas for future sewing projects. Your feedback helps inspire even more creative patterns and useful tutorials for fellow sewing enthusiasts.