
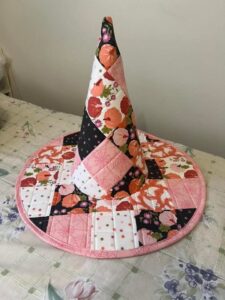
Fabric witch hat pattern is a creative sewing project that turns simple pieces of fabric into a charming decorative witch hat that can be used for Halloween décor, seasonal displays, costumes, table arrangements, or handmade gifts.
One of the most appealing things about this fabric witch hat sewing project is how adaptable the design can be. The basic construction consists of a cone-shaped crown attached to a circular or slightly oval brim, but small changes can completely transform the finished appearance.
This tutorial explains the complete process for making a Fabric witch hat pattern, from preparing a simple template to assembling and decorating the finished hat. The measurements provided can be adjusted, so you can use the same technique for small ornaments or larger decorative hats. Beginners should work slowly, especially when sewing the curved brim and attaching it to the cone. Accurate seam allowances and careful pressing make an important difference in the final shape. More experienced sewists can customize the pattern with patchwork, quilting, embroidery, decorative stitching, appliqué, ribbons, fabric flowers, or buttons. The goal is to create a practical pattern that gives you a reliable starting point while leaving plenty of room for personal creativity.
Materials, Measurements, and Preparing the Fabric Witch Hat Pattern
Before beginning your Fabric witch hat pattern, gather the basic sewing supplies. You will need approximately 1/2 yard of main fabric, 1/2 yard of lining fabric, medium-weight fusible interfacing or felt, coordinating sewing thread, fabric scissors or a rotary cutter, pins or sewing clips, a measuring tape, an iron, and a sewing machine. A hand-sewing needle is also helpful for closing small openings and attaching decorations. Cotton fabric is especially beginner-friendly because it cuts cleanly, presses well, and is easy to control while stitching curved seams.
For a medium decorative hat, begin with a crown approximately 11 to 13 inches tall. The lower curved edge of the cone piece can measure roughly 14 to 16 inches depending on how wide you want the crown. These measurements are flexible rather than mandatory. If you want a taller and more dramatic witch hat sewing pattern, increase the height of the cone while keeping the bottom width relatively similar. Always remember to include approximately 1/4 to 3/8 inch for seam allowances around the pattern pieces.
To draft the crown, draw a large triangular or slightly curved cone shape on paper. The top should narrow into a point, while the bottom edge should form a gentle curve rather than a perfectly straight line. This curved lower edge helps the crown sit naturally on the brim. Fold the paper template loosely into a cone before cutting your fabric. This simple test allows you to see whether the height and width are appropriate and gives you an opportunity to make adjustments before using your chosen fabric.
The brim requires two fabric circles or oval shapes. For a decorative medium-sized fabric witch hat, a diameter of approximately 12 to 15 inches works well. Place a plate, bowl, compass, or homemade cardboard template on the fabric and trace the outer edge. Then mark the center opening according to the circumference of the completed cone. The opening should be slightly smaller at first because it can always be enlarged gradually. Cutting an opening that is too large can make attaching the crown difficult.
Apply fusible interfacing to the wrong side of the main crown and one brim piece according to the manufacturer’s general pressing instructions for your chosen stabilizer. The purpose of fabric interfacing is to add body and help the hat maintain its shape. Medium-weight interfacing usually creates a flexible decorative hat, while felt or heavier stabilizer produces a firmer structure. Avoid making the cone excessively stiff because turning and shaping the pointed tip can become difficult.
After stabilizing the fabric, cut the main fabric, lining, and brim pieces carefully. Mark the center points of the brim opening by folding the pieces gently into quarters and making tiny removable marks. Do the same around the lower edge of the cone. These quarter marks become useful reference points later when attaching the crown to the brim. Accurate preparation is one of the easiest ways to achieve a professional-looking handmade fabric witch hat.
Sewing the Pointed Crown and Creating the Witch Hat Shape
Place the crown pieces with their right sides facing each other. Align the long side edges and secure them with sewing clips or pins. Beginning at the lower edge, sew toward the pointed top using an even seam allowance. Slow down as you approach the tip because this area determines how clean and defined the finished point will appear. Backstitch at the beginning and end to secure the seam.
Trim the seam allowance near the pointed tip without cutting through the stitches. Reducing excess fabric in this area allows the tip to turn more easily. If your Fabric witch hat pattern has curved areas along the crown seam, make several tiny clips into the seam allowance. These clips release tension and help the fabric lie smoothly after turning. Be careful to stop before reaching the stitching line.
Turn the crown right side out and gently push the tip into shape. A blunt turning tool, knitting needle, or capped pen can help, but avoid pushing aggressively because the point can easily be damaged. Roll the seam between your fingers and press it carefully with an iron. The result should resemble a simple fabric cone with a clean pointed top and an open circular bottom.
Repeat the basic process for the lining if your version includes one. The lining gives the fabric witch hat sewing pattern a cleaner interior and hides raw seams. Insert the lining into the outer crown with wrong sides facing each other. Match the lower raw edges and secure them temporarily with clips. You can baste around the lower edge approximately 1/8 inch from the edge to keep the layers together.
For a classic bent witch-hat appearance, gently curve the upper portion of the crown toward one side. If you used medium interfacing, the fabric may naturally hold a soft curve. Another option is to place a small amount of polyester stuffing inside the crown and shape it by hand. Decorative hats can also include flexible craft wire inside the seam area, but this is optional. A softly bent point usually looks more natural than an extremely rigid one.
Check the crown circumference before preparing the final brim opening. Place the bottom of the crown over the center of the brim and trace around it lightly. This provides a more accurate opening than relying entirely on predetermined measurements. Remember that the seam allowance needs to be considered before cutting. This small fitting step helps prevent one of the most common problems in a DIY fabric witch hat: a brim opening that does not match the crown.
Constructing the Brim and Assembling the Fabric Witch Hat
Place the two brim pieces right sides together. If only one piece has interfacing, position the stabilized piece carefully so the edges remain aligned. Pin or clip around the entire outer circumference. Sew around the outside using a consistent seam allowance. Because this is a curved seam, work slowly and gently rotate the fabric as you sew instead of pulling it sharply.
Trim the outer seam allowance slightly and make small notches around the curve. These notches allow the seam allowance to spread when the brim is turned. Turn the brim right side out through the center opening. Use your fingers to roll the outer seam until it sits directly along the edge, then press the brim thoroughly. Proper pressing is especially important for a sewn witch hat pattern because a smooth brim immediately makes the project look more refined.
Topstitch approximately 1/8 inch from the outer edge of the brim. This optional step helps keep the layers flat and adds a decorative finished line. You can also sew a second line approximately 1/4 inch from the first for additional detail. If you enjoy decorative machine stitches, the brim is an excellent area to experiment. Choose stitching that complements rather than overwhelms your fabric print.
Cut the center opening carefully using the measurement taken from the finished crown. Make the opening slightly smaller than necessary and test the fit. If it is too tight, trim away tiny amounts until the crown fits comfortably. Clip the inner curved seam allowance at regular intervals. These clips make it easier for the brim to bend around the base of the crown without creating excessive puckering.
Insert the crown through the brim opening and align the raw edges. Match the quarter marks you made earlier, then pin or clip between them. Sew slowly around the entire opening. Managing several fabric layers can be challenging, so stop periodically with the needle down and reposition the material. Do not stretch either piece aggressively. Gentle fabric management creates a smoother seam and preserves the intended shape of your Fabric witch hat pattern.
After sewing, inspect the connection between the brim and crown. If small puckers appear, gently press the seam using the tip of the iron. Depending on the construction method, the raw seam can be covered with bias tape, ribbon, or a narrow strip of coordinating fabric. This creates a neat finish while adding another decorative element. Once the crown and brim are securely connected, the basic handmade witch hat is complete and ready for personalization.
Decorating, Finishing, and Customizing Your Fabric Witch Hat Pattern
A fabric band around the base of the crown is one of the simplest ways to decorate the finished hat. Cut a strip approximately 2 to 3 inches wide and long enough to wrap around the crown with a small overlap. Fold the raw edges inward, press them, and position the band directly above the brim. Hand stitch it discreetly in place or secure it with carefully placed machine stitching.
For a traditional Halloween appearance, combine black fabric with orange, purple, or green accents. A black-and-orange Fabric witch hat pattern looks instantly seasonal, while purple and black can create a playful fantasy-inspired style. If you prefer rustic décor, try brown, beige, burnt orange, mustard, or muted plaid fabrics. The same pattern can therefore work with many decorating styles without changing the basic construction.
Patchwork is another creative possibility. Instead of cutting the crown from a single fabric, sew several fabric scraps together first and then cut the crown template from the completed patchwork panel. This technique is useful for leftover quilting cotton and gives every hat a unique appearance. Press the patchwork seams carefully before adding interfacing so the crown remains smooth and easy to assemble.
Small embellishments can transform a simple fabric Halloween decoration into a detailed handmade centerpiece. Consider fabric flowers, bows, buttons, lace, rickrack, felt leaves, miniature pumpkins, or decorative ribbon. Keep heavier decorations near the lower portion of the crown so they do not pull the pointed tip out of shape. If the fabric already has a bold print, a simple ribbon band may provide enough visual interest.
You can also change the dimensions to create an entire collection of hats. Small versions can become ornaments, garland decorations, table accents, or gift toppers. Medium versions work beautifully on shelves and seasonal displays, while larger hats can become dramatic decorative pieces. When resizing the witch hat fabric pattern, remember to enlarge both the crown and brim proportionally so the finished silhouette remains balanced.
Finally, give the project a careful inspection. Trim loose threads, check that embellishments are secure, and reshape the crown with your hands. Press the brim one final time if necessary, protecting delicate decorations from direct heat. A slightly curved brim can add character, so perfection does not require every part to be completely flat. Handmade variations are part of what gives a DIY witch hat decoration its distinctive personality.
FAQ About the Fabric Witch Hat Pattern
What is the best fabric for a Fabric witch hat pattern?
Medium-weight cotton is one of the easiest choices because it is stable, widely available, easy to press, and beginner-friendly. Quilting cotton is particularly useful for decorative hats because it comes in many seasonal prints. Canvas can create a heavier hat, while velvet offers a richer appearance but can be more challenging to sew.
Do I need interfacing to make a fabric witch hat?
Interfacing is highly recommended when you want the hat to stand independently. Without stabilization, ordinary cotton may collapse or wrinkle. Medium-weight fusible interfacing provides enough support for most decorative projects without making the fabric excessively rigid.
How much fabric do I need?
For a medium decorative Fabric witch hat pattern, approximately 1/2 yard of main fabric and 1/2 yard of lining is generally sufficient. The exact amount depends on the diameter of the brim, height of the crown, fabric width, and whether the print requires directional placement.
Can beginners make this sewing project?
Yes. The project uses relatively straightforward sewing techniques, although attaching the circular brim requires patience. Beginners should pin carefully, sew slowly around curves, and test the crown-to-brim fit before making final cuts.
How can I make the pointed tip bend naturally?
Use flexible interfacing instead of an extremely rigid stabilizer and gently shape the crown after turning. A small amount of polyester stuffing can help maintain a soft bend. The upper point can be curved toward one side to create the familiar whimsical witch-hat silhouette.
Can I make the hat without a sewing machine?
Yes, although hand sewing will require additional time. Use small, consistent backstitches for structural seams and secure the thread carefully. Decorative elements can also be attached by hand.
Why is my brim puckering around the crown?
Puckering usually happens when the center opening is incorrectly sized, the curved seam allowance has not been clipped, or one layer is being stretched while sewing. Match quarter points first and distribute the remaining fabric evenly before stitching.
How do I make the brim firmer?
Use heavier interfacing, felt, or an additional stabilizing layer between the two brim fabrics. The appropriate firmness depends on the size of the hat. Larger brims generally need more support than small decorative versions.
Can I use fabric scraps for this project?
Absolutely. A scrap fabric witch hat is an excellent way to use leftover cotton pieces. Scraps can be combined into patchwork panels before cutting the pattern pieces, or they can be used for bands, bows, appliqués, and other embellishments.
Can this pattern be resized?
Yes. Adjust the crown height and width together, then resize the brim proportionally. Before cutting the final center opening, assemble the crown and use its actual circumference as your guide. This approach reduces fitting problems caused by seam allowances.
How can I make several matching witch hats?
Create reusable paper or cardboard templates for the crown and brim. Label each template with its seam allowance and finished measurements. Batch-cutting several fabric pieces at once can make producing a coordinated collection much faster.
What decorations work well with a fabric witch hat?
Fabric bows, ribbons, buttons, felt leaves, patchwork accents, artificial flowers, lace, and small seasonal appliqués are all good choices. Try to coordinate the decorations with the scale and colors of the main fabric so the finished design remains balanced.
Conclusion
Creating a Fabric witch hat pattern is a fun way to combine basic sewing techniques with seasonal creativity. The process begins by drafting and cutting the cone-shaped crown and brim, adding appropriate stabilization, and carefully sewing the crown into its recognizable pointed form. Taking time to measure accurately and test the pieces before final assembly can prevent many common fitting problems.
The brim is equally important because it provides both structure and personality. Sewing smooth curved seams, clipping seam allowances, pressing carefully, and matching the brim opening to the finished crown all contribute to a polished result. Once these pieces are connected, ribbons, patchwork, fabric flowers, buttons, appliqués, or other decorative details can transform the same basic Fabric witch hat pattern into many different designs.
Whether you choose traditional Halloween colors or a completely unexpected fabric combination, this project offers plenty of opportunities for customization. You can make one statement piece or resize the pattern to create an entire collection of handmade hats. Most importantly, enjoy experimenting with the process and adapting the design to your own sewing style. If you make this project, leave your sincere opinion about the tutorial and share your suggestions for future sewing patterns and creative projects.