
Patchwork fabric curtain pattern projects are a wonderful way to transform leftover fabric into elegant, functional, and decorative home accessories.
Creating a Patchwork fabric curtain pattern is more than simply stitching fabric pieces together. It involves thoughtful planning, selecting complementary fabrics, cutting accurate shapes, assembling balanced blocks, and finishing the curtain with professional-looking seams and hems.
One of the greatest advantages of making a Patchwork fabric curtain pattern is the opportunity to recycle fabric scraps while creating something beautiful and useful. Cotton prints, linen blends, vintage fabrics, and quilting cottons all work wonderfully together. By carefully arranging colors and patterns, you can create a timeless curtain suitable for kitchens, living rooms, craft rooms, bedrooms, or country-style homes. This project is beginner-friendly while still offering endless possibilities for experienced sewists who want to experiment with creative layouts.
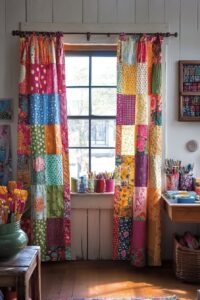
Choosing Materials and Planning Your Patchwork Fabric Curtain Pattern
Start by measuring your window carefully. Measure both the width and the desired finished length. Add extra fabric for hems and seam allowances before cutting any material.
Select high-quality quilting cotton or lightweight home décor fabric. Cotton is easy to sew, durable, and maintains its shape after repeated washing.
Choose a harmonious color palette. You can use soft neutrals for a farmhouse style, bright floral prints for a cheerful room, or modern geometric fabrics for a contemporary look.
Prepare your fabric by washing, drying, and ironing everything before cutting. Prewashing minimizes future shrinkage and helps maintain consistent sizing.
For a balanced appearance, arrange your fabric pieces on a large table before sewing. Moving blocks around until you’re satisfied with the design saves time later.
A rotary cutter, quilting ruler, cutting mat, sewing machine, pins, matching thread, and iron are essential tools for achieving precise results throughout the project.
Step-by-Step Patchwork Fabric Curtain Pattern Assembly
Cut fabric squares measuring approximately 5″ x 5″. Depending on your curtain size, you may need between 80 and 150 squares for a standard window.
Arrange the squares into rows while alternating colors, prints, and textures evenly. Take a photo before sewing so you can easily recreate your preferred layout.
Sew each row using a ¼-inch seam allowance. Press every seam open or toward one side after completing each row for a flatter finish.
Join all completed rows together carefully, matching every seam intersection. Pin generously before stitching to keep everything perfectly aligned.
After assembling the patchwork panel, trim the edges to square the curtain. This step gives the project a clean and professional appearance.
Add a fabric border around the patchwork panel if desired. Borders help frame the design while making it easier to reach your final curtain dimensions.
Finishing the Curtain with Professional Details
Create a double-fold hem along both side edges. Fold ½ inch twice, press well, and sew close to the folded edge for a neat finish.
Repeat the same double-fold technique along the bottom hem. A slightly wider bottom hem adds weight, allowing the curtain to hang beautifully.
For the curtain rod pocket, fold the top edge down approximately 4 inches. Stitch across the lower folded edge, leaving enough space for your curtain rod to slide through comfortably.
Press the entire curtain thoroughly using steam. Proper pressing removes wrinkles and gives every seam a crisp, polished appearance.
Inspect every seam for loose threads or uneven stitching. Reinforce any areas that receive additional stress, especially near the rod pocket.
Hang the completed curtain and evaluate how the fabric drapes. Small adjustments can easily be made before considering the project fully finished.
Crochet Edge Ideas to Enhance Your Patchwork Fabric Curtain Pattern
Although the curtain itself is sewn, adding a crochet trim creates an elegant handmade finish. A simple crochet edging complements patchwork beautifully.
Begin with a round of single crochet (sc) evenly around the curtain edge. Work through a fabric foundation using either a skip-stitch blade or evenly spaced blanket stitches.
Round 1: 1 sc in each stitch around. Work 3 sc in each corner. Join with a slip stitch (sl st).
Round 2: Chain (ch) 3, skip 1 stitch, 1 single crochet in the next stitch. Repeat from * to * all around.
Round 3: In each chain-3 space work (2 double crochet (dc), ch 2, 2 dc). Skip the next single crochet and repeat around.
Finish with one round of picot edging by working: sc, ch 3, sl st into the first chain, skip one stitch, repeat around the entire curtain. This delicate finish gives the curtain an elegant vintage appearance while highlighting the handcrafted design.
FAQ
Is a patchwork curtain suitable for beginners?
Yes. A Patchwork fabric curtain pattern is an excellent beginner project because it teaches accurate cutting, consistent seam allowances, pressing techniques, and fabric organization.
What fabrics work best?
Quilting cotton is the most recommended fabric because it is stable, easy to sew, durable, and available in countless colors and prints.
Can I use fabric scraps?
Absolutely. Fabric scraps are perfect for patchwork curtains and help reduce waste while creating unique combinations.
Should I line the curtain?
A lining is optional. Adding one improves durability, provides extra privacy, protects fabrics from sunlight, and gives the curtain a fuller appearance.
How do I wash a patchwork curtain?
Wash on a gentle cycle using cold water and mild detergent. Air drying or tumble drying on low heat helps preserve the fabric and stitching.
Can I customize the block sizes?
Yes. Squares, rectangles, half-square triangles, log cabin blocks, and many other quilting blocks can all be incorporated into your Patchwork fabric curtain pattern depending on your preferred style.
Conclusion
A Patchwork fabric curtain pattern is an enjoyable sewing project that combines creativity, functionality, and timeless design.
Throughout this guide, you learned how to choose fabrics, prepare materials, accurately cut fabric pieces, assemble patchwork blocks, sew the curtain panel, create professional hems, and add a beautiful crochet edging for an elegant handmade finish.
By following each step carefully and taking your time with pressing and accurate stitching, you can create a curtain that enhances any room while showcasing your sewing skills. Every completed curtain becomes a unique work of art that reflects your creativity and makes excellent use of fabric scraps. If you enjoyed this tutorial, please leave your honest opinion in the comments and share your suggestions or creative ideas. Your feedback helps inspire future sewing and patchwork projects while encouraging other makers to begin their own handmade creations.