
The Cat Block Quilt Pattern is a wonderful quilting project for anyone who loves cats, handmade decorations, and creative fabric combinations. This charming design transforms ordinary fabric pieces into an adorable cat-shaped quilt block that can be used in quilts, wall hangings, pillow covers, table runners, and many other sewing projects.
Whether you are an experienced quilter or someone learning patchwork for the first time, creating a cat block is an enjoyable way to practice accurate cutting, careful piecing, and decorative fabric arrangement. The finished design can feature a simple geometric cat silhouette or a more detailed representation with separate sections for the ears, face, body, and tail. With the right fabric choices and a little patience, you can create a beautiful block that adds personality to any handmade quilt.
One of the most appealing features of the Cat Block Quilt Pattern is its versatility. You can choose traditional cotton fabrics, colorful prints, neutral backgrounds, or even fabrics with small floral and geometric patterns. Each combination gives the finished cat a different personality.
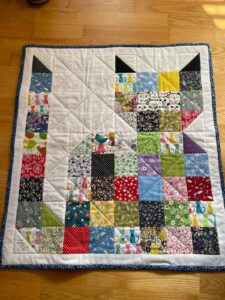
For example, black and white fabrics can create a classic cat appearance, while orange, gray, cream, and brown fabrics can represent different feline coat colors. You can also make several blocks using different combinations to create a collection of unique fabric cats. This makes the pattern particularly suitable for personalized gifts, children’s quilts, pet-themed decorations, and projects made from leftover quilting fabric.
The construction of a Cat Block Quilt Pattern usually involves combining small fabric squares and rectangles to form the recognizable silhouette of a cat. Depending on the chosen design, the block may include pointed ears, a square or rectangular face, a body, and a decorative tail.
The project can be completed using traditional patchwork techniques, making it a useful opportunity to improve your sewing accuracy. In this tutorial, you will learn how to organize your materials, prepare the fabric pieces, assemble the cat shape, and finish the block with neat seams. You will also discover practical customization ideas, common mistakes to avoid, and answers to frequently asked questions about making cat-themed quilt blocks.
Materials and Preparation for the Cat Block Quilt Pattern
Before beginning your Cat Block Quilt Pattern, gather the materials needed to create a clean and organized sewing workspace. The most important material is quilting cotton, which is generally easy to cut, sew, and press. Choose one main fabric color for the cat, another fabric for the background, and optional accent fabrics for the ears, face, or decorative details. A coordinated color palette will help the different sections work together without making the finished block look visually crowded.
You will also need a rotary cutter, cutting mat, quilting ruler, fabric scissors, sewing machine, matching thread, pins or fabric clips, and an iron. A seam ripper is useful for correcting small mistakes during assembly. Accurate cutting tools are particularly important because patchwork blocks depend on matching edges and consistent measurements. A small difference in the dimensions of several fabric pieces can affect the alignment of the entire design.
For this Cat Block Quilt Pattern, it is helpful to understand some common quilting terms. Patchwork means joining smaller fabric pieces to create a larger design. A quilt block is an individual unit that can later be combined with other blocks to form a quilt. Seam allowance refers to the fabric between the stitching line and the raw edge. A standard quilting seam allowance is usually 1/4 inch, approximately 6 mm, unless the pattern specifies otherwise.
Another important term is right sides together, which means placing the printed or finished sides of two fabric pieces facing each other before sewing. This technique keeps the seam allowances hidden when the pieces are opened and pressed. You should also understand the meaning of pressing seams. Pressing involves using an iron to flatten the sewn fabric without dragging it across the material. Proper pressing helps maintain the shape and accuracy of each patchwork section.
Before cutting your fabric, decide how large you want the finished cat block to be. An approximately 10-inch finished block is a convenient starting point for many small quilting projects. You can make it larger or smaller by adjusting the dimensions of the fabric pieces, but remember to maintain consistent seam allowances. Drawing a simple layout on paper can help you visualize the placement of the ears, face, body, and background sections before sewing.
Finally, wash and dry your quilting cotton if necessary, especially when combining fabrics from different collections. This helps reduce the possibility of unexpected shrinkage later. Press the fabric flat, remove loose threads, and organize the pieces according to their intended positions. Having everything prepared before sewing makes the Cat Block Quilt Pattern easier to assemble and helps prevent unnecessary interruptions.
Step-by-Step Instructions to Assemble the Cat Block Quilt Pattern
Begin by selecting the main fabric that will represent your cat. Cut the pieces according to your planned block dimensions. For an approximately 10-inch finished design, you can start with a face section measuring around 4 1/2 inches wide by 4 inches tall before sewing, two triangular ear sections, background rectangles, and additional pieces for the lower body. These are suggested construction measurements rather than a fixed commercial pattern, so adjust them to match your preferred layout.
Start by creating the cat’s ears. Cut two small squares from your main fabric and two corresponding background squares. Place each background square on top of a main fabric square, right sides together. Draw a diagonal line across the background square and sew along the marked line. Trim the excess fabric, leaving an appropriate seam allowance, then press the resulting triangular sections open. These units create the pointed appearance of the cat’s ears.
Next, prepare the face section. Position the two ear units at the upper corners of the face fabric, making sure the pointed sections face upward. Sew them carefully to the main face piece using a consistent 1/4-inch seam allowance. Press the seams gently toward the direction that creates the flattest surface. At this stage, the top portion of your Cat Block Quilt Pattern should begin to resemble a recognizable cat head.
Now add the background pieces around the face. Cut strips or rectangles to fill the remaining spaces on the left, right, and upper portions of the block. Sew these pieces to the face section one at a time, checking the alignment after each seam. Press the fabric flat after every addition. The background should frame the cat without covering the pointed ears or changing the intended proportions of the design.
To create the lower body, use a larger piece of the main cat fabric beneath the face. You can make a simple rectangular body for a geometric design or use smaller fabric sections to create a sitting-cat silhouette. Sew the body pieces together and attach them to the lower edge of the face section. If you want to include a tail, add a narrow strip of contrasting or matching fabric along one side of the body, arranging it into a curved or angled shape using several small patchwork pieces.
Once all the sections have been assembled, join the upper and lower portions of the block. Place the pieces right sides together, align the edges, and sew with a consistent seam allowance. Press the completed seams carefully. Measure the block from side to side and from top to bottom. If necessary, trim the outer edges so the finished patchwork unit has straight sides and square corners. Your basic Cat Block Quilt Pattern is now ready for the finishing stage.
Finishing, Decorating, and Customizing Your Cat Block Quilt Pattern
After completing the main patchwork construction, inspect the block carefully. Check whether the seams are secure, the corners are properly aligned, and the fabric lies flat. If you notice a small section that does not match correctly, use a seam ripper to remove the stitching and sew it again. Taking time to correct these details now will make the finished quilt look more professional. A well-pressed block is much easier to combine with other quilt sections.
You can personalize the cat’s face by adding embroidered eyes, a small nose, and whiskers. These details can be created with embroidery floss and a hand-sewing needle. If the quilt will be used by young children, embroidered details are generally preferable to small buttons or detachable decorations. They create a charming expression without introducing loose accessories that might become detached during use.
Fabric selection is another excellent way to customize your Cat Block Quilt Pattern. A solid-colored cat against a patterned background creates a simple and modern appearance. Alternatively, you can use floral fabric for the body and a contrasting solid fabric for the ears and face. Small-scale prints often work particularly well because they preserve the recognizable shape of the cat without making the design appear too busy.
If you want to create a larger quilt, consider repeating the cat block in different colors. You can arrange the blocks in straight rows, alternating them with plain fabric squares or complementary patchwork designs. Another possibility is to place each cat block inside a larger background square, creating additional space between the designs. This arrangement can help highlight each individual cat and make the overall quilt more balanced.
Once your block is complete, decide how it will be used. It can become part of a traditional patchwork quilt, a decorative pillow cover, a wall hanging, a fabric tote bag, or a small table decoration. If you plan to make a full quilt, calculate the number of blocks needed according to the finished dimensions and include additional fabric for borders, sashing, backing, and binding.
For a finished quilted project, layer the completed patchwork top with batting and backing fabric. Baste the layers together using your preferred method, then quilt through all three layers. Straight-line quilting around the cat shapes is a simple option, while gentle decorative stitching can add texture to the background. Finish the raw edges with binding to protect the quilt and give it a neat appearance. Following these finishing steps will help turn your individual Cat Block Quilt Pattern into a durable handmade project.
Quilting Tips, Common Mistakes, and Creative Project Ideas
One of the most important quilting tips is to measure every fabric piece carefully before cutting. Even small measurement differences can create problems when several patchwork sections are joined together. Use a quilting ruler and rotary cutter whenever possible, and check that the ruler is positioned correctly before making each cut. Consistent measurements make it easier to achieve straight seams and accurate corners.
Another common mistake is using an inconsistent seam allowance. If one seam is wider than another, the finished block may become smaller than expected or the pieces may not line up correctly. A 1/4-inch seam allowance is widely used in traditional quilting, so practice maintaining this measurement throughout the project. You can also test your machine settings on fabric scraps before sewing the actual block.
Pressing is just as important as sewing. Avoid pulling or stretching the fabric while ironing because this can distort the shape of the patchwork. Instead, lift and lower the iron gently. Pressing seams toward darker fabrics can also help reduce the appearance of seam allowances through lighter materials. These small techniques contribute to a flatter, more professional-looking quilt block.
If you are new to patchwork, begin with a simple cat design before attempting more complicated silhouettes. The Cat Block Quilt Pattern can be adapted to different skill levels. A basic square face with two triangular ears is an excellent beginner project, while more advanced quilters can experiment with curved tails, multiple fabric sections, and detailed geometric arrangements. Building confidence with a simple version makes more complex designs easier to manage.
You can also use this pattern as an opportunity to organize your fabric scraps. Small pieces of cotton left over from previous projects can be used for the ears, body, face, or background. Combining different prints can create the appearance of a patchwork cat with a unique personality. However, make sure the fabrics have similar weights so that the block remains relatively flat and easy to sew.
Finally, remember that quilting is a creative process, and handmade projects do not need to be perfectly identical to be beautiful. Small variations in fabric prints and color combinations can make every cat block special. Keep a record of the measurements and construction steps you use so that you can repeat the design more easily. With practice, you can develop a collection of personalized cat blocks for gifts, home decorations, and future quilting projects.
Frequently Asked Questions (FAQ)
1. Is the Cat Block Quilt Pattern suitable for beginners?
Yes. A simple cat block is suitable for beginners who understand basic sewing machine techniques and can work with straight seams. The design can be constructed from squares, rectangles, and half-square triangle units. Starting with a simple face and two pointed ears is a practical way to learn patchwork construction before attempting more detailed designs.
2. What fabric is best for making a cat quilt block?
Quilting cotton is generally the most convenient choice. It is easy to cut, has a stable structure, and works well with standard patchwork techniques. Using fabrics of similar weight and texture will help the pieces fit together more consistently.
3. What size should a cat quilt block be?
There is no single required size. An approximately 10-inch finished block is a useful starting point, but you can create smaller blocks for table runners or larger blocks for decorative quilts. The important thing is to plan the dimensions before cutting and account for the seam allowance.
4. How do I make pointed cat ears in a quilt block?
You can create pointed ears using half-square triangle techniques or by sewing diagonally across small background fabric squares. These triangular units can then be attached to the upper corners of the cat’s face. Carefully measuring and trimming the units will help produce symmetrical ears.
5. Can I use fabric scraps for the Cat Block Quilt Pattern?
Absolutely! Fabric scraps are excellent for this project. You can combine leftover cotton pieces to create different cat colors, patterned bodies, and contrasting backgrounds. Just make sure the scraps are large enough for the required pieces and have compatible fabric weights.
6. How can I add eyes and whiskers to my cat quilt block?
Embroidery is a simple way to add facial details. Use embroidery floss to stitch small eyes, a nose, and whiskers after the patchwork block has been assembled. For projects intended for children, securely embroidered details are a practical alternative to small detachable decorations.
7. Why are my quilt block pieces not lining up correctly?
The most common causes are inaccurate cutting, inconsistent seam allowances, and fabric stretching during pressing. Check your measurements, use a consistent 1/4-inch seam allowance, and press the seams carefully. Sewing a small test block can help identify measurement problems before working on the final design.
8. Can I make a complete quilt using several cat blocks?
Yes! You can repeat the same design using different fabric combinations and arrange the blocks in rows. Add sashing or plain fabric squares between the blocks if you want more separation. Borders and a coordinated backing fabric can help create a complete and balanced quilt.
9. What is the best way to finish a cat quilt block?
After completing the patchwork, trim the block to the desired dimensions and press it flat. If it will be used in a quilt, combine it with batting and backing fabric, baste the layers, quilt through them, and finish the edges with binding. If it will be used as a pillow or another small project, adapt the finishing method to that purpose.
10. Can I make different cat designs using the same pattern?
Definitely! You can change the main fabric colors, adjust the shape of the ears, create different tails, and add facial details. A simple geometric cat can become a black cat, orange tabby, gray kitten, or colorful decorative character simply by changing the fabric arrangement.
Conclusion
The Cat Block Quilt Pattern is a creative and enjoyable way to bring a love of cats into handmade quilting projects. In this tutorial, you learned how to select the right materials, prepare and cut the fabric, construct the cat’s ears and face, assemble the body, and complete the patchwork block. You also discovered how to add embroidered details, choose different fabric combinations, create multiple blocks, and transform your finished design into a quilt, pillow cover, or decorative wall hanging.
By practicing accurate cutting, maintaining consistent seam allowances, and pressing each section carefully, you can create a beautiful cat block with a neat and balanced appearance. Whether you prefer a simple geometric design or a more detailed feline silhouette, this pattern offers plenty of opportunities to experiment and express your creativity.
Now we would love to hear from you! Have you tried making a Cat Block Quilt Pattern? Which fabric colors and cat designs would you choose for your project? Please leave your honest opinion in the comments and share your suggestions for other quilting patterns you would like to see. Your ideas and experiences can inspire other quilting enthusiasts to create their own beautiful handmade designs.