
Cat Quilt Tutorial is a creative sewing project that combines traditional quilting techniques with an adorable feline-inspired design, making it an appealing choice for anyone who enjoys handmade home décor.
One of the advantages of following a Cat Quilt Tutorial is that the project provides an excellent opportunity to use fabric scraps left from previous sewing projects.
Accuracy is important when making a cat quilt pattern, but the project does not need to feel intimidating. The construction can be divided into manageable stages: selecting fabrics, cutting the pieces, assembling individual cat blocks, joining those blocks, creating the quilt sandwich, quilting the layers, and attaching the binding. Working slowly and checking measurements throughout the process can prevent small inaccuracies from accumulating. A consistent 1/4-inch seam allowance is particularly helpful when piecing quilt blocks. The following instructions explain each stage in detail so that both confident beginners and experienced quilters can adapt the project to create a charming handmade quilt.
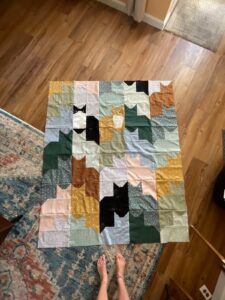
Materials, Fabric Selection, and Cutting for the Cat Quilt
Start your Cat Quilt Tutorial by gathering basic quilting supplies. You will need quilting cotton for the cats, contrasting background fabric, batting, backing fabric, coordinating sewing thread, a sewing machine, an iron, an ironing board, fabric scissors, pins or clips, and a ruler. A rotary cutter and cutting mat are extremely useful for achieving accurate pieces, although careful cutting with scissors can also work. Choose fabrics that have enough contrast so that the outline of each cat remains easy to recognize after the blocks are assembled.
For a manageable beginner project, consider making cat blocks approximately 10 to 12 inches square before joining them together. A small wall quilt could contain four blocks arranged in two rows, while a lap quilt might use twelve or more blocks. These dimensions are flexible rather than mandatory. The most important consideration is keeping the measurements consistent from one block to another so that the rows align properly when the quilt top is assembled.
A simple cat quilt block can be constructed from rectangles, squares, and triangles. For a 10-inch unfinished block, you might begin with a cat body rectangle measuring approximately 5 × 6 inches, a head section approximately 5 × 3 inches, and smaller squares for creating the ears. Background pieces can then be positioned around the cat to complete the square block. Add approximately 1/4 inch around individual design components where seam allowances are required.
To create triangular ears without cutting complicated templates, place a small background square on the upper corner of the cat-head fabric with right sides together. Draw a diagonal guideline from one corner to the opposite corner. Sew directly along the marked line, trim the excess fabric approximately 1/4 inch beyond the stitching, and press the remaining triangle outward. Repeat this process on the opposite side while reversing the direction of the diagonal. The resulting points create recognizable cat ears using straightforward patchwork techniques.
Cut all pieces for one test block before cutting enough fabric for the entire quilt. Assemble that first block and measure it carefully. If the dimensions and proportions look correct, use those measurements as your reference for the remaining blocks. This simple test can save fabric and prevent repeated cutting errors. Once you are satisfied, organize the pieces for each block into separate stacks so that the different colors and prints remain easy to coordinate.
Fabric placement can dramatically change the personality of your Cat Quilt Tutorial project. Dark cats against pale backgrounds produce strong silhouettes, while colorful patterned cats create a playful patchwork appearance. Black, gray, cream, orange, brown, and white fabrics can suggest familiar cat colors, but there is no need to limit yourself to realistic combinations. Purple, teal, pink, yellow, or multicolored cats can create an equally attractive quilt, especially when the overall fabric palette remains visually coordinated.
Step-by-Step Cat Quilt Block Assembly
Begin assembling each cat quilt block by constructing the head. Position the ear units carefully so that both points face upward and remain approximately symmetrical. Sew the head pieces together using a consistent 1/4-inch seam allowance. Press each seam after sewing rather than waiting until the entire block is complete. Pressing as you work keeps the patchwork flat and makes subsequent seams easier to match.
Next, prepare the body section. Depending on the design you want, the body can be a simple rectangle or a combination of several fabric pieces. A single rectangle gives the quilt a clean and modern appearance, while smaller patchwork sections add visual texture. Sew any body pieces together and press the seams carefully. Measure the completed body section before attaching it to the head so that both components remain compatible in width.
Place the completed cat head and body with right sides together, aligning their raw edges. Pin or clip the pieces to prevent shifting and sew across the joining edge with a 1/4-inch seam allowance. Press the seam toward the darker fabric whenever practical. At this stage, the basic patchwork cat should become clearly recognizable. If the head and body widths differ slightly, carefully trim the wider section rather than stretching the smaller piece during sewing.
Add background strips or rectangles around the cat unit to transform it into a complete square or rectangular quilt block. Attach side strips first and press them outward, followed by the upper and lower background sections. After pressing, place the block on your cutting mat and square it to the desired unfinished measurement. Squaring every block to exactly the same dimensions is one of the most important steps for producing straight rows later.
Optional facial details can give each cat additional personality. Small embroidered eyes, whiskers, noses, or mouths can be added before the quilt sandwich is assembled. Keep these elements simple so that they complement rather than overwhelm the patchwork. If the quilt will be used by a baby or young child, stitched or embroidered details are generally preferable to loose decorative pieces such as buttons because everything remains securely integrated into the fabric.
Repeat the same construction process until you have enough blocks for your planned quilt dimensions. Arrange the finished cat quilt blocks on a clean floor, large table, or design wall before sewing them together. Rotate colors and prints until the composition feels balanced. Try to avoid placing several very dark or visually busy blocks together unless that arrangement is intentional. Taking a photograph of the final layout can help you remember the order while assembling the rows.
Joining the Blocks and Quilting the Layers
Once you are happy with the arrangement, begin joining the blocks horizontally. Place the first two blocks right sides together and carefully align their edges and important seam intersections. Sew them together with a 1/4-inch seam allowance. Continue adding blocks until the first row is complete. Assemble every remaining row using the same method, checking periodically that the blocks remain in the intended order.
Press the seams of alternating rows in opposite directions. For example, press the seams in the first row toward the right and those in the second row toward the left. This allows corresponding seams to nest together when the rows are joined, making accurate alignment easier. Pin the intersections before sewing each row connection. After all rows are attached, press the completed cat quilt top carefully without pulling or stretching the edges.
If desired, add borders around the quilt top. A simple border between 2 and 4 inches wide can frame the cats and create additional visual space around the design. Measure the quilt through the center rather than simply cutting border strips based on the outer edges. Sew the side borders first, press them outward, and then attach the upper and lower borders. This method helps maintain a square and balanced quilt top.
Prepare the quilt sandwich by placing the backing fabric wrong side facing upward on a clean flat surface. Smooth it carefully and secure it temporarily if necessary. Position the batting over the backing and smooth away wrinkles. Finally, center the quilt top over the batting with the right side facing upward. The backing and batting should extend beyond the quilt top on every side to allow for small shifts during quilting.
Baste the three layers together using safety pins, temporary basting spray according to its instructions, or long hand-basting stitches. Begin near the center and work toward the edges so that wrinkles are not trapped between the layers. For a beginner-friendly quilting method, sew straight lines along the major block seams. This technique, sometimes called stitching in the ditch when sewn very close to seam lines, emphasizes the patchwork structure without requiring complicated free-motion quilting.
Continue quilting from the center toward the outer edges. Avoid quilting one entire side before moving to the other because balanced stitching helps reduce distortion. Additional diagonal, vertical, or horizontal lines can be added if you want a denser texture. The appropriate quilting distance also depends on the batting manufacturer’s recommendations. When the quilting is complete, trim the excess backing and batting so that all layers are even with the edges of the quilt top.
Binding, Finishing Details, FAQ, and Final Tips
The final construction stage in this Cat Quilt Tutorial is binding the raw edges. Cut fabric strips approximately 2 1/4 to 2 1/2 inches wide and join them end to end with diagonal seams until you have enough length to travel around the entire quilt plus several extra inches. Press the long strip in half lengthwise with wrong sides together to create double-fold quilt binding.
Starting away from a corner, align the raw edges of the folded binding with the raw edge on the front of the quilt. Leave several inches of loose binding at the beginning. Sew with approximately a 1/4-inch seam allowance. At each corner, use a standard mitered-corner technique by stopping before the edge, folding the strip upward, then folding it downward along the next side before continuing to sew.
When you approach the starting point, join or neatly overlap the binding ends according to your preferred method. Fold the binding around the raw edge toward the back of the quilt. The folded edge should cover the previous stitching line. Secure it with clips and finish it either by hand with small invisible stitches or by machine. Hand stitching gives a traditional finish, while machine binding can be faster and very durable.
Give the completed quilt a final inspection. Remove loose threads and check that the binding is secure around every corner. If you added embroidery to the cats, verify that all thread ends are firmly secured. Lightly press the quilt if necessary, taking care not to flatten textured quilting excessively. Your finished Cat Quilt Tutorial project should now display clearly defined cat shapes surrounded by neat patchwork and coordinated quilting.
FAQ About the Cat Quilt Tutorial
Is a Cat Quilt Tutorial suitable for beginners? Yes. A design based primarily on squares, rectangles, and simple triangle corners can be very approachable for beginners. Practicing accurate cutting, maintaining a consistent 1/4-inch seam allowance, and pressing after each construction stage will make the process considerably easier.
What fabric works best for a cat quilt? Quilting cotton is an excellent choice because it is stable, easy to cut, and simple to press. Using fabrics with similar weights also helps the blocks behave consistently during construction and quilting.
Can I make the cat quilt with fabric scraps? Absolutely. A scrap fabric cat quilt is a practical way to use smaller leftover pieces. Try coordinating scraps by color family or repeating one background fabric throughout the quilt to create visual consistency.
How large should each cat quilt block be? There is no single required size. Blocks around 10 to 12 inches are convenient for many projects, but smaller blocks can create detailed wall hangings and larger blocks can speed up the construction of lap or bed quilts.
Do I need a special sewing machine for quilting? No. A regular domestic sewing machine can handle many small and medium quilting projects. A walking foot can make quilting multiple layers easier, but simple straight-line quilting can often be completed successfully with standard equipment and careful handling.
How can I make the cat shapes more noticeable? Contrast is the key. Select cat fabrics that are noticeably lighter or darker than the background. Strong differences in value help the silhouette remain visible even when patterned fabrics are used.
Should I add facial features to every cat? This is optional. Leaving the cats without faces creates a modern silhouette style, while embroidered eyes, noses, and whiskers produce a more playful appearance. You can also add details to only a few cats for subtle variation.
How can I keep my quilt blocks from becoming uneven? Accurate cutting and consistent seam allowances are essential. Measure each completed block and square it carefully before joining the quilt top. Pressing rather than aggressively stretching the fabric also helps preserve accurate dimensions.
Can I enlarge this Cat Quilt Tutorial into a bed quilt? Yes. Simply create additional blocks and arrange them into more rows and columns. Remember to calculate additional fabric for the background, backing, batting, borders, and binding before beginning a larger version.
What quilting design works well with cat blocks? Straight-line quilting is one of the easiest options and complements geometric patchwork nicely. You can quilt along block seams, create a grid, or add gentle diagonal lines. More experienced quilters can also use free-motion patterns in the background areas.
Conclusion
Completing this Cat Quilt Tutorial involves several fundamental quilting skills that can be reused in countless future projects. You learned how to choose coordinated quilting fabrics, calculate practical block dimensions, cut geometric pieces, construct cat ears, assemble the head and body, add background sections, and square individual blocks before joining them together.The tutorial also covered how to arrange multiple cat quilt blocks into balanced rows, match important seam intersections, add optional borders, and prepare the backing, batting, and quilt top. These steps transform a collection of individual patchwork pieces into a unified quilt and provide valuable practice with accurate piecing.
After assembling the quilt sandwich, simple straight-line quilting can secure all three layers while highlighting the geometric structure of the cats. Finally, trimming the quilt and adding neatly finished binding creates a polished edge that completes the handmade project.One of the most enjoyable aspects of this Cat Quilt Tutorial is its flexibility. You can create realistic cats from black, orange, gray, brown, and cream fabrics or experiment with colorful prints for a whimsical appearance. You can also change the number of blocks, borders, facial details, and quilting pattern to make every version unique.
Whether the finished project becomes a wall hanging, lap quilt, decorative throw, or handmade gift, the same fundamental process can be adapted to different dimensions and fabric collections. Careful measuring, consistent seams, regular pressing, and patient assembly are the most important habits for achieving a neat result.Now that you know the complete process for creating a cat quilt, feel free to personalize the pattern and make it reflect your own quilting style. If you try this project, leave your sincere opinion about the tutorial and share any suggestions, fabric combinations, or creative changes you would make. Your ideas may inspire new variations and help other quilting enthusiasts discover even more possibilities for this charming handmade project.