
Log Cabin Quilt Block Pattern is one of the most beloved quilt designs in the world, admired for its timeless appearance, simple construction, and endless creative possibilities.
Creating a beautiful Log Cabin Quilt Block Pattern does not require expensive materials or advanced techniques.
One of the greatest advantages of learning a Log Cabin Quilt Block Pattern is the confidence it builds. Every strip added around the center square teaches valuable quilting skills, including pressing seams correctly, maintaining consistent measurements, and achieving perfect alignment. As your block grows larger, you will see how simple steps gradually transform into a sophisticated geometric design. By following each stage carefully and paying attention to detail, you can create a professional-looking quilt block that will become the foundation of many future quilting projects.
Choose Fabrics and Prepare Your Materials
Before sewing your Log Cabin Quilt Block Pattern, gather all the materials needed for a smooth quilting experience. You will need cotton quilting fabric, a rotary cutter, quilting ruler, cutting mat, sewing machine, neutral thread, pins or clips, and an iron. High-quality cotton fabrics are recommended because they are stable, easy to sew, and produce crisp seams.
Begin by selecting a color palette that creates contrast. Traditionally, the center square is red to symbolize the warmth of a fireplace, while one side of the block uses light fabrics and the opposite side uses darker fabrics. Although this classic arrangement is beautiful, modern quilters often experiment with florals, solids, batiks, or seasonal prints.
Cut one center square measuring approximately 2½ x 2½ inches. Then cut multiple fabric strips measuring 2½ inches wide. The strip lengths gradually increase because each new round wraps around the growing block. Preparing all your strips before sewing makes the process much easier.
Organize the strips into separate piles according to color value. Keeping light and dark fabrics separated prevents confusion while sewing and helps maintain the traditional visual effect that makes the Log Cabin Quilt Block Pattern so recognizable.
Press every fabric piece before cutting. Wrinkled fabric can lead to inaccurate measurements and uneven seams, which become more noticeable as the block grows larger. Smooth fabric contributes to cleaner construction and more accurate results.
Finally, double-check every measurement before making the first stitch. Spending a few extra minutes preparing your materials saves time later and helps ensure every block finishes at the correct size.
Step-by-Step Instructions to Make the Block
Place the center square right side up. Position the first strip along one side of the square with right sides together and sew using a consistent ¼-inch seam allowance. Press the seam toward the newly added strip before trimming any excess fabric.
Rotate the block clockwise. Add the second strip to the adjacent side, sewing with the same seam allowance. Press carefully after each seam instead of waiting until the entire block is finished. Frequent pressing keeps the block flat and accurate.
Continue adding strips one at a time, always rotating the block in the same direction. This repetitive sequence creates the distinctive spiral appearance associated with the Log Cabin Quilt Block Pattern. Maintaining the same order throughout the project ensures consistency among multiple blocks.
Alternate between light and dark fabrics as you add each new strip. This color placement creates movement and visual depth, allowing the finished quilt design to stand out once several blocks are arranged together.
Trim the edges occasionally using a quilting ruler to maintain perfectly straight sides. Although minor imperfections are normal during construction, regular trimming prevents measurement errors from accumulating throughout the project.
Repeat the process until your block reaches the desired size. Many quilters finish with 10½-inch or 12½-inch unfinished blocks, but the dimensions can easily be adjusted depending on the overall quilt design and intended project.
Create Stunning Quilt Layouts with Your Log Cabin Blocks
Once several Log Cabin Quilt Block Pattern units are completed, the real creativity begins. One of the reasons this classic design has remained popular for generations is that the same block can produce dozens of completely different quilt layouts simply by rotating each block before sewing them together. This flexibility allows every quilt to have its own unique personality without changing the basic construction method.
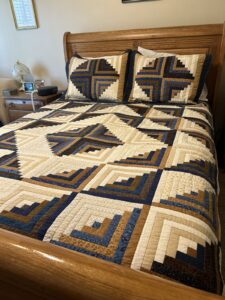
A traditional arrangement places all the dark sides of the blocks facing inward, creating a striking barn-raising effect that forms diamonds radiating from the center of the quilt. This dramatic layout is often considered one of the most iconic ways to showcase a Log Cabin Quilt Block Pattern, and it works beautifully with both modern prints and traditional fabrics.
Another popular option is the straight furrows layout, where all blocks are oriented in the same direction. This creates diagonal lines that flow across the quilt, giving the finished piece a sense of movement while maintaining a clean and organized appearance. It is an excellent choice for beginners because arranging the blocks is straightforward.
You can also rotate the blocks to create cheerful pinwheel designs, woven effects, stars, crosses, or zigzag patterns. Before sewing the rows together, place all the blocks on a flat surface or a design wall. Viewing the complete arrangement allows you to make adjustments until the colors and values are balanced across the quilt.
If you are using scrap fabrics, distribute similar colors evenly throughout the layout instead of clustering them together. A balanced arrangement helps the eye move naturally across the quilt and prevents one area from appearing too heavy or too bright. Taking a few extra minutes during this stage can significantly improve the overall visual impact.
After deciding on the final layout, sew the blocks together row by row using a consistent ¼-inch seam allowance. Press the seams carefully, matching every intersection as accurately as possible. Once all rows are complete, join them together to reveal the beautiful overall design created by your Log Cabin Quilt Block Pattern.
Finishing the Quilt for a Professional Result
With the quilt top assembled, it is time to transform it into a finished project. Begin by trimming the edges so that every side is perfectly square. Accurate trimming makes adding borders and binding much easier and contributes to a polished appearance.
If you wish to include borders, measure the quilt through its center rather than along the outer edges. This technique helps prevent stretching and keeps the finished quilt flat. Simple solid borders highlight colorful blocks, while pieced borders add additional visual interest for more elaborate projects.
Next, prepare the quilt sandwich by layering the backing fabric with the right side facing down, the batting in the middle, and the quilt top facing up. Smooth each layer carefully to remove wrinkles before securing everything with quilting pins or temporary spray adhesive. Proper preparation prevents shifting during quilting.
Choose a quilting design that complements the Log Cabin Quilt Block Pattern. Straight-line quilting emphasizes the geometric structure, while free-motion quilting adds texture and softness. Beginners often find simple diagonal or vertical quilting lines easier to manage while still producing attractive results.
After quilting is complete, trim away the excess batting and backing fabric. Attach double-fold binding around the edges using your preferred method, taking extra care to create neat mitered corners. Well-finished binding frames the quilt beautifully and increases its durability for years of use.
Before calling your project complete, inspect every seam, remove loose threads, and give the quilt a final press. This last step enhances the crispness of the fabrics and showcases all the careful work invested in creating your beautiful Log Cabin Quilt Block Pattern.
Frequently Asked Questions
What is a Log Cabin Quilt Block Pattern?
A Log Cabin Quilt Block Pattern is a traditional quilt block made by sewing fabric strips around a central square in a continuous spiral. It is one of the oldest and most recognizable quilt block designs.
Is this pattern suitable for beginners?
Yes. Because the construction follows a simple sequence of adding one strip at a time, it is an excellent project for beginners who want to practice accurate cutting, pressing, and seam allowances.
What fabric works best?
High-quality quilting cotton is the preferred choice. It is stable, easy to cut accurately, and provides consistent results during sewing and pressing.
Can I use fabric scraps?
Absolutely. Scrap fabrics are ideal for a Log Cabin Quilt Block Pattern. Mixing different prints and colors creates unique blocks while making excellent use of leftover materials.
What size should the strips be?
Many quilters use strips that are 2½ inches wide, although any consistent width can be used depending on the desired finished block size.
How can I keep my blocks accurate?
Use a precise ¼-inch seam allowance, press after every seam, trim the block periodically, and verify measurements throughout the construction process. These habits greatly improve the final result.
How many blocks are needed for a quilt?
The number depends on the finished quilt size and the dimensions of each block. Baby quilts may require only a few blocks, while queen-size quilts often include dozens of blocks arranged in repeating patterns.
Can I make modern versions of this pattern?
Yes. Modern interpretations often feature bold solids, low-volume prints, oversized center squares, or asymmetrical color placement while preserving the classic strip-building technique.
Conclusion
The Log Cabin Quilt Block Pattern continues to be one of the most rewarding quilting projects because it combines simplicity, creativity, and timeless beauty.
By learning how to choose fabrics, prepare accurate cuts, sew strips in the correct sequence, arrange blocks into eye-catching layouts, and finish the quilt professionally, you can create a project that is both durable and visually stunning. Whether you prefer traditional color schemes or contemporary fabric collections, this versatile block offers endless opportunities for creative expression and skill development.
I hope this guide has helped you understand every step needed to successfully create your own Log Cabin Quilt Block Pattern from start to finish. If you enjoyed this tutorial, please leave your honest opinion in the comments and share your suggestions. Your feedback is greatly appreciated and helps inspire future quilting tutorials for makers of every skill level.