
Shooting Star Quilt Pattern is a beautiful quilting project that combines the timeless elegance of classic star blocks with the dynamic movement of a shooting star across the night sky.
One of the most appealing features of the Shooting Star Quilt Pattern is how it creates the illusion of movement.
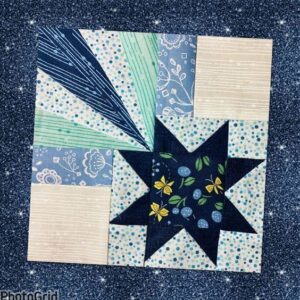
Even if you have only moderate quilting experience, this project is very approachable. The block uses traditional patchwork techniques such as half-square triangles, flying geese units, and carefully arranged rectangles and squares. With accurate cutting, consistent seam allowances, and careful pressing, you’ll be able to recreate the elegant block shown in the photo while also adding your own personal touch through fabric selection. The Shooting Star Quilt Pattern is both enjoyable to sew and rewarding to finish.
Choosing Fabrics and Preparing Your Materials
Begin by selecting fabrics with good contrast. The sample shown uses navy blue, soft aqua, light cream, and white prints, creating a calm yet striking appearance. A dark fabric works wonderfully for the center star, while lighter fabrics help define the background and make every point stand out clearly.
For a finished block measuring approximately 12 inches, prepare quilting cotton fabrics in four to five coordinating colors. You’ll also need rotary cutter, quilting ruler, cutting mat, pins, matching thread, sewing machine, iron, and pressing surface. High-quality cotton fabric helps maintain accurate seams and crisp points.
Cut the background squares and rectangles first since these form the framework of the design. Organizing every piece before sewing reduces mistakes and makes assembly much smoother. Labeling each group of pieces can also help if you’re making multiple blocks.
The shooting star rays are created using elongated triangles and carefully arranged geometric units. Cut these pieces precisely because even small inaccuracies may affect the alignment of the rays. Sharp rotary blades improve cutting accuracy considerably.
For the center star, prepare one feature square using your favorite focal fabric. Floral prints, berries, tiny leaves, or seasonal motifs work especially well because they naturally attract attention to the center of the block.
Finally, lay every cut piece on a design board or flat surface before sewing. Viewing the complete arrangement allows you to make small adjustments to color placement before stitching begins, ensuring the finished Shooting Star Quilt Pattern looks balanced and harmonious.
Sewing the Shooting Star Quilt Block Step by Step
Start by assembling the center star. Sew the small background triangles around the central feature square, forming the classic eight-point star. Maintain a consistent ¼-inch seam allowance throughout the project for the best results.
Next, construct the corner units surrounding the star. These sections consist of squares and half-square triangle units that frame the center while keeping the design symmetrical. Press the seams carefully after each step to minimize bulk.
Create the shooting star rays separately. Join the long triangular pieces together, alternating light and dark fabrics to create the appearance of motion. The changing fabric directions add visual energy and give the impression of a star traveling through the sky.
Once the rays are complete, attach them to the upper left section of the block. Align the long diagonal seams carefully so the rays flow naturally toward the center star. Take your time pinning before sewing to prevent shifting.
Assemble the remaining background sections by joining the cream and blue rectangles with the surrounding units. These larger pieces stabilize the design and provide visual breathing space around the more detailed star and ray sections.
Finish the block by joining all major sections together. Press the completed block thoroughly from the back, then check that the final measurements remain accurate. Trimming only if necessary helps preserve sharp points and clean edges throughout the finished Shooting Star Quilt Pattern.
Tips for Precision, Color Balance, and Professional Results
Accurate cutting is one of the biggest factors in achieving beautiful patchwork. Replace rotary blades regularly and always use a quilting ruler with clear markings to ensure each piece is identical.
Pressing is equally important. Instead of ironing back and forth, press the seams gently to avoid stretching the fabric. Many experienced quilters prefer pressing seams to one side before nesting them during assembly.
High contrast between the star and background makes the design stand out beautifully. Deep navy, charcoal, forest green, or burgundy pair nicely with soft creams, whites, pale blues, or light gray backgrounds.
Directional fabrics should be used thoughtfully. If your prints feature flowers, leaves, or text, pay attention to orientation while cutting so the finished block maintains a polished appearance from every angle.
Chain piecing can speed up construction if you’re making several blocks. Sewing identical units consecutively reduces thread waste and helps maintain consistent seam allowances throughout the project.
Before attaching the final sections, arrange the completed units on a flat surface and compare them with your planned layout. Taking a few extra minutes to verify placement often prevents unnecessary seam ripping later.
Creative Ways to Use the Shooting Star Quilt Pattern
A single Shooting Star Quilt Pattern block makes a stunning wall decoration, especially when framed with multiple coordinating borders. Seasonal fabrics can transform the design into holiday décor or year-round home decoration.
Several blocks sewn together create an impressive throw quilt. Alternate the shooting star blocks with simple solid blocks or traditional nine-patch blocks for additional visual interest without overwhelming the overall design.
The block also works beautifully as the centerpiece of a quilted table runner. Add narrow borders and coordinating binding to create an elegant decoration suitable for dining tables, coffee tables, or entryway furniture.
Pillows are another wonderful project option. A single block can easily become the front panel of a decorative cushion that adds handcrafted charm to a living room, bedroom, or reading corner.
Miniature versions of the block can be transformed into placemats, mug rugs, or even quilted tote bag panels. Reducing the block size allows you to enjoy the design in many practical sewing projects.
If you’re building a sampler quilt, the Shooting Star Quilt Pattern pairs beautifully with classic stars, flying geese, pinwheel blocks, and log cabin designs. The mixture creates visual movement while maintaining a cohesive traditional quilting style.
FAQ
Is the Shooting Star Quilt Pattern suitable for beginners?
Yes. Confident beginners who are comfortable with basic rotary cutting, accurate seam allowances, and simple patchwork units can successfully complete this project by working carefully and following each construction step.
What finished size should I make?
The photographed block is approximately 12 inches, but you can easily resize the pattern by adjusting the dimensions of the individual pieces while maintaining the same proportions.
Which fabrics work best?
100% quilting cotton is recommended because it is easy to sew, presses well, and provides excellent durability. Choose fabrics with strong contrast between the star and the background.
Can I use fabric scraps?
Absolutely. This pattern is an excellent scrap quilting project because many of the individual pieces are relatively small. Coordinating scraps can produce a charming and unique finished block.
How do I keep my star points sharp?
Accurate cutting, precise ¼-inch seams, careful pressing, and avoiding excessive trimming will help preserve crisp star points throughout construction.
What batting is recommended if I turn it into a quilt?
A lightweight cotton batting provides a soft traditional finish while maintaining excellent stitch definition for quilting designs.
How should I quilt this block?
Straight-line quilting emphasizes the geometric shapes, while gentle free-motion swirls can enhance the feeling of movement suggested by the shooting star.
Can I make an entire quilt using only this block?
Yes. Repeating the Shooting Star Quilt Pattern creates a stunning quilt with continuous visual motion. Rotating some blocks can produce even more interesting secondary designs across the finished quilt.
Conclusion
The Shooting Star Quilt Pattern is a delightful quilting project that combines traditional patchwork techniques with an imaginative layout inspired by the beauty of a shooting star crossing the night sky. Throughout this tutorial, you learned how to choose balanced fabrics, prepare accurate cuts, assemble the center star, construct the dynamic shooting star rays, join every section with precision, and finish the block with professional quilting practices. You also discovered practical tips for improving accuracy, selecting harmonious color combinations, and using the completed block in quilts, table runners, pillows, wall hangings, and many other creative projects.
Whether you decide to sew a single decorative block or create an entire quilt, this design offers endless opportunities to express your creativity while strengthening your quilting skills. Every finished block becomes a unique combination of color, texture, and craftsmanship that reflects your personal style.
If you enjoyed this tutorial for the Shooting Star Quilt Pattern, I would love to hear your honest opinion. Feel free to share your experience, tell us which fabrics you chose, and leave your sincere suggestions or ideas for future quilting projects. Your feedback can inspire and encourage other quilters to start their own beautiful handmade creations.