
Tutorial for a backpack made from jeans is an exciting and sustainable way to transform old denim into a stylish and functional accessory. If you have unused jeans at home, this project offers the perfect opportunity to recycle fabric while creating something practical and unique. Throughout this guide, you will learn step by step how to design, cut, and sew your own backpack using simple techniques that are suitable for beginners and intermediate crafters alike.
The beauty of a Tutorial for a backpack made from jeans lies in its combination of creativity and sustainability. Instead of discarding old clothing, you can repurpose it into a fashionable item that reflects your personal style. Denim is a strong and durable fabric, making it ideal for backpacks that need to withstand daily use. This project not only helps reduce waste but also allows you to create a handmade piece that stands out.
In this complete Tutorial for a backpack made from jeans, we will cover everything from selecting the right materials to assembling and customizing your backpack. You will also discover helpful tips to ensure your finished product looks polished and professional. By following this guide, you will gain confidence in your sewing skills and enjoy the rewarding process of making something truly your own.
Materials and Preparation for Tutorial for a backpack made from jeans
To start your Tutorial for a backpack made from jeans, you need to gather the right materials. The most important item is, of course, a pair of old jeans. Choose denim that is still in good condition, as it will determine the durability of your backpack.
You will also need basic sewing tools such as scissors, pins, a measuring tape, and a sewing machine. While it is possible to sew by hand, using a sewing machine will make the process faster and ensure stronger seams.
Lining fabric is another essential component in this Tutorial for a backpack made from jeans. It provides structure and helps protect your belongings inside the backpack. Cotton fabric is a popular choice for lining because it is lightweight and easy to work with.
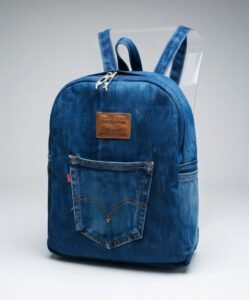
Straps are crucial for functionality. You can either reuse parts of the jeans, such as waistbands, or use ready-made straps. Adjustable straps are recommended for comfort and practicality.
You may also want to include accessories such as zippers, buttons, or magnetic closures. These elements enhance both the look and usability of your backpack.
Preparing your workspace is just as important. Make sure you have enough room to cut fabric and organize your tools. A clean and well-lit area will make your Tutorial for a backpack made from jeans much more enjoyable and efficient.
Step-by-Step Tutorial for a backpack made from jeans
The first step in your Tutorial for a backpack made from jeans is cutting the fabric. Lay your jeans flat and carefully cut out the sections you plan to use, such as the legs or back panels. These pieces will form the main body of your backpack.
Next, measure and cut your lining fabric to match the size of your denim pieces. This ensures that both layers fit together perfectly when assembled.
Once your pieces are ready, begin sewing the outer body of the backpack. Start by stitching the sides and bottom together, making sure the seams are secure. This step forms the main structure of your bag.
After completing the outer shell, repeat the process with the lining fabric. Then, place the lining inside the denim shell, aligning the edges carefully.
In this Tutorial for a backpack made from jeans, attaching the straps is a key step. Sew them securely to the top and bottom of the backpack, reinforcing the stitches to ensure durability.
Finally, add your closure system, such as a zipper or button. Once everything is in place, turn the backpack right side out and make final adjustments to ensure a neat finish.
Tips for a Professional Finish in Tutorial for a backpack made from jeans
Achieving a professional look in your Tutorial for a backpack made from jeans requires attention to detail. One of the most important tips is to press your fabric before and after sewing. This helps create clean lines and precise seams.
Using strong thread is also essential. Denim is a thick material, so a durable thread will prevent seams from breaking over time.
Another useful technique is double stitching. Reinforcing your seams ensures that your backpack can handle daily use without falling apart.
Take your time when aligning fabric pieces. Accurate alignment is key to achieving a balanced and symmetrical design in your Tutorial for a backpack made from jeans.
Consider adding pockets for extra functionality. You can reuse the original pockets from the jeans to give your backpack a unique and practical feature.
Lastly, don’t rush the finishing touches. Trim excess threads and check all seams carefully. These small details make a big difference in the overall quality of your project.
Creative Ideas and Customization for Tutorial for a backpack made from jeans
One of the best parts of a Tutorial for a backpack made from jeans is the opportunity to personalize your design. You can add patches, embroidery, or fabric paint to create a unique look.
Mixing different denim shades can also add visual interest. Combining light and dark denim pieces creates a stylish contrast that enhances your backpack’s appearance.
You can also experiment with different shapes and sizes. Whether you prefer a compact backpack or a larger one for daily use, this tutorial can be adapted to suit your needs.
Adding decorative elements such as buttons, studs, or lace can give your backpack a distinctive style. These details allow you to express your creativity.
Another idea is to include a drawstring closure for a casual and trendy look. This variation adds both functionality and charm to your backpack.
With this Tutorial for a backpack made from jeans, the possibilities are endless. Each backpack you create can be completely different, reflecting your personal taste and creativity.
Tutorial for a backpack made from jeans
Many people wonder if a Tutorial for a backpack made from jeans is suitable for beginners. The answer is yes. With basic sewing knowledge and patience, even beginners can successfully complete this project.
Another common question is how long it takes to make a backpack. Depending on your experience, it can take anywhere from a few hours to a full day.
People often ask what type of jeans work best. Medium to heavy-weight denim is ideal because it provides durability and structure.
A frequent concern is whether the backpack is washable. Yes, most denim backpacks can be gently washed and air-dried to maintain their shape.
Some also ask if it’s possible to make the backpack without a sewing machine. While it is possible, using a machine is recommended for stronger and more consistent results.
Lastly, many want to know how to make their backpack more durable. Reinforced seams, quality materials, and careful construction are key to ensuring longevity in your Tutorial for a backpack made from jeans.
Conclusion
In this complete Tutorial for a backpack made from jeans, you have learned how to transform old denim into a stylish and functional accessory. From gathering materials to sewing and customizing your design, each step plays an important role in creating a high-quality backpack.
This project not only helps you develop your sewing skills but also encourages sustainable practices by reusing materials. By following the techniques and tips shared in this guide, you can create a backpack that is both practical and unique.
Now it’s your turn to apply what you’ve learned in this Tutorial for a backpack made from jeans. Try different ideas, explore your creativity, and make something truly your own. Don’t forget to share your honest opinion and leave suggestions, as your feedback helps improve future tutorials and inspires new creative projects.