
Crochet chicken keychain pattern is a delightful project that transforms a small amount of yarn into an adorable handmade accessory.
One of the reasons crocheters love miniature projects is the satisfaction of completing them in a short amount of time while still learning valuable techniques.
Throughout this tutorial, you will learn how to make a charming Crochet chicken keychain pattern step by step. From choosing the best yarn and hook size to assembling the finished chicken and attaching the keyring, every stage is explained in a clear and beginner-friendly way. You can personalize your chicken with different colors, facial expressions, and decorative accessories to create a truly unique handmade keepsake.
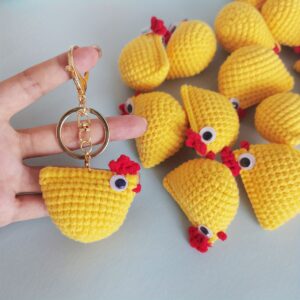
Materials and Preparing Your Crochet Chicken Keychain
Before beginning your Crochet chicken keychain pattern, gather all the supplies needed for the project. Preparing your materials beforehand helps maintain an enjoyable workflow and ensures a more polished final result.
A smooth cotton yarn or lightweight acrylic yarn works beautifully for small amigurumi projects. Cotton provides crisp stitch definition, while soft acrylic offers a slightly fluffier appearance. Choose white, cream, yellow, or light brown for the body, with red for the comb and wattle, orange or yellow for the beak, and black embroidery thread for the eyes.
Use a crochet hook that is slightly smaller than the yarn label recommends. A 2.5 mm or 3.0 mm hook is ideal for creating tight stitches that prevent stuffing from showing through the fabric.
Additional supplies include polyester fiberfill, stitch markers, scissors, a yarn needle, embroidery needle, split keyring, and a small lobster clasp if you prefer a removable keychain.
Before starting the project, practice making a Magic Ring and working continuous rounds. Tight, even stitches give the finished chicken a neat, professional appearance.
Taking a few extra minutes to organize your materials and prepare your workspace makes the crocheting process smoother and allows you to focus on shaping the adorable character.
Step-by-Step Crochet Stitch Instructions
The body of the Crochet chicken keychain pattern is worked from the bottom upward using continuous rounds. Place a stitch marker at the beginning of every round to keep track of your progress.
Abbreviations used throughout the pattern include: MR (Magic Ring), ch (chain), sl st (slip stitch), sc (single crochet), inc (increase), dec (invisible decrease), and FO (fasten off).
Round 1: Create a Magic Ring and work 6 sc into the ring. Pull the ring closed securely. (6)
Round 2: Work 2 sc in every stitch around. (12)
Round 3: (1 sc, inc) repeat around. (18)
Round 4: (2 sc, inc) repeat around. (24)
Rounds 5–9: Work 24 sc evenly around to build the body.
Round 10: (2 sc, dec) repeat around. (18)
Begin stuffing the body firmly with polyester fiberfill while maintaining a rounded shape.
Round 11: (1 sc, dec) repeat around. (12)
Round 12: Decrease evenly until only 6 stitches remain. Fasten off and close the opening neatly with a yarn needle.
For the wings, make two identical pieces. Begin with a Magic Ring of 6 sc, increase to 12 stitches, crochet one additional round evenly, flatten the piece, and sew one wing onto each side of the body.
Create the comb by chaining 7 stitches. Work small slip stitches and single crochet stitches back along the chain to create three tiny rounded bumps. Sew the comb securely to the top of the head.
For the beak, chain 2, work 1 single crochet into the second chain, fasten off, and sew the tiny triangle between the eyes.
Embroider two small eyes using black embroidery thread or create French knots for a gentle handmade expression.
Assembling and Customizing Your Chicken Keychain
Once every crochet piece has been completed, begin assembling the Crochet chicken keychain pattern carefully. Position all pieces before sewing so you can check the proportions and symmetry.
Attach the wings evenly on both sides of the body using small invisible stitches. Consistent placement creates a balanced appearance from every angle.
Sew the comb firmly onto the top of the head and attach the beak directly beneath it. If desired, add a tiny red wattle underneath the beak using a few simple stitches.
Attach a sturdy loop of yarn at the top of the head before connecting the split keyring. Reinforce this attachment several times because it will experience daily use.
You can personalize your chicken by adding miniature bows, embroidered flowers, tiny scarves, or different color combinations. Pastel shades create a spring-inspired design, while classic white and red produce a traditional farm-style chicken.
These adorable keychains also make wonderful backpack charms, zipper pulls, gift toppers, party favors, craft fair items, or stocking stuffers. Their small size makes them quick to produce while still offering endless creative possibilities.
Helpful Tips for a Professional Finish
Maintaining consistent tension throughout the project helps keep the stuffing hidden and gives the finished chicken a smooth, rounded shape.
Use invisible decreases instead of standard decreases whenever possible. This technique creates cleaner shaping and minimizes visible gaps in the crochet fabric.
Stuff the body gradually instead of waiting until the final rounds. Even stuffing produces a more balanced and attractive silhouette.
Secure every sewn piece with several stitches and weave yarn ends carefully inside the body. A durable finish helps the keychain withstand everyday handling.
If the keychain will be used frequently, choose a strong metal keyring and reinforce the hanging loop with additional stitches before attaching the hardware.
After completing your first Crochet chicken keychain pattern, experiment with different yarn textures, seasonal colors, embroidered details, or miniature accessories to create an entire collection of charming handmade chickens.
FAQ
Is this Crochet chicken keychain pattern suitable for beginners?
Yes. Anyone familiar with basic crochet stitches and working in the round can successfully complete this project with patience and careful assembly.
Which yarn is recommended?
Cotton yarn is an excellent choice because it provides excellent stitch definition, while lightweight acrylic yarn creates a softer appearance.
How large is the finished keychain?
Most finished chicken keychains measure approximately 2.5 to 4 inches tall, depending on the yarn weight and hook size.
Can I wash the finished keychain?
Yes. Hand washing with mild soap and allowing it to air dry is the safest method for maintaining its shape and colors.
Can I customize the colors?
Absolutely. White, yellow, brown, pastel, or even colorful fantasy chickens all make charming variations of the same pattern.
Is this a good handmade gift?
Definitely. A Crochet chicken keychain pattern is a thoughtful gift for birthdays, holidays, baby showers, craft exchanges, or anyone who enjoys handmade accessories.
Conclusion
Creating a Crochet chicken keychain pattern is an enjoyable crochet project that combines creativity, practical skills, and handmade charm in a compact design.
Throughout this guide, you learned how to choose suitable materials, work the essential crochet stitches, shape the body, create the wings, comb, and beak, assemble the finished chicken, and securely attach the keyring. You also discovered helpful finishing techniques and creative customization ideas that make every keychain unique.
Whether you make one as a personal accessory, a thoughtful handmade gift, or a craft fair item, this cheerful little chicken is sure to bring smiles wherever it goes. If you enjoyed this tutorial, please leave your honest opinion and share your suggestions. Your feedback is greatly appreciated and helps inspire future crochet patterns and creative projects.