
Granny Square Crochet Slippers Pattern is a wonderful project for anyone who loves combining comfort, creativity, and classic crochet techniques into a handmade accessory that can be enjoyed every day.
One of the biggest advantages of making a Granny Square Crochet Slippers Pattern is that it requires only basic crochet stitches and a small amount of yarn.
Learning to crochet a Granny Square Crochet Slippers Pattern also helps strengthen essential crochet techniques that can be used in many other projects. As you work through each square, you practice maintaining even tension, forming neat corners, counting stitches accurately, and joining motifs together. Once the individual squares are complete, simple seaming transforms them into attractive slippers with a professional appearance. By following each step carefully and taking your time with assembly, you will create slippers that fit well, look beautiful, and last through many seasons of everyday use.
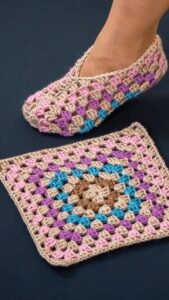
Choose the Right Materials and Crochet the Granny Squares
Before starting your Granny Square Crochet Slippers Pattern, gather all the necessary materials. You will need medium-weight cotton or acrylic yarn, a crochet hook suitable for your yarn weight (usually 4.0 mm to 5.0 mm), scissors, a yarn needle for weaving in ends, stitch markers, and a measuring tape. Choosing soft yet durable yarn ensures the slippers remain comfortable while standing up to frequent wear.
Begin by creating a magic ring. If you prefer, you may substitute it with a chain-four loop joined with a slip stitch. The magic ring provides a tightly closed center, giving your granny square a neat appearance. Secure the ring with chain 3, which counts as your first double crochet.
Work two additional double crochet stitches into the ring, then make chain 2 to form the first corner. Repeat this sequence of three double crochet, followed by chain 2, three more times until you have four clusters separated by chain spaces. Finish the round with a slip stitch into the top of the beginning chain.
For the second round, move into the nearest corner space using a slip stitch. Crochet chain 3, two double crochet, chain 2, and three more double crochet into the same corner. Continue this sequence in every corner while placing three double crochet into each side space. This forms the classic granny square structure.
Continue adding rounds until each granny square measures approximately 4½ to 5 inches across, depending on your desired slipper size. Most adult slippers require squares of equal size to ensure symmetry and a comfortable fit. Always count your stitches and corners after completing each round.
Fasten off the yarn and weave in every loose end using a yarn needle. Blocking the finished granny squares with light steam or gentle wet blocking helps them maintain their shape, making assembly much easier and producing a cleaner, more professional-looking Granny Square Crochet Slippers Pattern.
Assemble the Granny Squares into Comfortable Slippers
Most Granny Square Crochet Slippers Pattern designs use four to six granny squares for each slipper, depending on the chosen style and size. Lay the completed squares on a flat surface before joining them so you can visualize the final arrangement. This also allows you to experiment with color placement if each square features different shades.
Use a yarn needle and matching yarn or a crochet hook with slip stitch joins to connect the squares. Many crocheters prefer whip stitching because it creates nearly invisible seams, while others enjoy decorative crochet joins that add texture. Both methods produce durable slippers when sewn carefully.
Begin by joining the toe section first. Fold the front squares slightly to create a rounded shape that comfortably wraps around the toes. Secure the seams evenly without pulling the yarn too tightly, as excessive tension may affect the fit and flexibility of the slipper.
Next, join the side squares to create the body of the slipper. As you work, try the slipper on periodically to check the fit. If adjustments are needed, you can slightly reposition the seams before permanently securing every section.
The heel is formed by joining the final edges together while leaving enough room for the foot to slide in comfortably. A properly shaped heel prevents the slippers from slipping off while walking and gives the finished project a polished appearance.
Once the basic slipper shape is complete, crochet one or two finishing rounds around the opening using single crochet or half double crochet stitches. This edging strengthens the opening, creates a smooth finish, and improves comfort while giving your Granny Square Crochet Slippers Pattern a refined, handmade look.
Shape the Slippers and Add Beautiful Finishing Details
After assembling the basic structure of your Granny Square Crochet Slippers Pattern, it is time to refine the fit and add the finishing touches that make the slippers both comfortable and durable. Carefully inspect every seam before continuing. If you notice any loose stitches or uneven joins, reinforce them now to ensure the slippers will withstand regular use.
To shape the toe area, crochet one round of single crochet evenly around the front opening if necessary. If the slippers feel slightly loose, work a decrease every six to eight stitches by crocheting two single crochet stitches together. This simple adjustment helps the slippers hug the foot more securely without affecting their overall appearance.
For extra comfort, add a decorative edging around the ankle opening. A round of half double crochet creates a smooth, stretchy finish, while a picot stitch edging gives the slippers a delicate decorative touch. Both options enhance the appearance while reinforcing the opening to prevent stretching over time.
If you want additional warmth, crochet a short cuff above the opening. Begin with chain 2, then work half double crochet stitches around the entire opening. Continue for three to six rounds depending on your preferred height. This cuff keeps the slippers snug around the ankle and provides a cozy finish for colder weather.
To improve durability, consider sewing suede patches, leather soles, or non-slip fabric to the bottom of each slipper. Another simple option is applying flexible non-slip fabric paint in small dots across the sole. These additions help prevent slipping on hardwood or tile floors while extending the life of your handmade slippers.
Finally, weave in every remaining yarn end securely and give the slippers a gentle steam block or light wet block. This final step smooths the stitches, evens the shape of each granny square, and gives your finished Granny Square Crochet Slippers Pattern a professional appearance that looks as beautiful as it feels.
Tips for Customizing Your Granny Square Crochet Slippers Pattern
One of the greatest advantages of a Granny Square Crochet Slippers Pattern is its endless customization possibilities. By changing colors, yarn textures, or decorative details, you can create slippers that perfectly match your personal style or the preferences of the person receiving them as a gift.
Experiment with seasonal color palettes throughout the year. Soft pastels create beautiful spring slippers, vibrant floral combinations brighten summer projects, warm oranges and browns are perfect for autumn, and festive reds, greens, or snowy whites make wonderful holiday gifts. The classic granny square adapts beautifully to every season.
Textured yarns can also transform the finished look. Smooth cotton creates lightweight slippers ideal for warmer climates, while soft wool blends provide exceptional warmth during winter. Acrylic yarn remains a popular choice because it is affordable, washable, and available in countless colors.
Decorative embellishments can make each pair even more unique. Crochet flowers, bows, hearts, buttons, pom-poms, or simple embroidered details can be added after assembly. These finishing accents personalize the slippers while showcasing your creativity without making the project overly complicated.
Sizing adjustments are equally simple. Increase the size of each granny square by adding one or two extra rounds, or use a larger crochet hook with thicker yarn for bigger slippers. For children’s sizes, simply reduce the number of rounds while maintaining the same construction method.
As you gain confidence, experiment with different granny square variations such as sunflower centers, solid granny squares, spiral motifs, or modern geometric designs. Each variation creates an entirely different visual effect while preserving the comfortable structure of the classic Granny Square Crochet Slippers Pattern.
Frequently Asked Questions
What is a Granny Square Crochet Slippers Pattern?
A Granny Square Crochet Slippers Pattern is a crochet project that uses one or more granny squares joined together to create comfortable, handmade slippers suitable for everyday indoor wear.
Is this project beginner-friendly?
Yes. Beginners who know basic crochet stitches such as chain, slip stitch, single crochet, half double crochet, and double crochet can successfully complete this project with patience and practice.
What type of yarn works best?
Medium-weight cotton, acrylic, or wool-blend yarns are excellent choices. Cotton offers durability, acrylic is easy to care for, and wool provides extra warmth during colder months.
How many granny squares are needed?
Most adult slippers require between four and six granny squares per slipper, although the exact number depends on the design, size, and shaping method used.
Can I adjust the slipper size?
Absolutely. You can increase or decrease the number of granny square rounds, change the yarn weight, or use a different crochet hook size to create slippers that fit various foot sizes.
How do I make the slippers non-slip?
You can sew suede or leather soles onto the bottom, attach anti-slip fabric, or apply flexible non-slip fabric paint to improve traction on smooth floors.
Are these slippers washable?
Yes. Most slippers made with cotton or acrylic yarn can be gently machine washed or hand washed. Always follow the care recommendations for the specific yarn you choose.
Can I sell slippers made from this pattern?
Yes. Handmade slippers created from your own work are commonly sold at craft fairs, online marketplaces, and gift shops. Creating high-quality workmanship and unique color combinations helps your finished products stand out.
Conclusion
The Granny Square Crochet Slippers Pattern is a rewarding project that combines classic crochet techniques with everyday functionality.
By learning how to create neat granny squares, join them correctly, shape the slippers for a comfortable fit, and add durable finishing touches, you can produce cozy handmade footwear that is both practical and beautiful. This versatile project is perfect for using leftover yarn, exploring creative color combinations, and building confidence with essential crochet stitches such as the magic ring, chain, slip stitch, single crochet, half double crochet, and double crochet.
Whether you are making these slippers for yourself, as thoughtful handmade gifts, or even to sell at craft markets, the Granny Square Crochet Slippers Pattern offers endless opportunities for creativity and personalization. I hope this tutorial has guided you through every step with confidence and inspiration. If you enjoyed this article, please leave your honest opinion and share your suggestions. Your feedback is greatly appreciated and helps inspire future crochet tutorials for makers of all skill levels.