
Crochet Cross Pattern is a timeless and meaningful crochet project that combines creativity, simplicity, and symbolism in one beautiful handmade design.
One of the greatest advantages of learning a Crochet Cross Pattern is that it allows you to practice fundamental crochet techniques while completing a project that works up quickly.
As you crochet your Crochet Cross Pattern, you will strengthen important skills such as maintaining even tension, counting stitches accurately, shaping corners, and creating clean finishing edges. The project is relaxing and repetitive without becoming monotonous, making it an enjoyable choice for quiet evenings or weekend crafting sessions. By carefully following each step and taking time to finish every detail neatly, you can create a professional-looking crochet cross that will remain beautiful for many years.
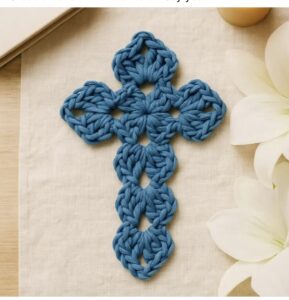
Gather Your Materials and Crochet the Foundation
Before starting your Crochet Cross Pattern, prepare all the necessary materials. You will need lightweight or medium-weight cotton yarn, a crochet hook that matches your yarn size (typically 2.5 mm to 4.0 mm), scissors, a yarn needle for weaving in ends, stitch markers if desired, and a measuring tape. Cotton yarn is especially recommended because it produces crisp stitches and helps the cross maintain its shape.
Begin with a slip knot, then crochet a foundation of chain stitches. The number of chains depends on the desired size of your cross. For a small decorative cross, begin with approximately 25 to 30 chains. If you would like a larger project for wall décor, simply increase the chain count while keeping the proportions balanced.
Work one single crochet into the second chain from the hook and continue placing one single crochet into each remaining chain. This first row creates the vertical center of the cross. Maintaining consistent stitch tension throughout the row helps keep the edges straight and symmetrical.
At the top of the vertical section, make chain 1, turn your work, and continue crocheting single crochet stitches back along the row. This second row adds thickness and stability to the center section. Pressing the work gently with your fingers after each row helps keep the stitches aligned.
When the center section reaches the desired width, fasten off temporarily or continue directly depending on your preferred construction method. Some crocheters prefer working the arms separately before joining them, while others crochet the entire cross continuously. Both approaches produce beautiful results when worked carefully.
Take a moment to verify that your foundation remains straight before moving to the next stage. Correcting minor inconsistencies now is much easier than making adjustments after the entire Crochet Cross Pattern has been completed.
Crochet the Cross Arms Step by Step
To create the horizontal arms of your Crochet Cross Pattern, locate the center portion of the vertical section. Count the rows carefully so both arms begin at exactly the same height. Accurate placement ensures the finished cross looks balanced and symmetrical.
Join your yarn with a slip stitch at the selected row. Crochet the required number of chain stitches to reach the desired arm length. Then work one single crochet into each chain while returning toward the center of the cross. This creates the first arm with clean, even stitches.
Once you return to the center, continue directly across the opposite side by repeating the same number of chain stitches. Crochet back using single crochet into every chain until both horizontal arms match perfectly. Counting stitches during this stage is essential for maintaining symmetry.
If you prefer a slightly thicker appearance, add a second row of single crochet or half double crochet across each arm. This additional round strengthens the structure while giving the cross a more substantial and elegant finish.
For decorative texture, some crocheters replace portions of the arms with double crochet stitches. These taller stitches create a softer appearance and allow the cross to drape beautifully when used as a hanging ornament or wall decoration. Choose the stitch style that best complements your preferred design.
After completing the arms, examine the entire Crochet Cross Pattern for consistency. Every edge should appear straight, every corner should remain square, and both horizontal sections should mirror one another before continuing with the finishing details.
Add Decorative Edging and Refine the Shape
Once the basic structure of your Crochet Cross Pattern is complete, adding a decorative edging is an excellent way to enhance both its appearance and durability. A simple border also helps straighten the edges and gives the finished piece a polished, professional look. Before beginning the edging, make sure every section of the cross is lying flat and that all stitches are evenly spaced.
Join the yarn in one corner using a slip stitch and work one round of single crochet around the entire cross. Place one single crochet in each stitch along the sides and work three single crochet stitches into every outer corner to maintain a smooth shape. Continue around the entire project until you return to the starting point.
If you prefer a more decorative finish, crochet a second round using half double crochet stitches. This creates a slightly raised border that frames the cross beautifully without overpowering the design. Keep your stitch tension even so the border remains smooth and flat.
For an elegant vintage appearance, add a picot edging. Work one single crochet, then chain 3, insert a slip stitch into the first chain, and finish with another single crochet before repeating around the border. The tiny picots create a delicate lace effect that is especially attractive for bookmarks and religious keepsakes.
If your Crochet Cross Pattern curls slightly after crocheting, gently block the finished piece. Lightly dampen the cross, pin it to the desired shape on a blocking mat, and allow it to dry completely. Blocking improves stitch definition and helps the cross maintain crisp, straight edges.
Finally, weave in every loose yarn end using a yarn needle. Trim excess yarn carefully without cutting too close to the stitches. These finishing details may seem small, but they greatly improve the durability and overall quality of your completed crochet project.
Creative Ways to Personalize Your Crochet Cross Pattern
One of the most enjoyable aspects of making a Crochet Cross Pattern is the opportunity to personalize every project. By changing colors, yarn textures, stitch combinations, or decorative embellishments, you can create unique pieces suitable for different occasions, seasons, and recipients.
Classic white or cream cotton yarn creates a timeless and elegant cross that works beautifully for religious celebrations, weddings, baptisms, and home décor. Soft pastel shades offer a gentle appearance for spring projects, while deep jewel tones provide a rich and sophisticated finish.
Metallic thread can be incorporated into the final edging for subtle sparkle. Gold, silver, or pearl accents are especially beautiful for holiday decorations or commemorative gifts. Adding only one decorative round with metallic yarn creates elegance without overwhelming the overall design.
Small crochet flowers, tiny leaves, bows, pearls, or wooden beads can also be attached after the cross is completed. These embellishments should remain simple so they complement rather than distract from the graceful shape of the Crochet Cross Pattern.
You can easily adjust the size of the project by changing the hook size or yarn weight. Fine crochet thread and a small steel hook produce delicate crosses suitable for bookmarks or ornaments, while thicker yarn creates larger decorative wall hangings or table centerpieces.
As your crochet confidence grows, experiment with textured stitches such as the front post double crochet, back post double crochet, or decorative shell stitches. These advanced techniques add dimension and create beautiful variations while preserving the recognizable silhouette of the traditional Crochet Cross Pattern.
Frequently Asked Questions
What is a Crochet Cross Pattern?
A Crochet Cross Pattern is a crochet design that creates the shape of a cross using basic crochet stitches. It can be used as a decorative ornament, bookmark, appliqué, wall hanging, gift embellishment, or keepsake.
Is this pattern suitable for beginners?
Yes. Beginners who are familiar with chain, slip stitch, single crochet, half double crochet, and double crochet can successfully complete this project by following the steps carefully.
Which yarn is recommended?
Cotton yarn is the most popular choice because it provides excellent stitch definition, durability, and helps the finished cross maintain its shape. Acrylic yarn may also be used for decorative projects.
What crochet hook should I use?
The hook size depends on the yarn weight. Most small decorative crosses are made using hooks between 2.5 mm and 4.0 mm, while larger decorative pieces may require larger hooks.
Can I make different sizes?
Absolutely. Increasing or decreasing the number of foundation chain stitches, changing the yarn weight, or using a different hook size allows you to create crosses in many different sizes.
How do I keep the cross perfectly flat?
Maintaining even stitch tension, adding balanced corner stitches, and blocking the finished piece after crocheting are the best ways to keep your Crochet Cross Pattern flat and symmetrical.
Can I use this pattern as a gift?
Yes. Handmade crochet crosses make meaningful gifts for baptisms, confirmations, weddings, holidays, birthdays, and many other special occasions because they combine beauty with thoughtful craftsmanship.
Can I sell finished crochet crosses?
Yes. Many crocheters sell handmade Crochet Cross Pattern creations at craft fairs, online marketplaces, and local gift shops. High-quality finishing and creative color combinations help make your handmade items even more appealing.
Conclusion
The Crochet Cross Pattern is a timeless crochet project that combines simplicity, elegance, and meaningful symbolism into one beautiful handmade creation.
Throughout this tutorial, you have learned how to choose the right materials, create a strong foundation with essential crochet stitches, form balanced horizontal and vertical sections, add decorative edging, block the finished piece, and personalize it with creative details. These techniques not only help you complete a beautiful crochet cross but also strengthen your overall crochet skills for future projects.
Whether you choose to make a small bookmark, a decorative wall hanging, a thoughtful handmade gift, or a meaningful keepsake, the Crochet Cross Pattern offers endless opportunities for creativity and personal expression. I hope this step-by-step guide has inspired you to start your own project with confidence. If you enjoyed this tutorial, please leave your honest opinion and share your suggestions. Your feedback is truly appreciated and helps inspire future crochet tutorials for makers of all skill levels.