
Pumpkin-themed quilt tutorial is the perfect project for quilters who love celebrating the warmth and beauty of autumn through handmade creations.
One of the greatest advantages of making a pumpkin-themed quilt is its versatility. The finished quilt can be displayed as a wall hanging, table topper, lap quilt, baby quilt, or full-size throw depending on the number of blocks you create.
Throughout this detailed guide, you will learn how to select coordinating fabrics, prepare your cutting layout, piece each pumpkin block, assemble the quilt top, add borders, layer the quilt sandwich, quilt the finished project, and attach a polished binding. By following each step carefully, you will create a beautiful seasonal quilt that can become part of your autumn decorating tradition for many years while strengthening your quilting skills.
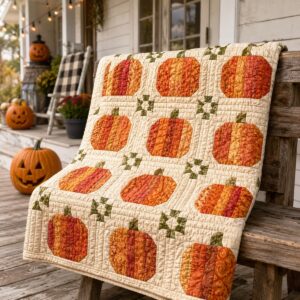
Choosing Fabrics and Preparing the Quilt Blocks
Before beginning your Pumpkin-themed quilt tutorial, gather all the necessary materials. High-quality quilting cotton is highly recommended because it presses beautifully, maintains accurate seams, and provides excellent durability for everyday use. Select fabrics in traditional autumn colors such as pumpkin orange, rust, mustard, cream, olive green, chocolate brown, burgundy, and soft beige to create a warm seasonal palette.
For a throw-size quilt measuring approximately 50 x 60 inches, you will need assorted orange fabrics for the pumpkins, green fabric for stems and leaves, a neutral background fabric, batting, backing fabric, coordinating thread, rotary cutter, acrylic ruler, cutting mat, sewing machine, quilting pins or clips, and an iron. Organizing your materials before beginning makes the entire process more enjoyable and efficient.
Decide on the finished size of each pumpkin block before cutting. A 12-inch finished block is a popular choice because it allows the pumpkin design to stand out while keeping the overall quilt manageable. Print or draw your block template and verify the measurements before cutting into your fabric.
Cut the pumpkin sections carefully using a rotary cutter and quilting ruler. Accuracy during cutting is essential because even small measurement differences can affect block alignment during assembly. Label each group of pieces to avoid confusion as you begin sewing multiple blocks.
Press every fabric piece before sewing. Flat fabric improves cutting precision and helps achieve accurate quarter-inch seams. Pressing throughout the project rather than waiting until the end results in cleaner piecing and sharper block definition.
Arrange the pumpkin pieces on a design board or flat surface before stitching. This preview allows you to balance colors, distribute prints evenly, and make any desired changes before permanently assembling the blocks.
Step-by-Step Pumpkin Quilt Block Construction
Begin by sewing the pumpkin body units together using a consistent ¼-inch seam allowance. Join the vertical sections one at a time, carefully matching the edges before stitching. Press each seam open or to one side according to your preferred quilting method.
Cut the stem pieces from brown fabric and sew them to the upper center of each pumpkin block. The stem can be constructed as a simple rectangle or a slightly tapered shape depending on the style shown in the featured project. Accurate alignment helps create a balanced finished block.
If your design includes leaves, cut them from green fabric using either pieced or appliqué techniques. Position the leaves beside the stem and sew them securely before joining the remaining background pieces. Small details like leaves add movement and personality to every pumpkin block.
Add the background sections around the completed pumpkin using the same accurate quarter-inch seam allowance. Sew opposite sides first, press carefully, then attach the remaining sections until the entire block reaches its finished dimensions. Square the block with a quilting ruler if necessary.
Repeat these steps until you have enough pumpkin blocks for your chosen quilt size. Arrange the finished blocks on a design wall or floor, alternating fabric prints and colors for visual balance. This layout stage allows you to create a harmonious overall composition before joining the rows.
Sew the blocks into rows, press the row seams, then join the rows together to complete the quilt top. Add one or more borders if desired to frame the pumpkin design. Layer the quilt top with batting and backing fabric, baste securely, quilt using straight lines or free-motion stitching, and finish with neatly attached double-fold binding.
Creative Ways to Customize Your Pumpkin-Themed Quilt
One of the most enjoyable aspects of a Pumpkin-themed quilt tutorial is the endless opportunity for personalization. Mixing solid fabrics with subtle tone-on-tone prints creates depth while maintaining a cohesive autumn appearance. Scrappy pumpkins made from several orange prints also produce beautiful, cheerful blocks.
Experiment with different background fabrics to completely change the mood of the quilt. Cream, ivory, light gray, or soft blue backgrounds each create a distinct visual effect while allowing the pumpkin blocks to remain the focal point.
Decorative appliqué can enhance the design even further. Consider adding embroidered vines, tiny flowers, acorns, falling leaves, or small birds around the pumpkins to create a charming seasonal landscape without overwhelming the composition.
Machine quilting also offers countless creative possibilities. Straight-line quilting provides a modern appearance, while swirling free-motion quilting can resemble autumn wind or curling vines. Simple echo quilting around each pumpkin helps emphasize the block shapes beautifully.
Adjust the finished quilt size according to its intended purpose. Four blocks make an attractive table topper, nine blocks create a wall hanging or baby quilt, while larger arrangements become cozy throw quilts perfect for autumn evenings.
The completed Pumpkin-themed quilt tutorial also makes a thoughtful handmade gift for housewarmings, Thanksgiving hosts, birthdays, weddings, or anyone who enjoys decorating with seasonal quilts throughout the fall months.
Tips for Professional Quilting Results
Accurate cutting is one of the most important foundations of successful quilting. Always verify your ruler placement before every cut and replace rotary blades when they begin to dull. Sharp tools contribute significantly to precise piecing.
Maintain a consistent quarter-inch seam allowance throughout the project. Even slight variations in seam width can accumulate across multiple blocks, making final assembly more difficult and affecting the quilt’s overall accuracy.
Press rather than iron the seams. Lifting and lowering the iron instead of sliding it across the fabric helps prevent stretching and distortion, especially when working with bias edges or smaller patchwork pieces.
Take time to square every completed block before assembling the quilt top. Uniform block sizes ensure matching seams and create a polished finished quilt with clean, professional alignment.
Choose quilting thread that complements both the quilt top and backing. Balanced thread color helps the quilting stitches enhance the design without distracting from the beautiful pumpkin blocks.
Practice making several pumpkin blocks before beginning the full quilt if you are new to patchwork. Every completed block improves your cutting accuracy, seam consistency, and confidence while helping your finished Pumpkin-themed quilt tutorial look increasingly polished and professionally crafted.
FAQ
Is this Pumpkin-themed quilt tutorial suitable for beginners?
Yes. The project mainly uses straightforward patchwork construction with basic quilting techniques, making it suitable for confident beginners who are familiar with quarter-inch seams.
Which fabric works best?
High-quality quilting cotton is the preferred choice because it is stable, easy to press, and provides crisp, accurate piecing with long-lasting durability.
What size should each pumpkin block be?
A finished size of approximately 12 inches is popular, although the block dimensions can easily be adjusted depending on the desired quilt size.
Can I make a smaller project?
Absolutely. The pumpkin blocks can be used to create table runners, placemats, wall hangings, pillow covers, tote bags, or mini quilts instead of a full-sized quilt.
How should I quilt the finished project?
Straight-line quilting, diagonal grids, echo quilting, or free-motion swirls all complement the pumpkin motif beautifully. Choose a quilting style that matches your experience level and personal preference.
Can I wash the finished quilt?
Yes. Quilting cotton quilts are generally machine washable on a gentle cycle using mild detergent. Air drying or low-temperature drying helps preserve the quilt’s appearance.
Can I sell quilts made from this design?
Yes. Handmade seasonal quilts remain popular at craft fairs, quilting exhibitions, farmers’ markets, and online handmade marketplaces. Careful construction and high-quality finishing increase their appeal.
Can I use different pumpkin colors?
Certainly. White, cream, sage green, dusty blue, mustard, blush, and even multicolored pumpkins create beautiful modern interpretations while maintaining the same overall quilt design.
Conclusion
Creating this Pumpkin-themed quilt tutorial is a rewarding quilting project that combines timeless patchwork techniques with the welcoming beauty of autumn. Throughout this guide, you learned how to select coordinating fabrics, prepare accurate pattern pieces, construct balanced pumpkin blocks, assemble the quilt top, add borders, quilt the layers together, and finish the project with durable binding. These essential quilting techniques can also be applied to many future patchwork projects, helping you continue growing your quilting skills with confidence.
Whether you create a small seasonal wall hanging or a full-sized throw quilt, this Pumpkin-themed quilt tutorial offers endless opportunities for creativity through fabric selection, quilting designs, appliqué details, and block arrangements. Every completed quilt becomes a meaningful handmade decoration that celebrates the warmth and colors of autumn while showcasing your craftsmanship.
Thank you for reading this tutorial. I hope this Pumpkin-themed quilt tutorial inspires your next quilting project and encourages you to continue exploring beautiful seasonal patchwork designs. If you decide to make this quilt, I would truly appreciate your honest opinion. Please share your experience, suggestions, and creative variations, as your feedback can inspire other quilting enthusiasts and help improve future tutorials.