
Crochet pattern for a Wizard Gandalf bookmark projects are a wonderful combination of creativity, crochet skills, and a love for classic fantasy literature.
One of the reasons this Crochet pattern for a Wizard Gandalf bookmark is so enjoyable is that it uses only a small amount of yarn.
This complete tutorial explains every stage of the crochet process using beginner-friendly stitch abbreviations and detailed instructions. You will learn how to crochet the bookmark body, create the head, beard, hat, and decorative accessories before assembling all of the pieces into a charming finished bookmark. Whether you are making this project for yourself or as a handmade gift, this Crochet pattern for a Wizard Gandalf bookmark provides a fun opportunity to practice amigurumi techniques on a smaller scale while creating a unique reading companion.
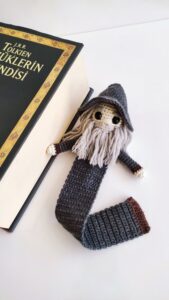
Materials and Crochet Stitch Guide
Before beginning your Crochet pattern for a Wizard Gandalf bookmark, gather all of the necessary supplies. Having everything prepared before starting makes the project easier to complete and helps maintain consistent stitch quality.
Choose lightweight cotton yarn for excellent stitch definition. Gray, white, blue, brown, beige, and skin-tone yarn are ideal choices for recreating the classic appearance of the wise wizard while still allowing room for your own creative interpretation.
Select a crochet hook slightly smaller than the size recommended on the yarn label. Tighter stitches create a firm fabric that keeps the bookmark flat and durable during everyday use.
Additional materials include a yarn needle, stitch markers, scissors, polyester fiberfill for the head, embroidery thread, and small safety eyes if desired. Embroidered eyes are another excellent option, especially if the bookmark may be used by younger readers.
The crochet abbreviations used throughout this guide include:
ch = chain
mr = magic ring
sc = single crochet
inc = increase
dec = invisible decrease
sl st = slip stitch
FO = fasten off
Take time to count your stitches after each round or row. Consistent stitch counts help maintain the proportions of the bookmark and make the assembly process much easier.
Crocheting the Head and Bookmark Body
Begin your Crochet pattern for a Wizard Gandalf bookmark by crocheting the head.
Round 1: Make a magic ring and work 6 sc into the ring. Pull the ring closed securely. (6)
Round 2: Inc in each stitch around. (12)
Round 3: (1 sc, inc) repeat around. (18)
Rounds 4–6: Sc in each stitch around. Insert the safety eyes or embroider the facial features before stuffing the head lightly with fiberfill.
Round 7: (1 sc, dec) repeat around. (12)
Round 8: Dec around until the opening is closed. Fasten off while leaving a long tail for sewing.
To create the bookmark body, attach gray or blue yarn to the base of the head.
Row 1: Ch 2, work 1 sc in each stitch across.
Continue crocheting straight rows of single crochet until the bookmark reaches approximately 20 to 25 centimeters in length, depending on your preferred book size.
Fasten off neatly and weave in the yarn ends. The slim rectangular body should remain flexible while being firm enough to lie flat between book pages.
Making the Hat, Beard, and Staff
The recognizable details are what make this Crochet pattern for a Wizard Gandalf bookmark especially charming.
To crochet the pointed hat, begin with a magic ring containing 4 sc.
Increase gradually over several rounds until the base of the cone fits comfortably onto the head. Continue crocheting without increases until the hat reaches the desired height.
Fasten off and sew the hat securely to the top of the head, leaving a slight bend if you prefer a more whimsical appearance.
For the beard, cut several equal strands of white or light gray yarn. Fold each strand in half and attach them beneath the face using a lark’s head knot or sew them individually before trimming them into a flowing beard shape.
Create the mustache using two shorter yarn strands attached just above the beard. Lightly brush the yarn if you want a softer, fuller texture.
Finally, crochet or embroider a tiny brown staff. A simple chain covered with slip stitches works beautifully and can be sewn alongside the bookmark body as an optional decorative detail.
Personalization Ideas and Finishing Touches
One of the greatest advantages of making a Crochet pattern for a Wizard Gandalf bookmark is the opportunity to personalize every finished bookmark.
Experiment with different shades of blue, gray, silver, or cream for the wizard’s robe. Subtle color variations allow every bookmark to have its own unique personality while preserving the recognizable fantasy-inspired theme.
Add embroidered stars, moons, or tiny decorative stitches to the robe for extra detail. These simple embellishments enhance the magical appearance without making the project overly complicated.
If you enjoy working with textured yarn, consider using fluffy white yarn for the beard to create a fuller, more realistic finish.
This bookmark also makes an excellent handmade gift for book clubs, teachers, librarians, fantasy readers, and crochet enthusiasts. Pair it with a favorite novel or journal to create a thoughtful personalized present.
Once you become comfortable with the basic construction, experiment with different facial expressions, hat styles, robe lengths, or miniature accessories. Small customizations allow you to create an entire collection of fantasy-inspired bookmarks while improving your crochet skills.
Frequently Asked Questions
Is this Crochet pattern for a Wizard Gandalf bookmark suitable for beginners?
Yes. The project mainly uses beginner-friendly stitches including the magic ring, single crochet, increases, decreases, chains, and slip stitches.
What yarn works best?
Cotton yarn is highly recommended because it provides excellent stitch definition, durability, and helps the bookmark remain flat.
Can I embroider the face instead of using safety eyes?
Absolutely. Embroidered facial features are a wonderful alternative and create a softer handcrafted appearance.
How long should the bookmark be?
Most bookmarks measure between 20 and 25 centimeters, although you can easily adjust the length to fit different book sizes.
Can I wash the finished bookmark?
Yes. Gentle hand washing followed by air drying helps preserve both the stitches and the decorative details.
Is stuffing required?
Only the head requires a small amount of fiberfill. The body should remain flat so it fits comfortably inside books.
Can I sell finished bookmarks?
Yes. Handmade crochet bookmarks are popular at craft fairs and online handmade marketplaces, provided your finished products comply with applicable laws and marketplace requirements.
Can I customize the design?
Certainly. You can personalize colors, facial expressions, beard length, accessories, robe decorations, and overall size while creating your own interpretation of a classic fantasy-inspired wizard bookmark.
Conclusion
Creating a Crochet pattern for a Wizard Gandalf bookmark is a rewarding crochet project that combines practical functionality with imaginative design. Throughout this tutorial, you learned how to gather suitable materials, understand the essential crochet abbreviations, crochet the head and bookmark body, create the pointed hat, flowing beard, decorative staff, and assemble every piece into a finished bookmark that is both durable and visually appealing. These techniques provide excellent practice for both beginner and experienced crocheters while resulting in a handmade accessory that readers will enjoy using every day.
Because the project requires only a small quantity of yarn and can be completed in a relatively short amount of time, it is perfect for using leftover materials and experimenting with creative variations. By changing colors, adding embroidered details, or adjusting the accessories, you can easily create unique bookmarks inspired by classic fantasy themes while continuing to build your crochet skills.
Thank you for reading this Crochet pattern for a Wizard Gandalf bookmark tutorial. I hope this guide inspires you to create your own magical bookmark and enjoy every step of the crochet process. If you found this article helpful, please leave your honest opinion, share your experience with the pattern, and send your suggestions for future crochet tutorials. Your feedback is greatly appreciated and helps inspire even more creative handmade projects.