
Fabric bow tutorial is a simple and creative sewing project that can transform small pieces of fabric into charming handmade accessories.
Making a fabric bow is also an excellent opportunity to use leftover fabric from quilting and sewing projects. Cotton fabric is particularly practical because it is easy to cut, press, fold, and stitch while maintaining a crisp shape. However,
Another advantage of following a Fabric bow tutorial is that the basic construction method can be adapted to many sizes. A miniature bow can become a hair accessory, while a medium bow can decorate a tote bag or handmade pouch. Larger versions can work as decorative accents for wreaths, cushions, nursery décor, or gift wrapping. The essential construction remains similar: prepare the fabric, sew the main bow piece, shape the loops, create the center band, and assemble everything securely. Accurate cutting and careful pressing are especially important because even a very simple sewing project looks considerably more polished when the edges, folds, and center are symmetrical.
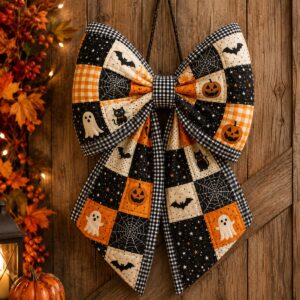
Materials, Measurements, and Preparation for the Fabric Bow
Before beginning the Fabric bow tutorial, gather your basic sewing materials. You will need woven fabric, coordinating thread, fabric scissors or a rotary cutter, pins or sewing clips, an iron, an ironing surface, a ruler, and a sewing machine. Hand sewing is also possible if you do not have a machine. A turning tool or blunt pencil can be useful for gently shaping corners without damaging the fabric.
For a practical medium-sized bow, cut one rectangle measuring approximately 10 x 6 inches (25.5 x 15 cm) for the main bow body. Cut another rectangle approximately 4 x 2.5 inches (10 x 6.5 cm) for the center band. These measurements are flexible and can be adjusted depending on how wide or full you want the finished bow to appear.
If you want additional structure, cut a piece of lightweight fusible interfacing slightly smaller than the main fabric rectangle. Fuse it to the wrong side according to the manufacturer’s general heat recommendations for the material you are using. Interfacing is optional, but it can help a lightweight fabric bow maintain its shape, particularly when the finished piece will be attached to a bag or decorative object.
Press the fabric before cutting. Wrinkles can distort measurements and cause the finished bow to look uneven. Place the fabric on a flat surface, measure carefully, and make clean cuts. If the fabric contains stripes, checks, or directional motifs, consider their position before cutting so the design appears centered on the finished bow.
A standard seam allowance of approximately 1/4 inch (6 mm) works well for this small project. You can increase it slightly if you feel more comfortable sewing with a wider allowance. Consistency matters more than the exact measurement because matching seam allowances help maintain symmetry on both sides of the bow.
The preparation stage may seem simple, but it strongly influences the final result. Straight cuts, smooth fabric, accurate measurements, and properly positioned prints make assembly easier. Once all pieces have been prepared, arrange them on your work surface and confirm that you have the main bow rectangle and the smaller bow center strip before beginning the sewing process.
Step-by-Step Fabric Bow Tutorial: Sewing the Main Bow
Start the main section of this Fabric bow tutorial by placing the large rectangle with its right side facing upward. Fold the rectangle in half lengthwise so that the right sides of the fabric are facing each other. Carefully align the long raw edges and secure them with pins or sewing clips. The fabric should now resemble a long folded rectangle.
Sew along the long raw edge using approximately a 1/4-inch seam allowance. Leave a small opening of around 1.5 to 2 inches near the center of the seam. This opening will allow you to turn the piece right side out later. Backstitch briefly at both sides of the opening so the stitches do not unravel during turning.
After sewing the long seam, rotate the fabric tube so that the seam sits near the center rather than directly along one edge. Press the seam allowances open or gently to one side. Positioning the seam toward the back helps conceal it when the bow is assembled and gives the front a cleaner appearance.
Sew across both short ends of the rectangle. Trim excess bulk from the corners without cutting through the stitching. Carefully turn the fabric bow right side out through the opening left in the long seam. Use a blunt turning tool to push the corners outward gently. Avoid using a sharp object because it can puncture the fabric.
Once the piece is turned, roll the seams gently between your fingers until the edges are properly shaped. Press the rectangle carefully with an iron. Fold the raw edges of the turning opening inward so they align with the sewn seam. The opening can be closed with a small hand stitch, or it may remain hidden later beneath the gathered center depending on its placement.
Now locate the horizontal center of the rectangle. Bring both short ends toward the middle so that they overlap slightly at the back. Adjust the folds until the two loops appear equal in size. Pin or clip the overlapping area. This simple folding method creates the recognizable handmade fabric bow shape while keeping most construction seams concealed on the back.
Shaping the Bow and Making the Center Band
The next stage of the Fabric bow tutorial creates the gathered appearance that gives the bow dimension. Hold the center of the folded rectangle and pinch it into small accordion-style pleats. Usually two or three folds are enough. Look at the bow from the front and adjust the folds until both loops appear balanced.
Temporarily secure the gathered center using a few hand stitches or a strong length of thread wrapped several times around the middle. Pull the thread firmly enough to define the center without crushing the fabric excessively. Knot the thread securely at the back. At this stage, you should already see the final fabric bow shape beginning to emerge.
To make the center band, take the smaller rectangle and fold it lengthwise with the wrong side facing outward. Sew along the long raw edge using a narrow seam allowance. Turn this small tube right side out. Because the piece is narrow, a safety pin or loop turner can make this step easier.
Press the center strip with the seam positioned along the back. If turning a narrow tube feels difficult, there is another beginner-friendly option. Fold both long raw edges toward the center, press them, and then fold the entire strip in half lengthwise. Stitch close to the open edge. This produces a neat fabric bow center band without requiring the tube to be turned.
Wrap the prepared strip around the gathered middle of the bow. Pull it snugly enough to cover the gathering thread while maintaining the pleats. Overlap the ends at the back and trim away unnecessary excess, leaving enough material to create a secure join. Stitch the overlapping ends together by hand.
Before finishing, examine the bow from several angles. Gently pull and shape each loop so they are similar in width and height. Adjust the center band if it has shifted. A quick final press around the outer edges can improve the appearance, but avoid pressing directly over the gathered center because excessive pressure may flatten the bow’s natural dimension.
Finishing, Customizing, and Using Your Fabric Bow
After completing the basic Fabric bow tutorial, you can decide how the bow will be used. For a hair bow, attach it securely to an alligator clip, barrette, or fabric-covered elastic using strong hand stitches. When sewing around metal hardware, work slowly and make several passes through the fabric so the accessory remains firmly attached during normal use.
A fabric bow can also become a decorative detail on bags, zipper pouches, fabric baskets, aprons, and other sewing projects. In these applications, stitching is generally the most durable attachment method. Sew through the back layers or center band whenever possible so that the stitches remain discreet from the front.
Fabric selection offers endless opportunities for customization. Floral prints create a romantic handmade look, gingham provides a classic country-inspired appearance, and solid colors highlight the bow’s structure. Seasonal fabrics can create decorations for spring, autumn, birthdays, or festive occasions. Coordinating the fabric bow pattern with another handmade project can create a polished matching set.
You can also experiment with size. For a smaller bow, reduce both rectangles proportionally. For an oversized decorative bow, enlarge the main rectangle while making the center strip slightly wider. Remember that larger bows often benefit from interfacing because additional fabric weight can cause the loops to droop.
Another creative variation involves layering two bows. Make one larger bow and a second slightly smaller bow using coordinating fabrics. Place the smaller bow over the larger one before wrapping the final center band around both pieces. This technique creates additional volume and provides an easy way to combine contrasting prints.
The finishing stage is where small details make the greatest visual difference. Remove loose threads, check the center band, smooth the loops, and verify that both sides appear balanced. Handmade pieces do not need to be mechanically identical, but careful finishing helps the DIY fabric bow look clean, intentional, and professionally constructed.
FAQ About the Fabric Bow Tutorial
What is the best fabric for making a fabric bow?
Medium or lightweight cotton is one of the easiest materials for beginners because it presses well, holds folds, and is easy to sew. Poplin, linen blends, lightweight denim, and similar woven materials can also work. Very slippery or stretchy fabrics may require additional practice.
Do I need interfacing for a fabric bow?
Not always. If your fabric already has enough body, you can make the bow without interfacing. Lightweight fusible interfacing is useful when working with thin cotton or when you want a more structured fabric bow with clearly defined loops.
Can this fabric bow be sewn by hand?
Yes. Although a sewing machine makes the project faster, all the seams can be completed with small hand stitches. A backstitch works well for structural seams because it creates a stronger line of stitching than a basic running stitch.
How can I make the bow larger or smaller?
Adjust the dimensions of the main rectangle while maintaining similar proportions. If you increase the width substantially, also increase the center band slightly. Making a quick test bow from scrap fabric is an easy way to determine your preferred proportions.
Why does my bow look uneven?
Uneven loops usually result from inaccurate cutting, inconsistent seam allowances, or placing the ends unevenly when folding them toward the center. Before securing the gathered middle, compare both sides carefully and adjust the fabric until the loops look balanced.
How do I make a fabric bow look fuller?
Use a slightly wider main rectangle and create deeper accordion folds in the center. Fabric with moderate body also produces fuller loops. Lightweight interfacing can provide additional structure without making the bow excessively stiff.
Can I make fabric bows from leftover quilting fabric?
Absolutely. This Fabric bow tutorial is particularly useful for fabric scraps because the project requires relatively small pieces. Coordinating scraps from quilts, bags, and other projects can be transformed into matching decorative accessories instead of being discarded.
How can I hide the seams on the finished bow?
Position the main seam along the back of the rectangle before pressing. When forming the bow, place the overlapping ends and turning opening toward the back. The center band will conceal much of the construction area, leaving the front clean and attractive.
Can I attach the bow to a bag?
Yes. Fabric bows make attractive decorations for tote bags, pouches, backpacks, and handmade purses. For items that will be used frequently, sew the bow securely rather than relying only on temporary attachment methods.
What can I do if my fabric is too soft?
Add lightweight fusible interfacing to the wrong side before sewing. You can also choose a slightly heavier fabric. Pressing carefully throughout construction helps improve definition and gives the finished handmade bow a more structured appearance.
How long does it take to make a fabric bow?
Once you understand the basic construction, a simple bow can often be completed fairly quickly. Beginners may want to work more slowly during measuring, turning, pressing, and shaping because accuracy is more important than speed.
Can I sell items made using this basic bow technique?
A basic fabric bow construction method is commonly used in sewing. If you develop your own finished products, designs, fabric combinations, and presentation, you can use the technique as part of your handmade work. When working from any separately purchased commercial pattern, always check its specific usage terms.
Conclusion
This Fabric bow tutorial demonstrates how a few simple pieces of fabric can become an attractive and versatile handmade accessory. The project begins with accurate measuring and cutting, followed by sewing the main rectangle, turning and pressing the fabric, folding the bow into shape, gathering the center, and creating a neat center band. Each stage uses basic sewing techniques, making this project accessible to beginners while still offering plenty of possibilities for experienced makers.
The most important lessons are to work accurately, press the fabric during construction, keep the loops balanced, and secure the center carefully. Once you understand the basic method, you can experiment with different fabrics, sizes, prints, interfacing, and layered designs. The same fabric bow sewing technique can be adapted for hair accessories, handbags, clothing details, gifts, seasonal decorations, and many other creative sewing projects.
Most importantly, use this tutorial as a foundation for your own creativity. Try different measurements, combine coordinating fabrics, experiment with the fullness of the loops, and discover the style that works best for your projects. If you make your own bow using this Fabric bow tutorial, leave your sincere opinion about the process and share your suggestions. Your ideas and experiences can inspire new variations and help other sewing enthusiasts discover creative ways to transform simple fabric scraps into beautiful handmade pieces.