
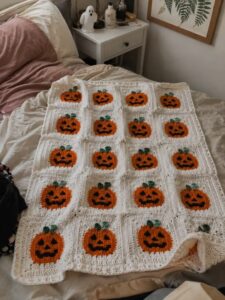
Pumpkin Granny Square Crochet Bedspread Pattern is a warm, creative, and highly customizable crochet project that combines the timeless charm of granny squares with cheerful pumpkin motifs.
One of the best features of this Pumpkin Granny Square Crochet Bedspread Pattern is the freedom to personalize the finished blanket.
Understanding the basic crochet terminology will make the pattern much easier to follow. In this guide, ch means chain, sl st means slip stitch, sc means single crochet, hdc means half double crochet, dc means double crochet, st means stitch, sts means stitches, and sp means space. The pattern is worked primarily in rounds, beginning with the pumpkin center before transforming the motif into a traditional square shape. Stitch counts may need minor adjustments depending on your yarn, hook, and personal tension, so focus on maintaining four balanced sides and clearly defined corners. Once you understand the construction of the first square, the remaining motifs become pleasantly repetitive and ideal for relaxed crochet sessions.
Materials, Crochet Key and Planning Your Pumpkin Granny Square
For a comfortable bedspread, choose a soft medium-weight yarn that can tolerate regular handling and washing. You will need pumpkin-colored yarn for the central motifs, green or brown for stems, and one or more background colors for the granny-square sections. The total yarn quantity depends heavily on the bed size and square dimensions, so making a test square before purchasing the full amount is useful. A crochet hook around 4.5 mm to 5.5 mm often works well with medium-weight yarn, although the yarn label should always be considered when selecting your hook.
The crochet key for this Pumpkin Granny Square Crochet Bedspread Pattern is straightforward: ch = chain, sl st = slip stitch, sc = single crochet, hdc = half double crochet, dc = double crochet, st = stitch, sts = stitches, sp = space, rep = repeat, and FO = fasten off. A chain creates the foundation and spaces, slip stitches close rounds or move the working yarn, and double crochet stitches provide much of the classic granny-square texture. Knowing these abbreviations before starting will make each round easier to understand.
Begin with pumpkin-colored yarn. Make a magic ring, or ch 4 and sl st into the first chain to create a small center ring if you prefer not to use a magic circle. For Round 1, ch 3, which may count as the first dc, then work 11 dc into the ring. Join with a sl st to the top of the beginning chain. You should now have a compact circular foundation that will become the center of the pumpkin.
For Round 2, ch 3, dc in the same stitch, then work 2 dc into each stitch around. Join with a slip stitch. Increasing evenly allows the circle to expand without becoming overly cupped. Depending on your tension, you can slightly modify the increases, but the goal is to produce a relatively flat circular shape. This round establishes enough width for the pumpkin body and prepares it for subtle shaping.
For Round 3, begin creating the fuller pumpkin silhouette. Work combinations of hdc and dc stitches, placing occasional increases around the outer edge. A useful sequence is ch 2, hdc in the same st, 2 dc in the next st, dc in the next st, 2 dc in the next st, repeating the general increase rhythm around. The slightly different stitch heights help prevent the pumpkin from looking like a perfectly plain circle and provide a more organic shape.
Finish the pumpkin center by fastening off the orange yarn and adding a short stem at the top. Join green or brown yarn near the upper edge, ch 3 or 4, sc in the second ch from the hook, sc in the remaining chains, then sl st back into the pumpkin edge. Fasten off securely. This small detail immediately makes the motif recognizable and adds character without making the square unnecessarily complicated.
Turning the Crochet Pumpkin Into a Granny Square
Once the pumpkin motif is complete, the next stage of the Pumpkin Granny Square Crochet Bedspread Pattern is transforming the rounded center into a square. Join your background yarn at a convenient point around the pumpkin. Ch 3, then begin working around the outer edge using dc stitches. The objective is to create four distinct corner locations around the motif, roughly corresponding to the upper right, lower right, lower left, and upper left areas.
At each corner location, work 2 dc, ch 2, 2 dc into the selected stitch or space. Between corners, continue with dc stitches distributed evenly around the pumpkin. Avoid placing too many stitches along the sides because excessive stitches can cause the square to ripple. Too few stitches can cause the motif to cup inward. Lay the work flat after completing the round and make small adjustments if necessary.
On the following round, slip stitch or move to the first corner space. Ch 3, 2 dc, ch 2, 3 dc into that corner. Work 3 dc groups along the side, usually separated by ch 1, depending on your preferred granny-square construction. In every corner space, work 3 dc, ch 2, 3 dc. Repeat around all four sides and join with a slip stitch.
Continue adding granny-square rounds until your square reaches the desired dimensions. For example, a small motif might be approximately 6 inches or 15 cm, while a larger block might reach 8 to 10 inches or 20 to 25 cm. Larger squares mean fewer individual blocks are required for the bedspread, while smaller squares create a more detailed overall arrangement. Whatever size you choose, make every square approximately identical.
Color placement can dramatically change the appearance of the Pumpkin Granny Square Crochet Bedspread Pattern. You might use cream around every orange pumpkin for a bright farmhouse appearance, or alternate cream, brown, mustard, and olive backgrounds. Another possibility is to crochet orange pumpkins against charcoal or black squares for a dramatic seasonal bedspread. Consistent color placement creates a polished appearance, while controlled variation produces a charming patchwork effect.
After completing each square, weave in the yarn ends using a tapestry needle. Avoid waiting until the entire bedspread is assembled because hundreds of loose ends can become frustrating later. Gently block the squares so that their corners and edges become more uniform. Blocking is particularly helpful when some motifs are slightly tighter than others and can make the joining stage noticeably easier.
Making Enough Squares and Joining the Bedspread
Before producing dozens of motifs, measure your completed sample square. Suppose one finished square measures approximately 8 x 8 inches. A bedspread measuring roughly 64 x 80 inches would require about 8 squares across and 10 squares down, or approximately 80 squares before adding a border. These numbers are examples rather than strict requirements because mattresses, desired overhang, yarn choices, and personal preferences vary considerably.
A useful approach is to measure the bed directly. Measure the desired finished width from one hanging edge to the other, then measure the length from the top of the bed to the desired lower edge. Divide each measurement by the finished dimension of one blocked square. Round the resulting numbers to convenient whole squares. This calculation gives you a practical estimate for planning your crochet pumpkin bedspread.
Arrange all finished squares on a clean floor or large table before joining them. This allows you to check the distribution of colors and pumpkin motifs. If all squares use the same background, orientation becomes especially important because each pumpkin stem should point toward the same end of the blanket. Take a photograph of the arrangement before joining so you can easily recreate the layout if the squares are moved.
One joining method is the slip stitch join. Place two squares with the appropriate sides facing each other and slip stitch through corresponding edge stitches. This creates a firm seam and works particularly well for a structured bedspread. Another option is a single crochet join, which creates a visible ridge that can become part of the decorative design. For a flatter finish, squares can also be sewn together with a tapestry needle and matching yarn.
Join the squares into rows first. Once every row is complete, join the rows together using the same method. Check alignment frequently so that corners meet correctly. Avoid pulling the joining yarn too tightly because a tight seam can shorten the edges and cause the bedspread to bunch. The joined fabric should remain flexible enough to drape comfortably across a mattress.
When all the squares are connected, spread the bedspread flat and examine the overall shape. Minor irregularities are normal in handmade crochet, but obvious puckering can sometimes be corrected by gently stretching the seams or blocking the completed piece. At this stage, the repeated pumpkin motifs should create a strong visual rhythm, while the granny-square backgrounds connect them into one cohesive seasonal design.
Border, Finishing Details, Care and Styling
A border gives the Pumpkin Granny Square Crochet Bedspread Pattern a polished final appearance and helps stabilize the outer edges. Join your chosen border yarn at any corner and begin with a foundation round of sc stitches. Work approximately one sc into each available stitch or evenly spaced position around the entire bedspread. At each corner, work 3 sc into the same corner space so the border can turn without pulling.
For the second border round, you can continue with simple sc stitches or switch to dc for additional width. If using dc, work ch 3, then dc evenly around. At each corner, work 2 dc, ch 2, 2 dc into the corner space. Continue around and join with a slip stitch. A simple border often works best because the pumpkin motifs already provide plenty of decorative interest.
A third decorative round is optional. You might use a subtle scalloped edge by working 5 dc into one stitch, skip 2 sts, sl st into the next st, skip 2 sts, and repeating around while adjusting near corners when necessary. Alternatively, finish with one final round of sc for a clean contemporary appearance. Choose a border that complements rather than competes with the pumpkin granny squares.
Weave in every remaining yarn tail carefully. For a bedspread that will receive regular use, yarn ends should be woven through several stitches in different directions to reduce the chance of them working loose. Examine the joining seams and reinforce any areas that appear weak. This final inspection takes a little extra time but can significantly improve the durability of a large crochet project.
Blocking the completed bedspread can improve the final drape and alignment. Follow the care recommendations appropriate for your chosen yarn. Many washable yarns can be gently shaped after laundering, while natural fibers may require more specific handling. Avoid excessive heat unless the yarn manufacturer specifically indicates that it is safe. Allow the bedspread to dry completely before folding or placing it on the bed.
Styling your finished Pumpkin Granny Square Crochet Bedspread Pattern can be as creative as crocheting it. Pair orange and cream motifs with neutral pillows for an understated autumn bedroom, or combine black, orange, purple, and green accents for a playful Halloween theme. Because the individual pumpkin blocks remain recognizable from a distance, the finished bedspread can function as both practical bedding and a handmade decorative statement.
Frequently Asked Questions About the Pumpkin Granny Square Crochet Bedspread Pattern
Is the Pumpkin Granny Square Crochet Bedspread Pattern suitable for beginners?
Yes. A confident beginner who understands chains, single crochet, half double crochet, double crochet, slip stitches, and basic increases can work through this pattern. Creating one practice pumpkin granny square before beginning the full bedspread is recommended.
What yarn is best for a pumpkin granny square bedspread?
Medium-weight yarn is a practical choice because it provides good stitch definition while remaining manageable for a large project. Choose yarn that feels comfortable against the skin and has care instructions appropriate for bedding.
What crochet hook size should I use?
A hook around 4.5 mm to 5.5 mm can work well with many medium-weight yarns. However, your yarn label, crochet tension, and desired fabric density should guide the final choice.
How many pumpkin granny squares do I need for a bedspread?
The number depends on the dimensions of each square and the desired finished blanket size. Measure one blocked square, measure the desired bedspread dimensions, and divide the width and length by the corresponding square measurement.
How can I make every pumpkin granny square the same size?
Use the same yarn weight, hook size, stitch counts, and tension throughout the project. Blocking the completed squares before joining also helps create more consistent dimensions.
Why is my pumpkin granny square curling?
Curling often occurs when the stitch distribution is too tight or when tension varies significantly. Check that you have enough stitches around the pumpkin and adequate chain spaces at each corner. Gentle blocking can correct minor curling.
Why is my square becoming wavy?
Waviness usually indicates that too many stitches have been added around the motif. Reduce unnecessary increases and check whether the square lies flat after every round.
Can I make the pumpkins in different colors?
Absolutely. Orange is traditional, but pumpkins can be crocheted in cream, rust, mustard, terracotta, green, or other autumn shades. Using several pumpkin colors can create an attractive patchwork effect.
Can I use this pattern to make something smaller than a bedspread?
Yes. The same pumpkin granny squares can be arranged to create smaller blankets, cushion covers, table decorations, wall hangings, or other decorative crochet projects. Simply adjust the number of squares used.
Should I block the squares before joining them?
Blocking before joining is highly recommended. It helps standardize the dimensions, straightens the edges, and makes it easier to align corresponding stitches during assembly.
What is the easiest way to join pumpkin granny squares?
Slip stitch and single crochet joins are approachable options. Slip stitching creates a relatively compact seam, while single crochet can create a more noticeable decorative ridge. Sewing with a tapestry needle is useful when you prefer flatter seams.
How do I make the bedspread larger?
Add additional squares across the width, length, or both. You can also crochet additional rounds around every granny square or make the final border wider. Planning the dimensions before producing all the squares makes resizing easier.
Can I create a Halloween version of this crochet bedspread?
Yes. Orange pumpkins surrounded by black, charcoal, purple, or deep green backgrounds can produce a distinctly Halloween-inspired design. You can alternate colors while keeping the same construction method throughout the blanket.
How do I keep the bedspread from becoming too heavy?
Choose a yarn that is not excessively thick and avoid making the squares unnecessarily dense. A slightly larger hook can sometimes produce a lighter fabric, although you should always test the resulting stitch structure before committing to the full project.
How should I wash a handmade crochet bedspread?
Always follow the care instructions for the specific yarn you used. Secure all yarn ends carefully before washing, use gentle treatment when appropriate, and reshape the bedspread during drying if necessary.
Conclusion
Creating a Pumpkin Granny Square Crochet Bedspread Pattern is a rewarding way to combine classic granny-square construction with a cozy seasonal motif. The project begins with a simple pumpkin center, continues by transforming that motif into a structured square, and gradually grows as identical blocks are crocheted and assembled. By learning the basic crochet key—ch, sl st, sc, hdc, dc, st, sp, and FO—you can follow the construction logically and repeat each stage until you have enough squares for your chosen bedspread size.Throughout this tutorial, you learned how to crochet the pumpkin motif, create its small stem, build a granny-square background, calculate the approximate number of squares required, arrange and join the blocks, and finish the entire project with a stabilizing border. You also learned why tension, blocking, careful joining, and secure yarn ends are especially important when creating a large handmade blanket.
The greatest advantage of this Pumpkin Granny Square Crochet Bedspread Pattern is its flexibility. You can make a traditional autumn blanket with orange pumpkins and neutral backgrounds, create a dramatic Halloween version, or experiment with softer modern colors that can remain on display throughout the season. The same motif can also be adapted into smaller projects whenever you want to use leftover squares.
If you decide to make this pumpkin granny square bedspread, leave your sincere opinion about the pattern and share your suggestions. Your ideas about color combinations, borders, square arrangements, and creative variations can inspire new ways to personalize this cozy crochet project.